How to Root Oppo F1s with SafetyNet Bypass
We posted a guide on how to root the Oppo F1s some time ago, but a more efficient and better method had recently come out – this method will actually bypass SafetyNet and SystemUI root checks. Thus, it’s a much better root since you’ll be able to use any apps that verify SafetyNet.
Before following this guide, you will need a clean Android 6.0 stock ROM installation
Requirements:
- MTK USB drivers
- 8
- Flashable stock ROM
- Latest 6.0 stock firmware
- Magisk flashable .zip
- Original CTR recovery
- Stock recovery if TWRP was previously installed
- The first step is to download and install the MTK drivers on your PC. Mediatek USB drivers are not digitally signed, thus we will disable Driver Signature Enforcement in Windows. Press Windows Key + X and choose “Command Prompt (Admin)” from the menu that opens, then type into the command terminal:
bcdedit /set testsigning on - The terminal should return “The operation was completed successfully”, so now restart your computer. When it boots back to your desktop, you should see “Test Mode” in the bottom-right corner of your screen.
- Note: If your command prompt returned “The value is protected by Secure Boot policy”, then Secure Boot must be disabled in your BIOS settings. Refer to your BIOS manual.
- Open Device Manager under Windows – the quickest way is to hold Windows Key + R to open the Run command, and type “devmgmt.msc” and click OK.

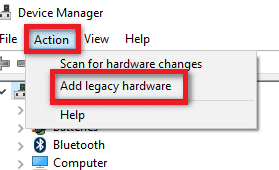
- Now click on your computer’s name, then click the Action tab, and choose “Add Legacy Hardware”. Click Next in the Hardware Wizard box, then choose “Install the Hardware that I manually select from a list”, and click Next again.
- Enable “Show All Devices” before clicking Next, then “Have Disk” > Browse > navigate to your Mediatek drivers folder you extracted earlier. Be very careful which driver you choose to install, you must choose only the driver for your Windows version and system type (e.g. Windows 10 64-bit or Windows 7 32-bit).
- Now choose the Mediatek Preloader USB VCOM Port and click Next a couple times, then wait for the driver installation to finish. If an error comes up like “This Device Cannot Start (Code 10)”, just click Ignore and Finish.
- Now connect your Oppo F1s to your PC via USB, and copy the Magisk .zip and the stock firmware zip to your external SD card.
- If you previously had TWRP flashed on this device, you’re going to need to revert back to stock recovery. You’ll need to boot into TWRP, wipe all data, and then flash the stock recovery .zip file via TWRP flashing.
- After stock recovery is re-installed, turn off the device and boot into recovery mode. Now install the stock firmware .zip, and after the installation go to Power Off option, do not reboot the device.
- Now open the DownloadTool_1612.8.exe, and choose “Developement Mode”. You’ll be prompted for a password, so enter:
- oppodeve
- Now uncheck all the partitions, leaving only the recovery box checked.
- Select CTR recovery image as target. Press Start > Volume Up on your device, and connect it to the PC with USB cable, and when the PC detects it, release the volume up button.It should automatically begin flashing the recovery file, and when its done, don’t boot up the device.
- Hold Volume Down + Power to boot into CTR recovery, and wipe /data.
- Now go in CTR recovery, go to Install Zip > select the Magisk .zip and install it.
- Reboot the device, and choose No if it asks to fix the stock recovery.
- Congratulations, you now have Oppo F1s root with SafetyNet bypass!