How to Restore Processors In System Configuration in Windows 10
Microsoft’s Windows usually has default settings to configure how your system works. This configuration includes the number of processors that the operating system can run. By default, Windows uses all your processors to run the tasks on your system. In the case of multiple tasks, each processor core can be handed different tasks so that they can work independently from each other. This improves performance over the old single layer processing that needed each task to be loaded back to the CPU for processing during interrupt handling, or round robin processing.
However, for diagnostic purposes, Windows provides the ability to a user to limit the number of processors that can run at a given time. This will help identify a faulty processor, or help programmers test their program when running it on one processor versus multiple processors. The feature is available from the advanced options of the msconfig window.
We are going to cover on why you lose the rest of the processor when you choose a number less than the maximum processors available. A guide will then be provided on how to recover your number of processors.
Why you lose the other processors after changing to one processor
By default, the checkbox that restricts the number of processors is usually unchecked. This way, windows can choose when to run one processor to save on energy, or when to run several processors to increase performance. Therefore, changing this configuration will probably hurt your performance.
If you select 1 processor and choose to make this option permanent, you will have to restart your computer in order for the effect to take place. The next time the computer boots, only one processor will come online and you will run only a single processor. Since only one processor is online, windows will assume that your CPU has only one processor. Therefore, from the Microsoft configuration window, you will only have a drop down showing one processor. This is the same scenario when you choose to run a smaller number of processors than are available for your system.
Here is how to restore your number of processors back to the default number after choosing to make your previous configuration permanent. These methods will also work for other versions of windows.
Uncheck the number or processors box and restart your PC
Despite checking the ‘make all boot settings permanent’ option, windows still allows you to come back and change your configuration. This method will reboot with the default configuration, therefore all processors will come online, and can therefore be listed by msconfig.
- Press Windows/Start Key + R to open the run window
- Type msconfig in the run textbox and hit enter to open the system configuration window
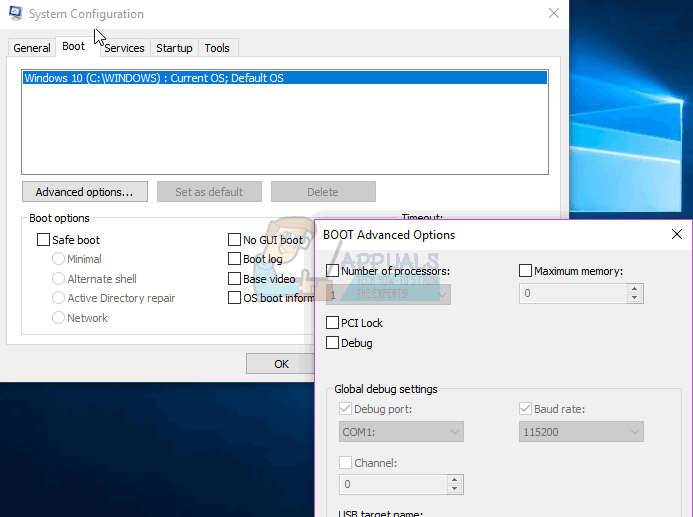
- From the boot tab, click on advanced options (if you have several operating systems on your computer, select the operating system you would like to configure first)
- In the ‘boot advanced options’ window, uncheck the number of processors checkbox. To restore all the defaults, also uncheck the rest of the checkboxes in this window.
- Click on OK to close this window (accept any warnings that appear)
- Click on apply, then OK on the system configuration window (accept any warnings that appear).
- Restart your PC
The next boot will show you the number of all the processors available on your CPU.
We will reset the startup/boot configuration using the system registry. This will restore the defaults.
- Press Windows/Start Key + R to open the run window
- Type regedit in the run textbox and hit enter to open the registry editor
- Navigate to this key
- Click on the “startupreg” sub key and delete all the key entries (except for the (default) key ) on the right panel by right clicking and choosing delete
- Click on the “state” sub key on the left panel. Double click on the keys on the right panel and change their DWORD Value as listed below:

Bootini – 2
Services – 0
Startup – 2
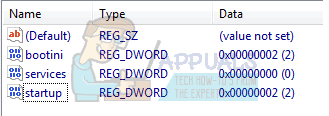
All in hexadecimal
- Restart your PC. It will now boot normally and you will have all your processors listed.
In general it is a very bad idea to mess about with settings in msconfig. In most cases you will end up with poorer performance; in the worst case you will end up with an unbootable computer. This feature is for debugging purposes, and not intended to speed up your PC.
same problem cant see all cpu only 1