How to Replace KingoRoot with SuperSU
KingoRoot is well known as the “one click root solution” for Android users, especially those who cannot flash root through custom recovery. KingoRoot is unfortunately a necessary evil for some Android users – and I say evil because KingoRoot has well-known shady practices, such as uploading your IMEI to strange servers in China (taking your IMEI information is completely unnecessary for a rooting app).
Aside from KingoRoot’s shady practices, the KingoRoot SuperUser app is fairly buggy in comparison to the more trusted, stable SuperSU app. Of course, SuperSU depends on being rooted with a SuperSU.zip being flashed in recovery, which most KingoRoot users are unable to do – the good news is that a new method of replacing KingoRoot with SuperSU via scripts has surfaced.
In this guide, I will walk you through replacing KingoRoot with SuperSU on your rooted device. Please note this guide is for KingoRoot, not KingRoot. Don’t get confused.
The advanced method has been tested mainly on ARMv7 devices. ARM64/v8/x86 users proceed with caution.
Requirements
- A phone rooted with KingoRoot
- CPU-Z from Google Play
- A root file explorer
- SuperSU flashable .zip
- SuperSU app from Google Play
Automatic Method (Easy)
- There is a simple method that should work for many Marshmallow devices. If this method does not work, you’ll need to use the advanced method in the next section.
- First uninstall KingoUser app, but do not uninstall KingoRoot. Also do not reboot your phone after this step.
- Install the SuperSU .apk file that comes in the flashable SuperSU .zip
- Launch the SuperSU app and press “continue” then “normal” and wait while it finishes the process.
- Reboot your phone and completely uninstall KingoRoot.
Advanced Script Method
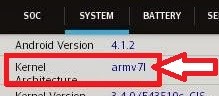
Use the CPU-Z app to check your kernel architecture – this is extremely important. Remember what architecture you have.
Download the flashable recovery .zip from SuperSU and extract it to your desktop. You’ll see 9 folders inside, which are:
- META-INF
- Common
- Arm
- Arm64
- Arm7
- Mips
- Mips64
- X64
- X86
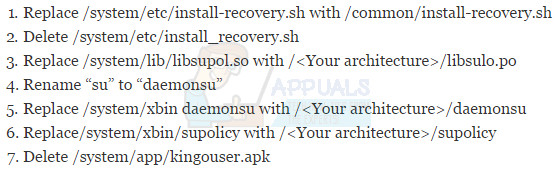
Copy the folder for your architecture and the common folder to your SD card, then open a root file explorer on your phone. We’re going to do a bit of operating on your Android /system, so get your surgical gloves ready and follow my steps extremely carefully.
Navigate to /system/app/ and create a folder called Superuser. Change the folder permissions to 755 (drwxrwxr –x) by long-pressing on the folder you just created.
Now copy the superuser.apk from the common folder you extracted earlier and place it inside /system/app/superuser. Change the .apk permissions to 644 (-rw-rw-r–).
Make sure when you are replacing files, you set the permissions for the files as the same permissions on the old files.
Now reboot your phone, and SuperSU will ask to update the binaries. Choose “Normal” mode and after the update is complete, reboot your phone again. KingoRoot should now be successfully replaced with SuperSU.
Thank you, easy method worked for me :))