Fix: Potential Windows Update Database Error Detected
Handling Windows updates is always going to be an adventure a couple of people go through without having to go through several issues and errors. A plenty of people simply ignore these updates until Windows actually forces you to download them or until you face an app which only runs on the latest installment of windows.
A lot of different errors may appear while you deal with these updates and the fixes tend to be difficult to find and you never know what exactly is causing the issue until you try several alternatives.
Database Error during Windows Update
The error message stating “Potential Windows update database error detected” can appear during several different processes regarding Windows update. First of all, it can appear while simply updating Windows to a newer version. Apart from that, it can occur when you select several other functions such as “Repair Windows Update” or similar. You may encounter several different codes or no code at all but the solution to each of them is the same.
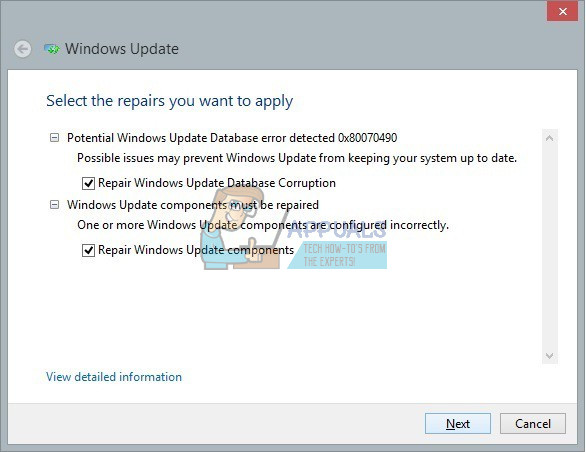
This may look quite frustrating to people who struggle to go through with the update after several months of delaying only to be faced with an error message saying something went wrong. There are several solutions to the issue and you may have to try all of them to end up happy with the end product.
Solution 1: Use the SFC Scan
The solution to this problem suggested by Microsoft helped an unusual amount of people, unlike their other solutions which looks almost automated. Try this out before doing anything else. The SFC stands for System File checker and it checks your computer for faulty or corrupt system files and it automatically repairs them.
- Enter “Command Prompt” in your Search box, right click on the icon and select “Run as administrator.
- Type “sfc/scannow” and press Enter.
- The process should begin and automatically fix faulty files.

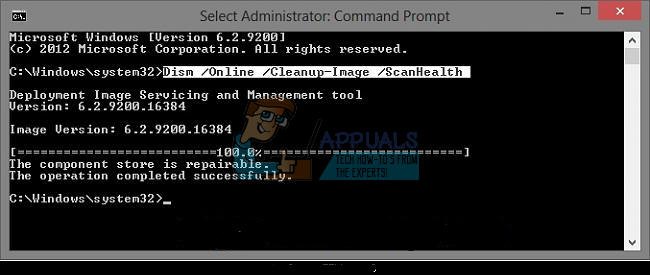
Solution 2: Use the DISM Tool
DISM stands for Deployment Image Servicing and Management and it’s a tool which can be used to repair and service Windows images. This is also recommended by Microsoft as it can automatically fix certain issues.
- Run the Command Prompt as Administrator as described in Solution 1.
- There are two separate commands you need to use in order to complete the process:
DISM.exe /Online /Cleanup-image /scanhealth

DISM.exe /Online /Cleanup-image /Restorehealth
- You will have to wait for a certain amount of time for the process to finish but DON’T cancel it yourself in any way.
Solution 3: Resetting the Windows Update Components Manually
This process is somewhat more advanced and it means that you will manually reset the entire update utility and start the updating process from scratch. Follow the instructions below very carefully.
- Run the Command Prompt as Administrator as described in the solutions above.
- You can use the following commands in order to stop the processes Windows Update Services, MSI Installer, BITS, and Cryptographic.
net stop wuauserv

net stop cryptSvc

net stop bits

net stop msiserver
- You need to rename two folders, SoftwareDistribution and Catroot2. You can try to find them yourself but it’s definitely easier just to copy the commands below. You can see the location of these files in the command if you want to rename them manually.
ren C:\Windows\SoftwareDistribution SoftwareDistribution.old

ren C:\Windows\System32\catroot2 Catroot2.old
- It’s time to start the processes we ended in the Step 2 by using the following commands:
net start wuauserv

net start cryptSvc

net start bits

net start msiserver
- It’s time to reboot your PC and proceed with Windows Update once again.
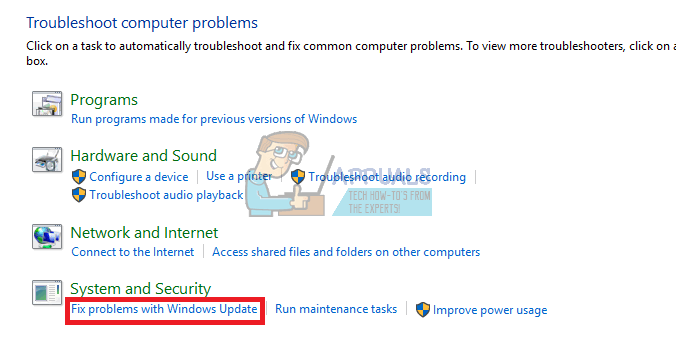
Solution 4: Using the Windows Update Troubleshooter.
Windows comes with a pre-installed troubleshooter designed to deal with similar issues and it can definitely help once you are out of other options.
- Open Control Panel >> Troubleshooting >> System and Security >>Fix problems with Windows Update.
- Follow the instructions on screen.
Solution 5: Deleting Some Folders
- Locate C:\Windows\SoftwareDistribution\Download and delete everything you find inside.
- Open C:\Windows\SoftwareDistribution and delete the Download.old file you see.
- The update should start without issues.
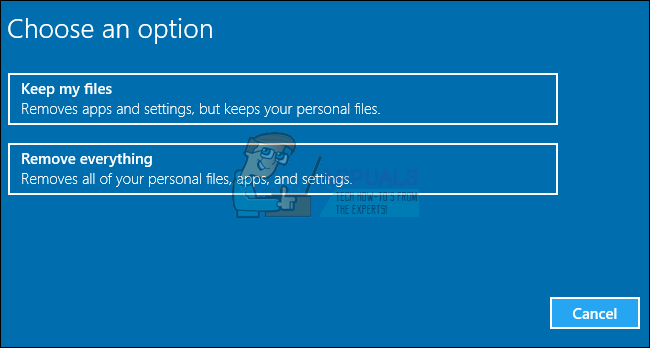
Solution 6: Doing a Windows Reset
After other solutions fail, your last bet may be to simply reinstall Windows without using any files because you can do that with Windows 10. First of all, you will need a USB or a DVD to download the Windows 10 installation too. You can download it here.
- Load the DVD or the USB drive you use as Windows installation media and start your computer.
- Select Troubleshoot from the Choose an option screen and click on Advanced Options.
- Select Reset this PC and Keep My Files.
Solution 7: Using an Automated Script to Reset Windows Update Services.
If the steps in Solution 3 sounded too complicated, you can always use this script and achieve even better results because there are some features not included in the Solution 3.
- Download the script for Windows 10 build 10240 and later from here and for users running Windows 7,8.0 or 8.1 from here
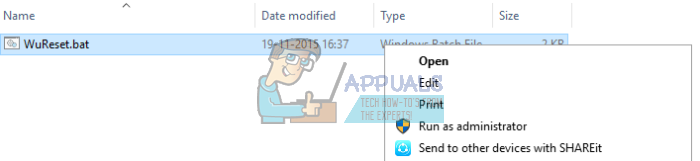
- Locate it in the Downloads folder, right-click, and select Extract.
- Right-click on the WuReset.bat file after the extraction and run it as administrator.
- Restart the PC after the process finishes and the “Task completed successfully message pops up.


I have been searching for a solution! Thanks for the info,. I have not successfully updated Win 8.1 to Win 10 on an Acer e17 laptop. The first two update attempts failed with , i ran Troubleshooters, and then 3rd attempted to update Win 8.1 from the official Win 10 image on USB.
(i read on MS, updating to Win 10 can be done from an image for FREE with Windows 8.1 authentication)
The 3rd attempt failed with database errors similar to the ones you displayed.
uhoh! the SFC scan just msged Windows Resource Protection failed due to corrupt files and is unable to fix
solution 2: I will execute the DISM commands.
solution 3: I will run the Solution 7 automated script
I will run the Restoro Repair Tool
solution 4: I will run the Win Troubleshooter
solution 5: I will delete Solution 5 files
And execute an update from Win 8.1 to Win 10 using the Solution 6 method. I read its okay to update off the image and its still FREE!
Sorry I had a question to path resolution though think its methodology is resolved as noted
Hey the first DISM command finished and stated
The component store is repairable.
Ya know Microsoft is one of the biggest corporations in the WOrLD!
In my days of Production Management.. if a person did such a lame job of an update…. they would be fired!!!!
Hour o experts spent fixing something like this… i am a solver…
just flash a fresh update copy and move peoples personal stuff in.
Its like the 1990s to make Windows 95 run 30% faster, move the pagesysfile to a different 40g drive. all the junk in cabfiles bloating the operating system. The files can be kept in online repositories and operate like a distributive processing arrangement, rather than each and every computer has to have a personal techno wizard or a lot of money.
i gott go submit the second DISM comand..
thanks again.
ey if this fails, tis okay.. we tried too hard,