How to Fix #Name Error in Excel (with Examples)
The #name error is one of the most common errors that you may encounter in Microsoft Excel and it can be easily said that there may not be a single Excel user who did not encounter this error. By this error, Excel tells us that the formula you entered is incorrect or that Excel does not recognize a particular entity in the formula and you are required to rectify it.
This error might occur if either:
- There is a typo in the formula (the most common cause),
- The range used is not valid,
- A colon or quotations mark is missing, etc.
The reason for the error may vary from case to case and there is not a single size that may fit all.
To better understand the concept, have a look at the image below in which Excel is showing a #name error in cell B11 and the formula used in su(B3:B10). As we all know, there is no Excel function su, so, Excel threw the #name error.
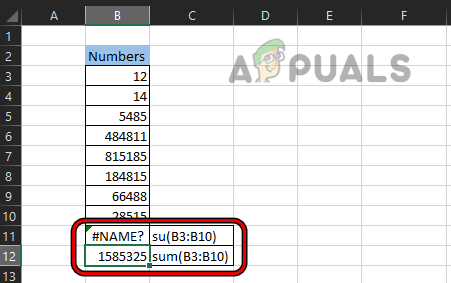
Now again, have a look at the image above and check the cell B12 which shows the Sum of the range B3 to B10, and the formula used is sum(B3:B10). So, by comparing the cells B11 and B12, you can note that the formula in the B11 cell has a typo where the formula should be SUM but due to the typo, it is written as su, thus causing the #name error.
Keep in mind this article is written for Excel but the steps and methods discussed in it cover a majority of the spreadsheet programs like Google Sheets, which also have a #name error.
Reasons for the #Name Error in Excel
You may encounter the #name error on Excel due to many reasons and you may go through these reasons to rectify the #name error on your Excel sheet. These reasons can be categorized as:
- Typo in the Formula or Function: If your formula has a typo like using a Su instead of SUM, then that could result in the #name error.
- Formula or Function Does not Exist: You may encounter the #name error in Excel if the formula you entered is not an Excel formula, e.g., using Total as a formula will trigger the #name error as Total is not yet a formula or function in Excel.
- Missing Quotation Marks: The #name error might occur in Excel if you forgot to put quotation marks around a text string in a formula or have added smart or curly quotes around the Text.
- Missing Colon: If a colon is missing in a range, then that could result in the #name error as the Excel fails to apprehend the formula range.
- Add-in Missing: You may encounter the #name error in Excel if a particular add-in is required to execute a formula and your Excel installation does not have that add-in available.
- Range: If the Range for which you are trying to add the formula does not exist, then that may cause a #name error.
- Name not Defined: The #name error might occur if the Name of the range you entered is not valid.
- Range Local Scope: If a range is configured to use in the local scope but you are trying to use it globally, then that may trigger the #name error.
- A #name Error in the Formula Range: You may face a #name error if the formula range contains another formula and that formula is showing the #name error.
- Using of a New Excel Formula in An Older Version of Excel: Older Excel versions (like Office 2013) may fail to execute the formulas that are added to new versions (like Office 365) and show the #name error in Excel.
Fixes for #Name Error in Excel with Examples
As you have understood the basics of the #name error, let’s discuss each scenario in detail and then the steps to fix it. Keep in mind that after understanding a particular scenario, have a good look at your formula and try to rectify it accordingly. If you still cannot find the issue, then you may use the Formula Assistant, Formula Wizard, or Name Manager to clear the error (discussed later).
But before we move on with the steps and methods to rectify a #name error in Excel, make sure the language of the problematic sheet (like French) or Excel matches the locale language of your system (e.g., English USA) as mismatching languages can sometimes trigger the #name error in Excel.
1. #Name Error due to Typo in the Formula
Before we try other steps, let us make sure the formula or function we entered is correct and it does not have a typo. Let us clears this through an example.
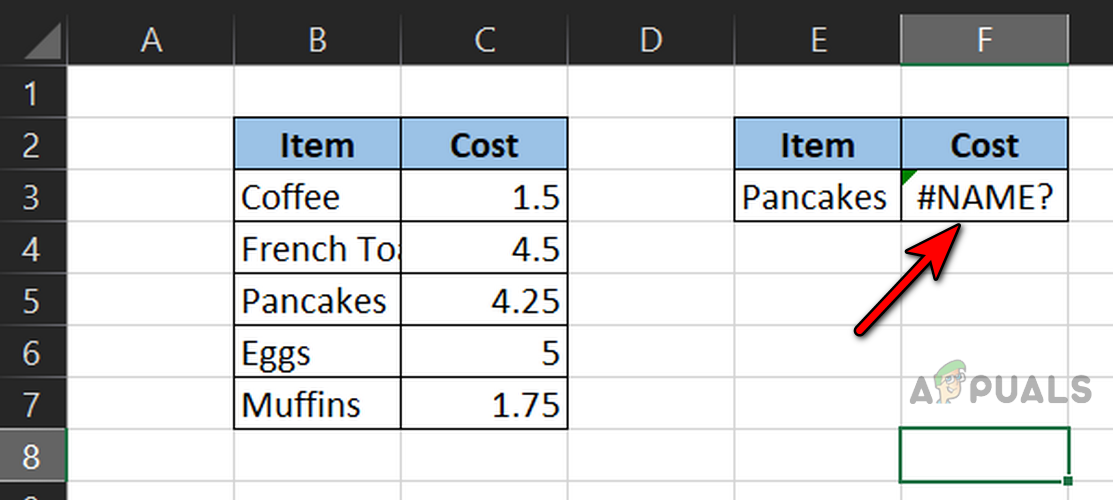
- Look at the sheet in the image. It has two columns, one for Items and the other for Cost.
- Now see the cell F3 which is showing the #name error.
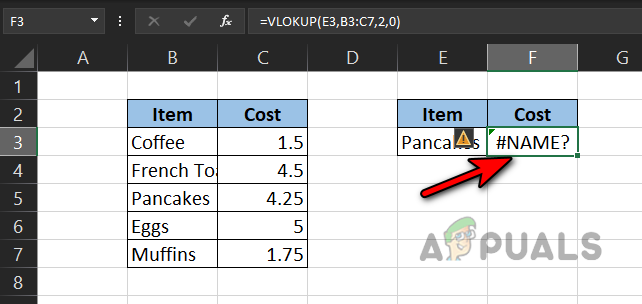
#Name Error Due to Typo in the Formula - Have a close look at the formula and you will find the formula to be as under, which clearly shows a typo in VLOKUP as it should have been VLOOKUP (if you are not sure about the formula, you may use formula assistance or formula wizard as discussed later in the article):
=VLOKUP(E3, B3:C7,2,0)
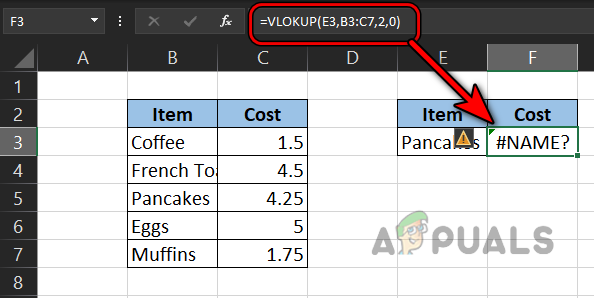
#Name Error Due to a Typo in the VLOOKUP Formula - Now have a look at the sheet below and check the F3 cell in which the formula is modified as the following which cleared the #name error:
=VLOOKUP(E3,B3:C7,2,0)
Moreover, if you are trying to use a formula or function (like Total), that is not an Excel formula or function, then that could result in the #name error.
2. #Name Error Due to an Incorrect Range
As you have confirmed in the previous step that the formula is correct, now let’s ensure that the range entered is correct (if a range is being used).
- Look at the sheet in the image. It has two columns, one for Days and the other for Temperature.
- Now we have set up two formulas to find out the Max and Min temperatures but the Min temperature in cell F4 is showing a #name error.
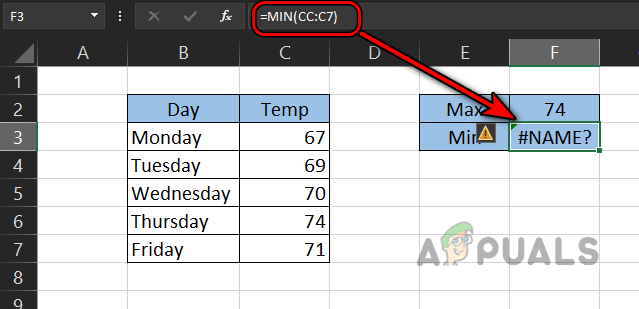
#Name Error Due to Invalid Range - Then have a detailed look at the range of the formula and you will notice that the range is not correct as CC is not a range. It is showing as:
=MIN(CC:C7)
- Now look at the image below and the formula’s range is modified to correct the #name error as:
=Min(C3:C7)
3. #Name Error Due to a Missing Colon
If the range you have defined in your formula is missing a colon, then that could result in the #name error as the Excel will fail to apprehend it as a range and will try to interpret it as a function, which it is not, thus the #name error. Let us understand this by the example below:
- Look at the sheet in the image below and you will notice a #name error in the B8 cell where we wanted to sum up the B2 to B7 cells.
- Now, look at the sum formula and you will see:
=sum(B2B7)

#Name Error Due to a Missing Colon in the Formula Range - You can see that the range is missing a colon and due to this, Excel is “thinking” it as a function but it is not a function, thus a #name error.
- Now let us add a colon to the formula and that will clear the #name error from the B8 cell:
=sum(B2:B7)
4. #Name Error Due to Missing Quotations Around a Text String
If your formula uses a text and you forgot to add double-quotations around the text in the formula, then that could result in the #name error as the Excel “thinks” the text as a function or range which is not present. Let us clear the concept by the example below:
- In the sheet shown in the image below, our LEN(apple) formula in cell B3 is showing a #name error.
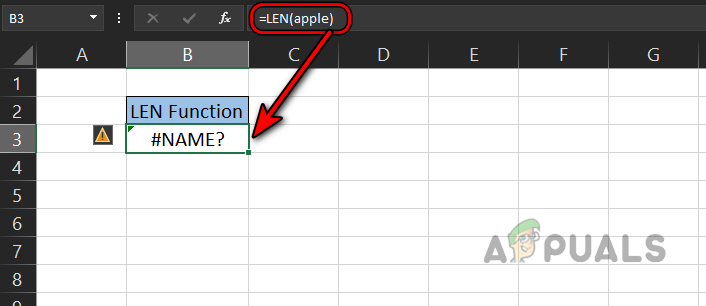
#Name Error Due to Missing Quotes Around a Text String - In this formula, we are trying to count characters in the text apple but we forgot to wrap the word apple in double-quotations, due to which, Excel is “thinking” it as a function and Excel does not have an apple function or range, so, it is returning #name error.
- Now, let’s wrap the string apple in quotes and then check what happens.
LEN(“apple”)
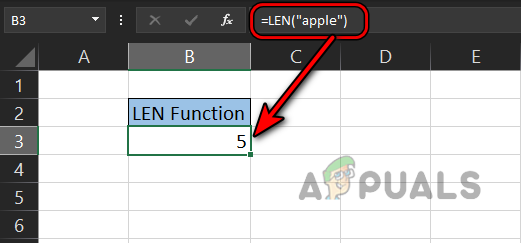
#Name Error Cleared After Adding Quotes Around the Text String - Hurray, the #name error is cleared from Excel as shown in the image above:
Keep in mind that the double-quotes are different from smart or curly quotes, as the smart or curly quotes around a text may cause the #name error. This can happen as if you are copying a formula from another application (like MS Word) as it automatically replaces the straight double-quotes with the smart or curly quotes. You can see it in the image below:
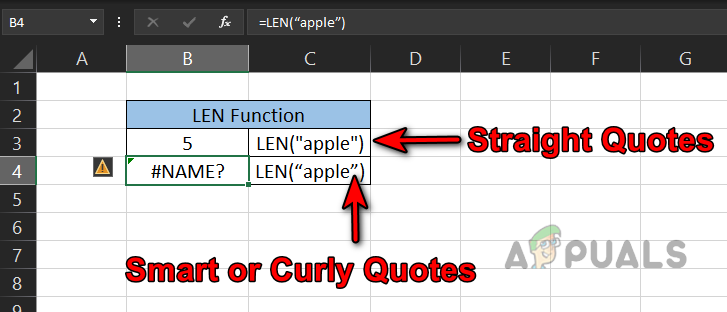
The rectification is to edit the formula in Excel and replace the smart or curly quotes with straight double-quotes.
5. #Name Due to Range Name not Defined
Excel provides us the feature of naming ranges and then that Range name can be referred to in a formula. If you are referring to a Range Name in your formula but the name is not correct, then that could result in the #name error. To better understand it, let’s take the following example:
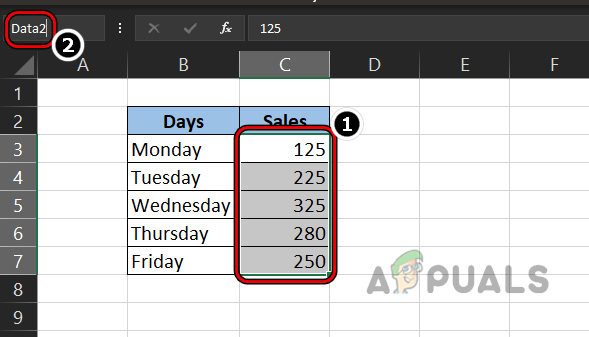
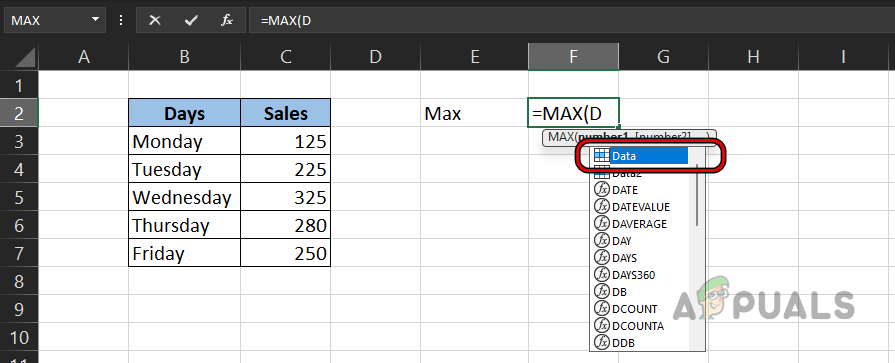
- Look at the sheet in the image below. It has two columns, one for Days and the other for Sales.
- Now, select the cells C3 to C7 and click in the Name Box.
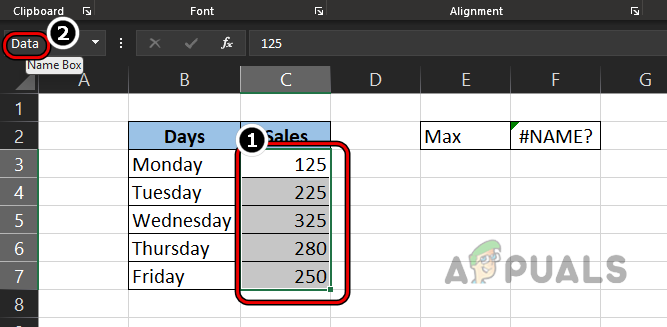
Name the Range as Data - Then enter the name as Data and let’s find the Maximum sale by using the Max formula like:
=Max(Daata)
- But our formula has returned a #name error. Now our formula is correct (as Max is a valid Excel formula) and does not have any typos.
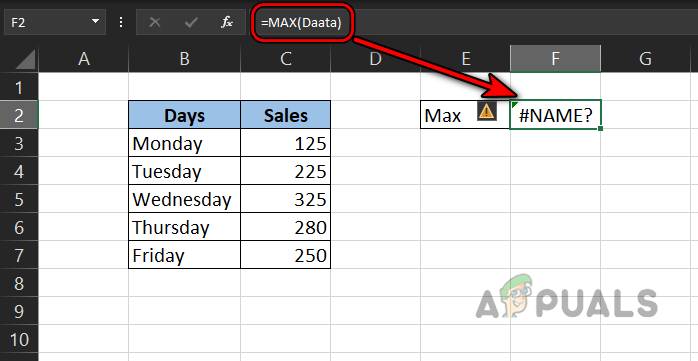
#Name Error Due to the Wrong Range Name - Then see the name range and you will instantly find that the Range name is incorrectly entered as Daata, whereas, it should have been Data.
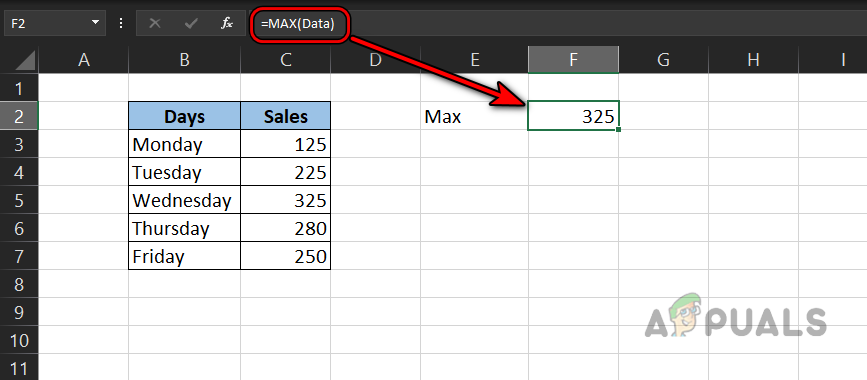
- Now, look at the image below where the formula is rectified and the error is cleared.
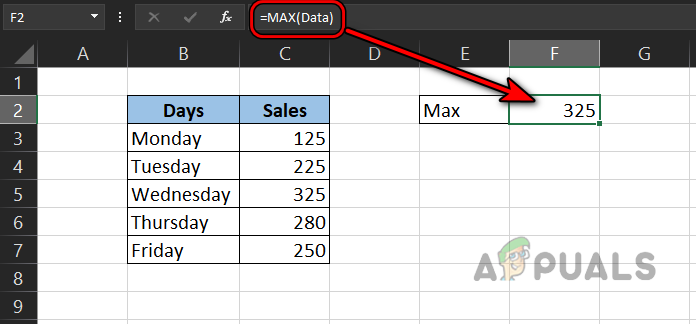
#Name Error Cleared After Correcting the Range Name
Keep in mind that you can also use Formulas>> Use in Formula>> All Points to view the named ranges.
6. #Name Error Due to the Local Scope of the Range
You may encounter the #name error in Excel if the Range name you are trying to use has a local scope, not global. When you name a range, by default it is global i.e., you can access in it any worksheet of an Excel workbook.
If a Range name is set to be of the Local Scope, then that Range can be only referenced in the worksheet where it is defined, not in any other worksheet of the workbook and if you try to use the range name of that sheet in any other sheet, then that may result in the #name error in Excel. Let us understand the concept through the following example:
- Create a new worksheet in Excel and enter its name as LocalScopeTest (or any name of your choice).
- Now enter the data as per the image in step 4.
- Then select C3 to C7 and head to the Formulas tab in the Office Ribbon.
- Now click on Name Manager and click on New.
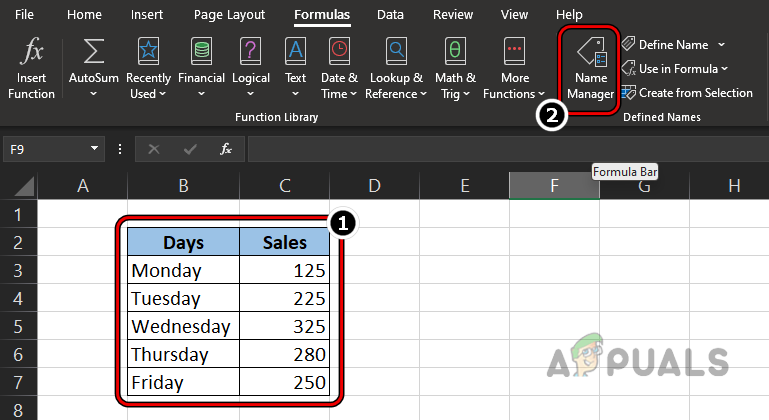
Enter Data and Open Name Manager - Then change the Scope dropdown to the LocalScopeTest (or name of the sheet) and enter the name of the range like Data2.
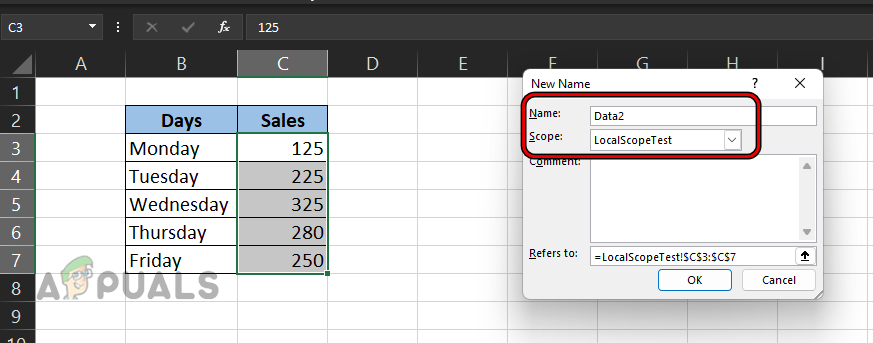
Name the Range as Data2 and Set its Scope to the LocalScopeTest - Now click OK and check the Status column of the Data2 range which will show LocalScopeTest.
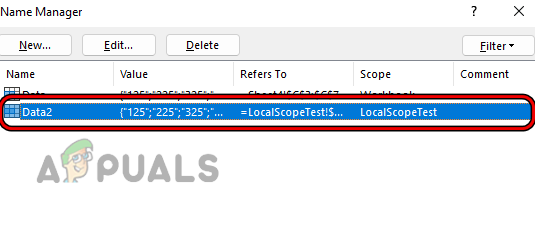
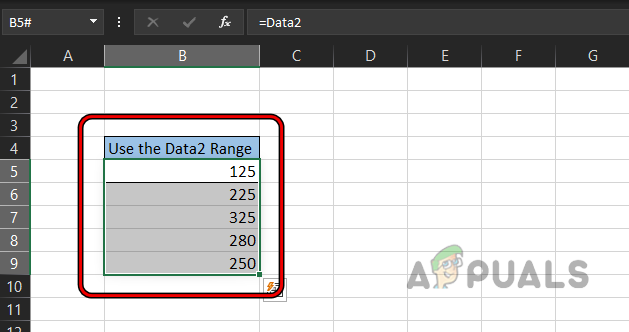
Name the New Range as Data2 and Set its Scope to the Worksheet - Now switch to any other sheet in the workbook and enter the following (where Data2 is the range name):
=Data2
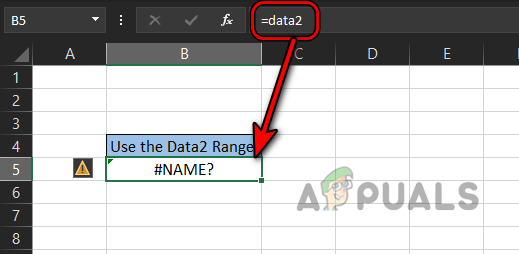
#Name Error Due to Using the Range With Local Scope in Another Sheet - Then that will return the #name error as the Data2 range name is not available to that sheet.
- Now, switch to the LocalScopeTest sheet and open Name Manager.
- Then select the Data2 range and click Delete.
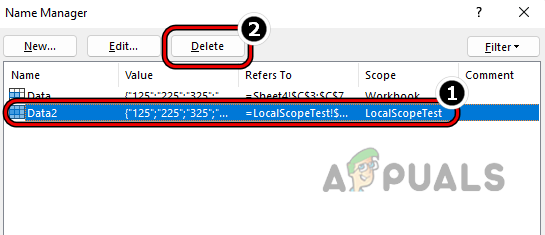
Delete the Data2 Range Name Through the Excel’s Name Manager - Now confirm to delete the range and again, select the C3 to C7 cells.
- Then, in the Name Box, enter the name as Data2 and switch to the sheet which showed the #name error.
Add The New Range as the Local Scope Range and Set its Name as Data2 - Now double-click in the cell where it is showing #name error and hit Enter.
#Name Error Cleared After Changing the Scope of the Named Range - Hurry, the #name error will be removed from the sheet and the result will be shown.
Keep in mind that you can simply check a range’s status in the Name Manager if it is set to Local Scope or Workbook. If set to scope, then delete the range (be careful, this may break another formula on the sheet or may cause unintended behavior) and recreate it with Workbook status to resolve the #name issue or reference the range in another way (like using cell references).
7. #Name Error Due to a Missing Add-in of Microsoft Excel
If a particular formula requires an Excel add-in but your Excel does not have that add-in, then that may cause the #name error in Excel. Let us clear this by the following example by using EUROCONVERT:
- Look at the sheet in the image and you will notice #name errors in the cells C3, C4, and C5.
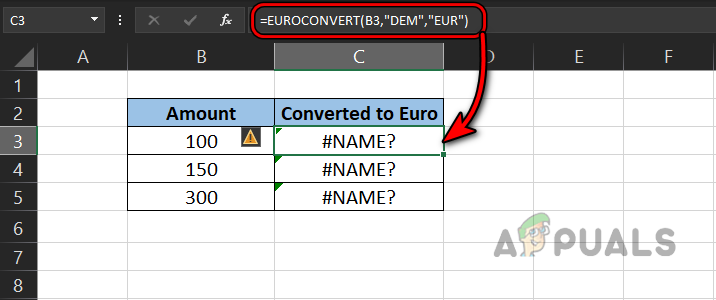
#Name Error Due to Using EUROCONVERT - Now notice the formula and you will see that it uses EUROCONVERT, which requires the Euro Currency Tools Add-in but that add-in is not installed on the system.
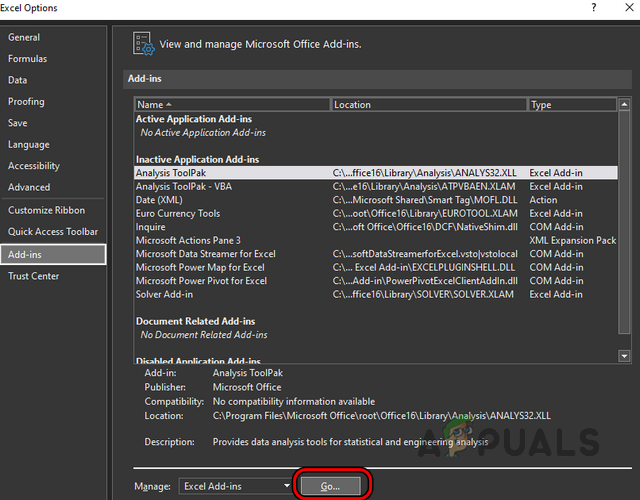
- To clear the #name error in this case, you must install the add-in, and do so, head to the File tab of Excel, and expand More.
- Now select Options and steer to the Add-ins tab.
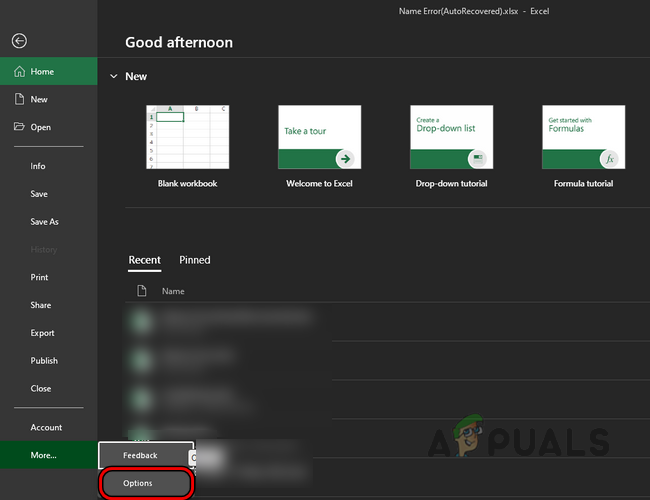
Open Excel Options in the File Menu - Then click on Go and in the add-ins menu, checkmark Euro Currency Tools.
Click Go in the Add-ins Tab of Excel - Now click OK and double-click the C3 cell.
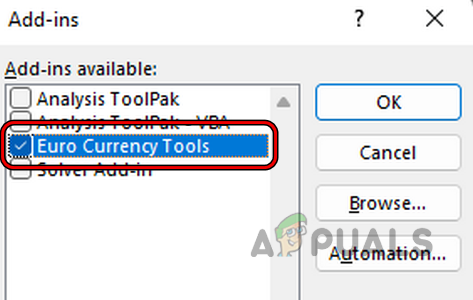
Install Euro Currency Tools Add-in on Excel - Then hit Enter and the formula will be recalculated, which will clear the #name error from the cell.

#Name Error Cleared After Installing the Excel Add-in - Repeat the same for the C4 to C5 cells and ta-da, that will remove the #name error in Excel.
8. #Name Error Due to Another Formula Showing the #Name Error
If there is a formula in your current formula range that is showing the #name error, then the current formula will also show the #name error. If your sheet is a large one and it is problematic to find all the #name formulas that your formula is dependent on, you may refer to the section Find the #Name Errors on a Large Sheet (discussed later in this article).
- Let us take the example of the Range Name not Defined section.
- Now let’s try to calculate half of the Max in the F3 celland you will see that this formula also throws the #name error whereas, there is no mistake in the formula. It is only occurring due to the #name error of the Max function in the F2 cell.
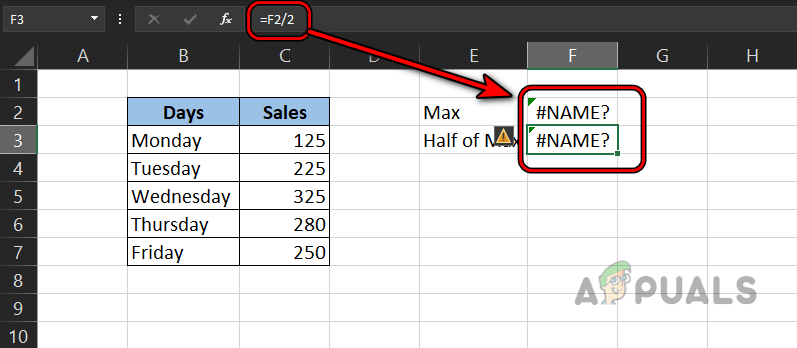
#Name Error Due to Error on Another Formula - Then edit the formula of the Max function to use the correct Range name as Data and afterward, the #name error will be cleared from the half of the max cell.

#Name Error Cleared After Correcting the Wrong Formula in Another Cell
9. #Name Error Due to New Formula in Older Version of Excel
With each new version of Excel, Microsoft is constantly updating Excel with new functions and formulas. If a sheet created in a newer version (like Excel 2019) of Excel that has newer formulas (e.g., XLookUp) is opened in an older version of Excel (like Excel 2010), then those cells which use newer formulas may show the #name error.
In this case, either the formulas should be replaced with older alternatives or the older version of Excel may be updated to the latest version, there is no other way to clear the #name error caused by this reason. Although, you can try some steps that can sometimes resolve the issue like re-formatting the numbers columns as numbers (if it converts to text in the older Excel version). Also, some Office 365 functions only work if a user is signed in with its Office 365 credentials, otherwise, it starts acting like Office 2019 and you may see a #name error on Office 365 functions (sometimes with an _xlfm prefixes) in an Excel sheet.
Try Assisted Troubleshooting
We are confident that for a majority of readers, the above-listed troubleshooting would be enough to clear the #name error but still there will be a few who may still encounter the #name error. These readers can benefit from the assisted troubleshooting features of Excel to resolve the #name issue, discussed under:
Use the Excel’s Formula Assistant
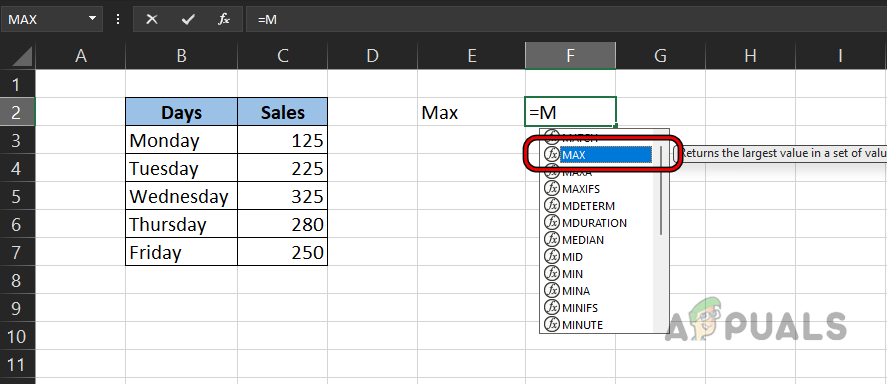
- Look at the sheet in the image in step 3 and you will notice a #name error in the F2 cell.
- Now, select the F2 cell and press the = sign.
- Then press the M key and in the suggestions shown, double-click on Max.
Select the Max in the Formula Assistant - Now type D and in the suggestions shown, double-click on the Data (range name).
Select Data Range in the Formula Assistance - Then press the ) key and hit Enter.
Use the Formula Assistant to Calculate the Max Function - Now you can compare your formula to the older formula and you will notice that the range name was misspelled as Daata in the older formula.
You can use this approach to clear the #name error in many cases.
Use the Excel’s Formula Wizard
If you are not comfortable with using formula assistant (as you are required to know some of the basic formula syntaxes), then using the formula wizard may do the trick for you.
- Refer to the above example and select the cell where you want to display the results like H2.
- Then head to the Formula tab on the Excel ribbon and click on Insert Function.
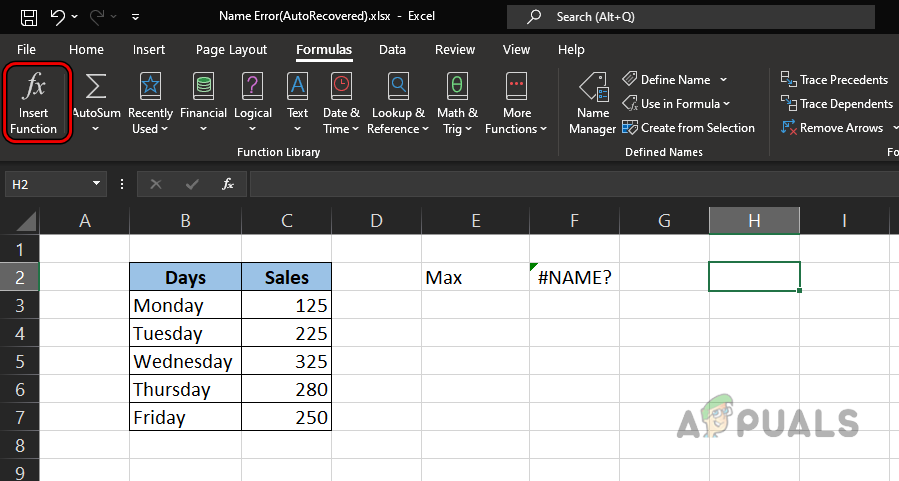
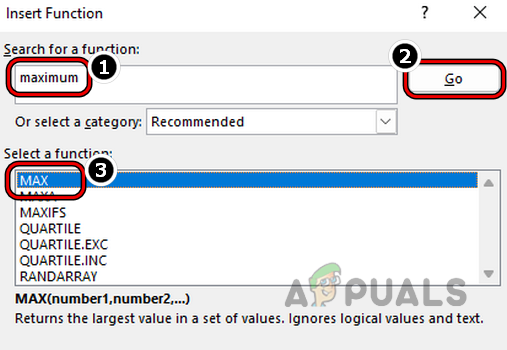
Click on Insert Function on the Formula Tab - Now search for the function that you want to use like Maximum and click on Go. You can also set the Category dropdown to all (or to a required one like Statistical) and scroll through the functions to find the required formula.
- Then, in the results, select the Max function and read its description to understand the formula i.e., that a Max function returns the largest value in a data set.
Search and Select the Max Function in the Insert Function Menu - Now click OK and then, click on the Up Arrow sign corresponding to Number 1.
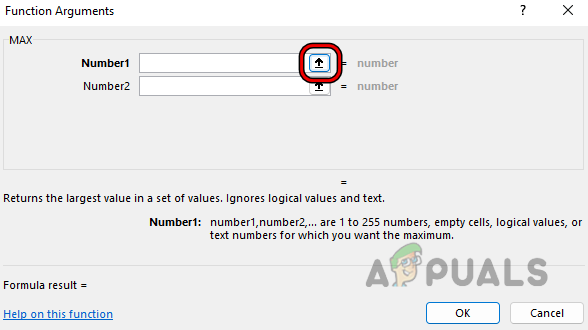
Click the Up Arrow Corresponding to Number1 in the Function Arguments of Max Function - Then select the range of C3 to C7 and you will notice that the Functions Arguments menu is not showing the range of C3 to C7 but it is showing its name Data (we had named it as Data previously).
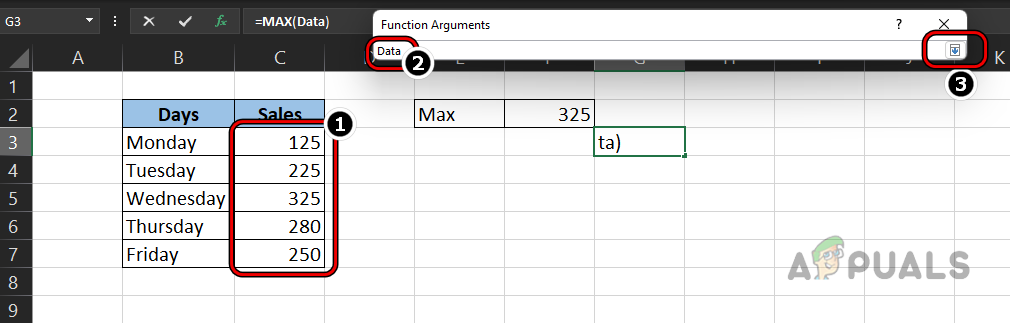
Select the Data Range in Max’s Function Argument - Now click on the Down Arrow in the Functions Arguments menu and click OK.
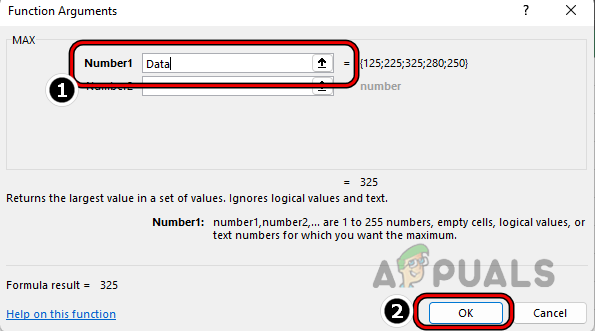
Click OK in Max’s Function Arguments - Then you can compare this formula to the formula in the F2 cell and you will notice that the range name in that formula in the F2 cell is not correct i.e., Daata.

Click OK in Max’s Function Arguments
Use the Name Manager
In a large workbook, it is not possible to remember the names of all the ranges and their scopes. Here, you can use the Name Manager to find the exact name of the range and its scope.
- Refer to the above example and you will notice a #name error in the F2 cell.
- As our formula is correct (Max is an Excel function) and we are in a bit of doubt, about whether the Range name (Daata) is correct, let’s confirm it.
- Head to the Formula tab on the Excel ribbon and click on Name Manager.
- Now check the names of the ranges and you will notice that the Range name is Data but we have entered Daata.
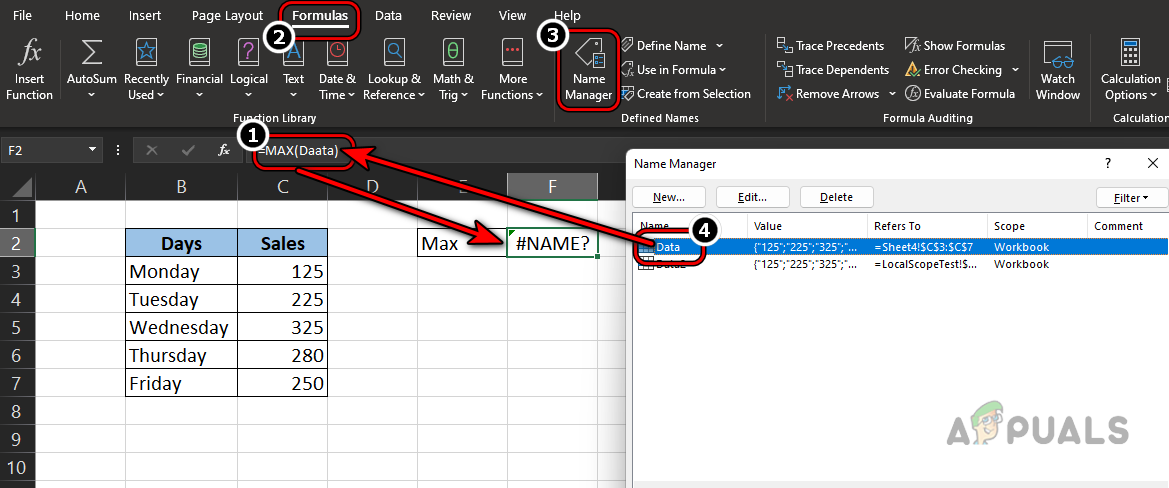
Check the Range Name Through the Name Manager - So, modifying the range name as per the Name Manager clears the #name error in Excel.
Find the #Name Errors on a Large Sheet
In the above examples, the examples used are simple ones but in a large sheet, it can become problematic to find the #name error. To do so:
- Open the problematic sheet and expand the dropdown of Find & Select in the Editing Group on the Ribbon’s Home tab.
- Now open Go To Special and then select the radio button of Formulas.
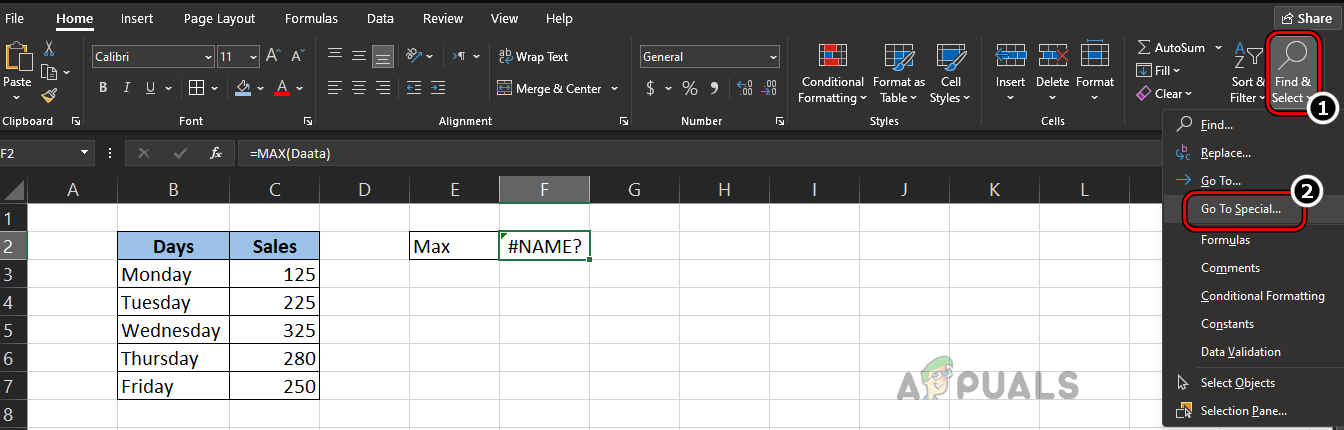
Open Go To Special in Find & Select of the Excel’s Home Tab - Then uncheck all other options under Formulas except Errors. Afterward, click on OK.
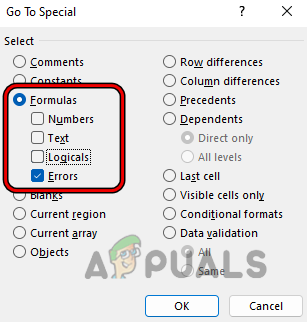
Select the Radio Button of Formulas and Select Checkbox of Errors - Now you can use the Enter key to navigate between different errors and then correct the problematic formulas to solve the #name problem.
- If the above did not work or you are not comfortable with it, then expand the Find & Select the dropdown, and open Find.
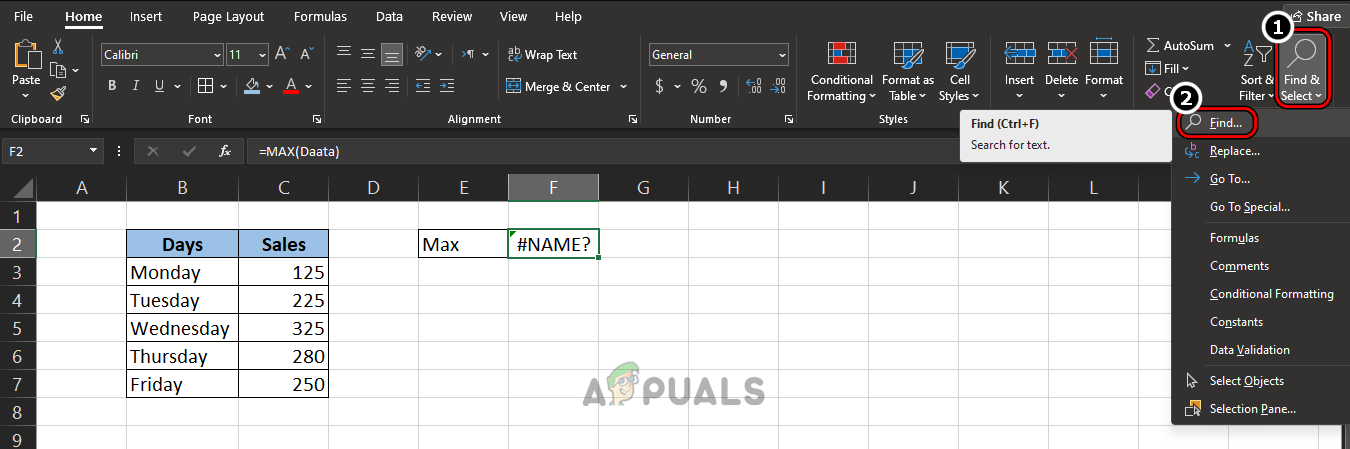
Open Find in Excel - Now enter #Name? in the Find What box and set the Within dropdown to Sheets.
- Then set the Search dropdown to By Rows and change the Look In dropdown to Values (default is Formulas).
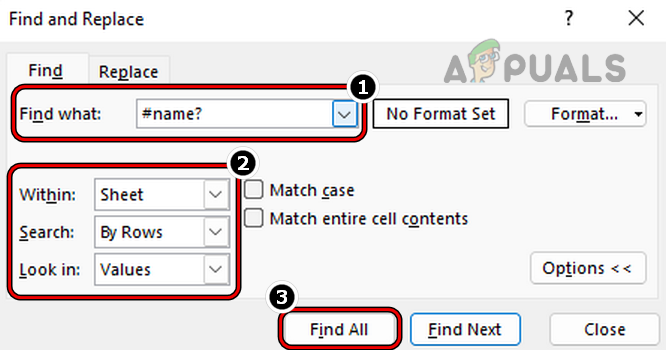
Find for #Name and Set its Look into Values - Now click on Find All and all the cells with the #name error will be available to you.
- Then you can modify the formulas (one by one) to clear the #name errors from those cells.
Prevention is Better Than Cure
So, in the last, here are some tips for newbies to avoid the #name error in Excel.
- It is better to select the cells in a formula, rather than typing.
- If you are not sure about a formula, always use help (like formula assistant).
- If a sheet is shared with you or you are sharing a sheet with someone else, make sure the Excel versions match and there are no language differences.
- If a sheet with Macros is saved by using the Save as a feature, then the new sheet might show #name errors due to the absence of the required Macros.
We have tried our best to cover all the aspects of the #name error and hopefully, may have succeeded in helping our precious readers. If you have any queries or suggestions, please let us know in the comments section.


