Fix: Minecraft Could Not Reserve Enough Space for Object Heap
Minecraft is one of the most popular sandboxed games that allows you to work with blocks, build anything (castles, mansions, farms, cities, pyramids, etc.), and go on adventures. You can decide to play the game “solo” or create a Minecraft server and play with friends or family. Of course, if you decide to create a server to play with friends, you will need to note the server’s hardware and software resources. You need to put more focus on memory (RAM). Ensure you assign enough RAm to your Minecraft server for better performance and efficiency.
This is similar to most situations we face in our day-to-day activities interacting with computers. If you only want a PC to watch a movie and edit documents, acquiring a computer with only 2GB of RAM would be okay. However, if you want a PC for android development and graphics design, you need to focus on something with at least 8GB of memory.
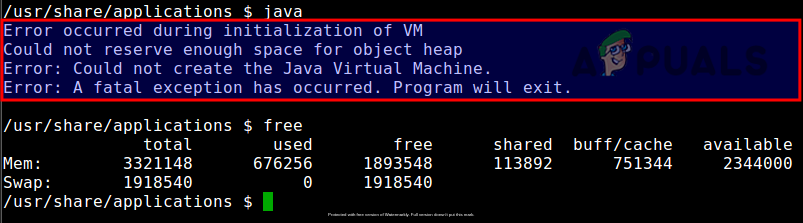
However, there is a catch! There are situations when you try to assign more RAM to your Minecraft server, but you get the error “Could not reserve enough space for object heap,” as shown in the image below.
This post will try and get to the root cause of this error and also show you the various methods you can apply to your system to mitigate and avoid such an issue arising again.
Possible Causes of “Could not reserve enough space for object heap” Error
Note: The space we are talking about here is not “storage space (hard drive or SSD size),” we are talking of the memory (RAM).
As you well know, to run a Minecraft server, you will need to install Java. To better understand what raises the error, we need to understand the term “heap” or “object heap” in Java.
Java heap – Refers to the memory space (RAM) allocated to store objects instantiated by running Java applications. The heap is created when the Java Virtual Machine starts running and can increase or decrease in size when the application is running. When the heap is full, garbage is collected, hence the popular term “garbage collection” in Java development. Therefore, this error means Java could not allocate the specified RAM size (heap) needed to handle the running applications.
Some of the possible causes of this error when trying to allocate more Ram to your Minecraft server include:
- The Java JRE version is incorrect.
- The total free memory space available is far less compared to the specified memory size.
- The heap size is larger than the process can hold
- Java cannot allocate the specified memory due to memory consumption by other running applications.
Even though this error might be triggered by something else, these are the main culprits. Now, let’s dive and look at some of the solutions you can implement.
Install 64-bit Java JRE
From my experience, this is the first solution you should try. Uninstall Java from your computer and follow the steps below.
- Open the official Java JRE web page.
- Don’t click on the Download button, as you might end up downloading the 32-bit version. Just scroll down to your OS section. If you are on Windows, select Windows Offline (64-bit). For Linux users, select Linux x64 if you are using a Debian-based system or Linux x64 RPM if you are using Rhel-based distribution.
- Once the download completes, launch the installer to install Java JRE 64-bit.
- After a successful installation, launch the Minecraft server, allocate more memory (RAM), and see if the error still occurs.
- If no error is raised, you are good to go. If the error persists, launch the Terminal or CMD in Windows and check the Java version by executing the commands below:
- – Windows:
java -version - – Linux:
java --version
- – Windows:
- If you don’t see an output like “64-bit Server VM,” or “OpenJDK 64-Bit Server,” that means you are still using the Java JRE 32-bit version. Uninstall Java and follow the steps above again and carefully to install Java JRE 64-bit version.
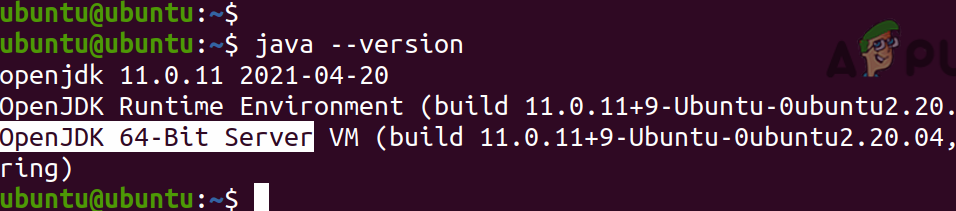
OpenJDK 64-Bit Server
Try the next solution if you have Java JRE 64-bit, but you are still getting the error.
Lower the Heap Size
As discussed above, the error is raised when Java could not allocate the specified RAM size (heap) needed to handle the running applications. A simple fix would be to reduce the set heap size. There are two flags to control the heap size: -Xms and -Xmx.
-XmsSets the minimum heap size. Therefore a value like -Xms128m will set the minimum heap size to 128 MB.-XmxSets the maximum heap size. Therefore, a value like -Xmx512m will set the maximum heap size to 512 MB.
For example, when starting the Minecraft server on our machine, we can use the command below.
sudo java -Xmx1024M -Xms1024M -jar minecraft_server.jar nogui

That sets the minimum heap size to 1024 MB (1GB) and maximum heap size to 1024 MB (1 GB).
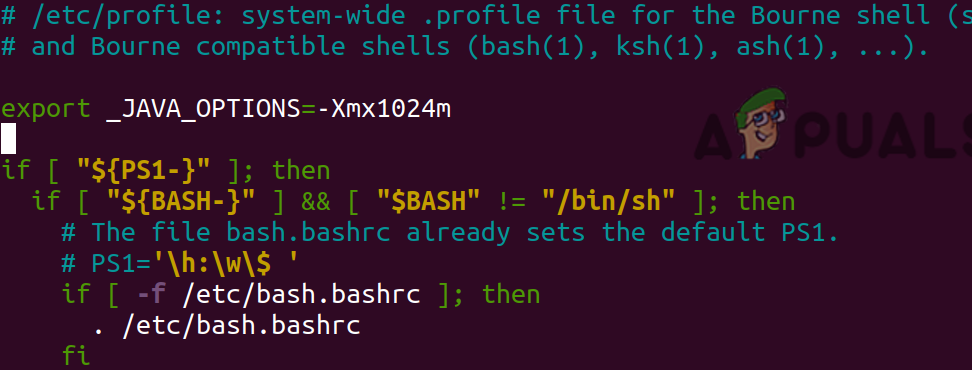
Alternatively, you can edit the /etc/profile file and add your new configurations. To edit the file with nano editor, execute the command below:
sudo nano /etc/profile
Add the line below. Remember to replace 1024 with the maximum heap size you want to assign the Java virtual machine.
export _JAVA_OPTIONS=-Xmx1024m
Add a New System Variable (Windows OS)
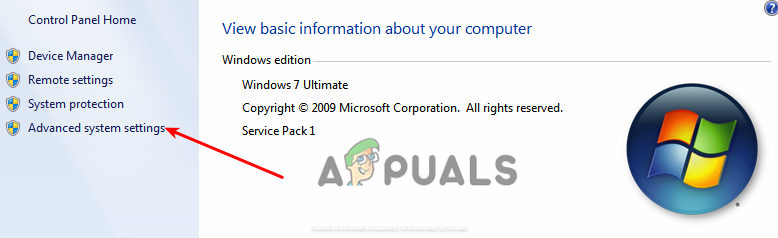
On your Windows system, open the Control Panel and click the System option under System and Security menu. On the new window that appears, click “Advanced system settings” as shown in the image below.
On the window that appears click Environment variables button. A new window will open. Click the New button under System variables.
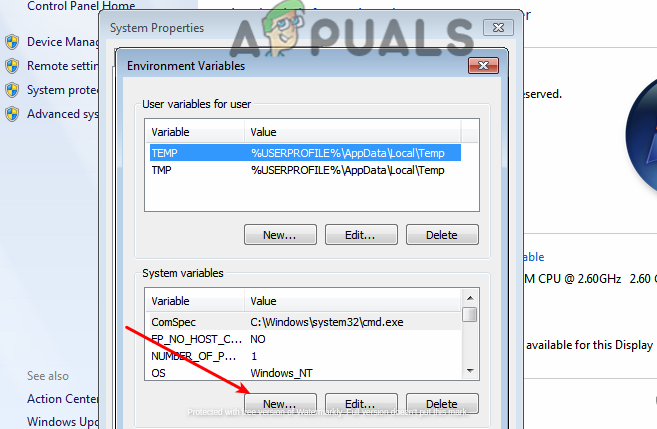
A small window will open. Set values below:
- Variable name: _JAVA_OPTIONS
- Variable value: –Xmx512M
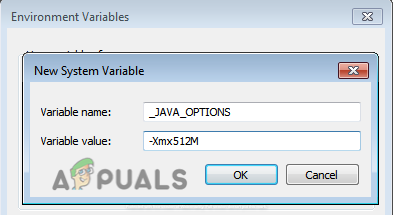
Click Ok to save and apply the changes. This action will set the Java maximum size to 512 MB.
Conclusion
This post has looked at the main probable causes of the “Minecraft Could Not Reserve Enough Space for Object Heap” error and the various solutions you can apply. Which of the above solutions worked for you? Or do you have any other tips you wish to share with our readers? Please feel free to hit the comments below.


