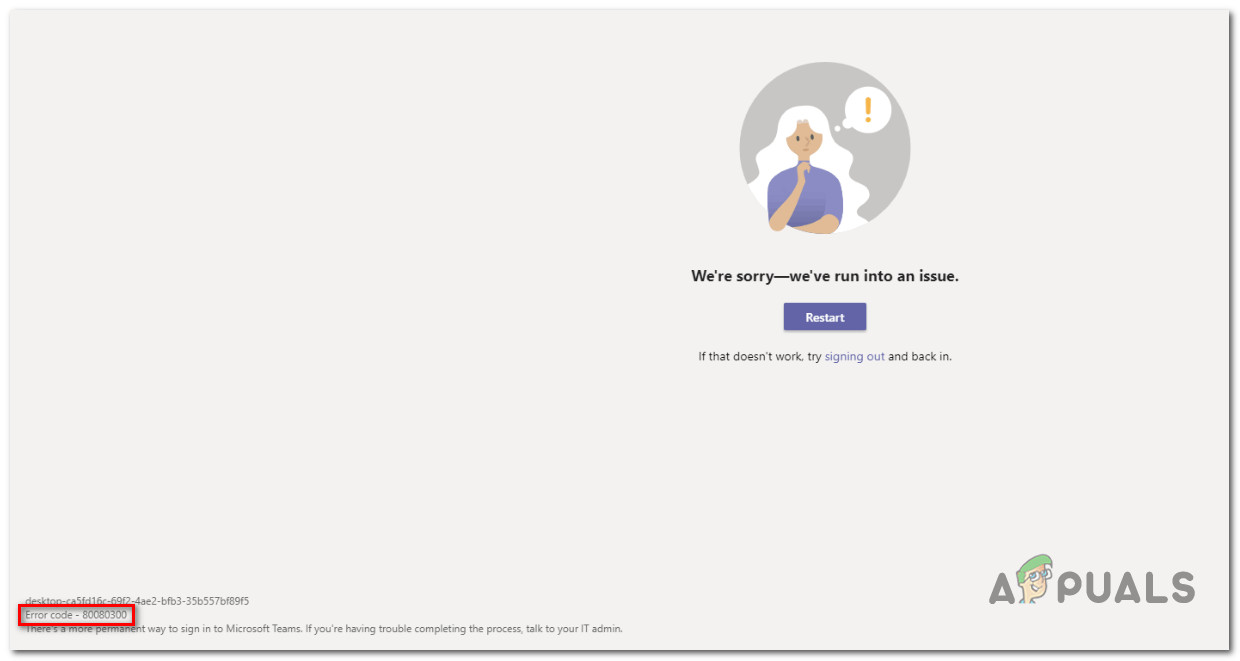
How to Fix Error Code 80080300 in Microsoft Teams?
The error Code 80080300 is encountered when users try to log into Microsoft Teams via email. Most users affected by this issue report that logging into their Teams accounts from Chrome (or another browser) works just fine. They only get this error on the dedicated Windows Teams app.
This Microsoft Teams error most likely occurs due to a bad update or a corrupted Microsoft Teams cache. On Windows 11, you can also face this issue due to corruption affecting the UWP installation of MS Teams. If the affected PC is connected to a shared network, you should also investigate for a corrupted MS Teams credential inside Credential Manager.
Use the potential fixes below to troubleshoot the issue.
1. Install the WU hotfix
The biggest surge of this Microsoft Teams 80080300 error started when Microsoft pushed the updates KB4560960 and KB4534132 on the retail and insider preview channels on Windows 10.
Since then, Microsoft has rectified the issue via a couple of hotfixes deployed on every currently supported Windows version (Windows 10 and 11).
Unfortunately, Microsoft is consistently releasing bad updates that mess up the functionality of UWP (Universal Windows Platform) apps, including Microsoft Teams.
If you’re experiencing this issue due to a new bad update or have just installed updates KB4560960 or KB4534132, follow the instructions below to install the hotfix released by Microsoft.
- Press the Windows and R keys simultaneously to bring up the Run box.
- Type “ms-settings:windowsupdate” in the text box and press Enter to open the Windows Update tab in the Settings program:
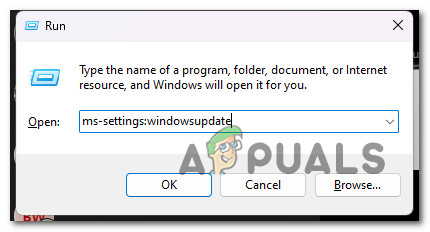
Access the Windows Update screen Note: You could be asked for an account control prompt at this point, even if you haven’t changed the UAC’s default settings. In this case, choose “Yes” to allow admin access.
- Then, go to the right side of the page and click the “Check for Updates” button.
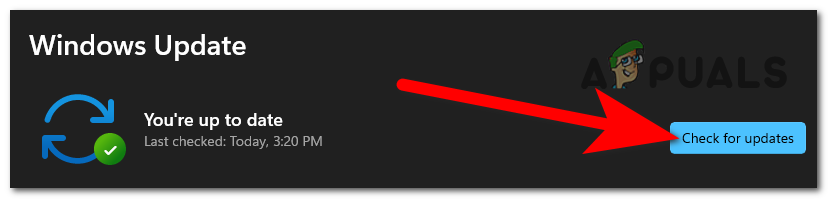
Checking for new updates - If a new update is available, click the Download & Install all button. When the update is downloaded locally, you can install it by clicking the Install button.
Note: If multiple updates are waiting to be installed, you might be prompted to reboot before installing every update. If this happens, reboot, then go back to the WU screen to finish the installation of the remaining updates. - Restart your computer and check to see if the problem is still when you open Microsoft Teams.
If the problem is still not fixed and you started to experience this issue after installing a new Windows update, chances are Microsoft didn’t release a hotfix yet.
In this case, move down to the next method below, where we attempt to uninstall the problematic update (if there is one
2. Uninstall the latest Windows update
If the issue is tied to a bad Windows Update and there’s no hotfix available, you should first uninstall the problematic update.
You can do this by accessing the Programs and Features screen and triggering the uninstallation from the View installed updates tab. But our recommendation is to do it directly from the recovery menu – this will allow you to revert feature updates and cumulative updates and delay their installation until Microsoft finally arrives with a hotfix.
Note: It’s important to remember that a bad update might not be the only cause of this problem. In this case, following this procedure will not harm your PC. Deleting the latest update will prompt your operating system to reinstall it correctly after a few days.
Follow the instructions below to uninstall the latest update from the Recovery menu:
Note: The instructions below will show you how to ‘brute-force’ your way into the Recovery menu without using a compatible installation media.
- Turn off your computer and hold down the power button while your PC is booting up to interrupt the process. In most cases, you’ll need to keep the power button pressed for 5 seconds until the force shut down is finished.

Interrupting the Booting Sequence - Start your PC once again and repeat the step above 2 more types until you successfully force the Recovery menu to appear.
Note: If you force your Windows computer to interrupt the boot-up process three times a row, the system will not finish the boot and boot directly into the Recovery menu. - When you get to the Advanced Options screen, choose Troubleshoot from the list of options. Click on the Troubleshoot tab.
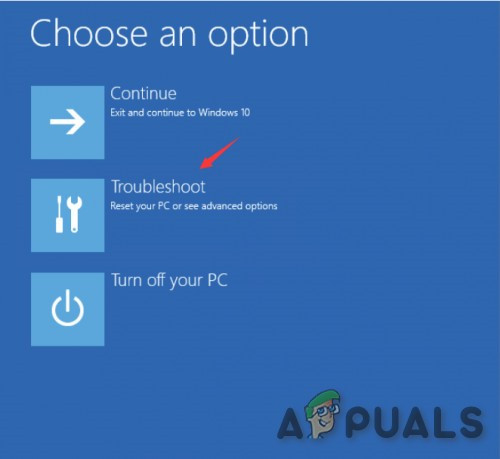
Access the Troubleshoot tab - Go to the Troubleshoot menu and choose Uninstall Updates.
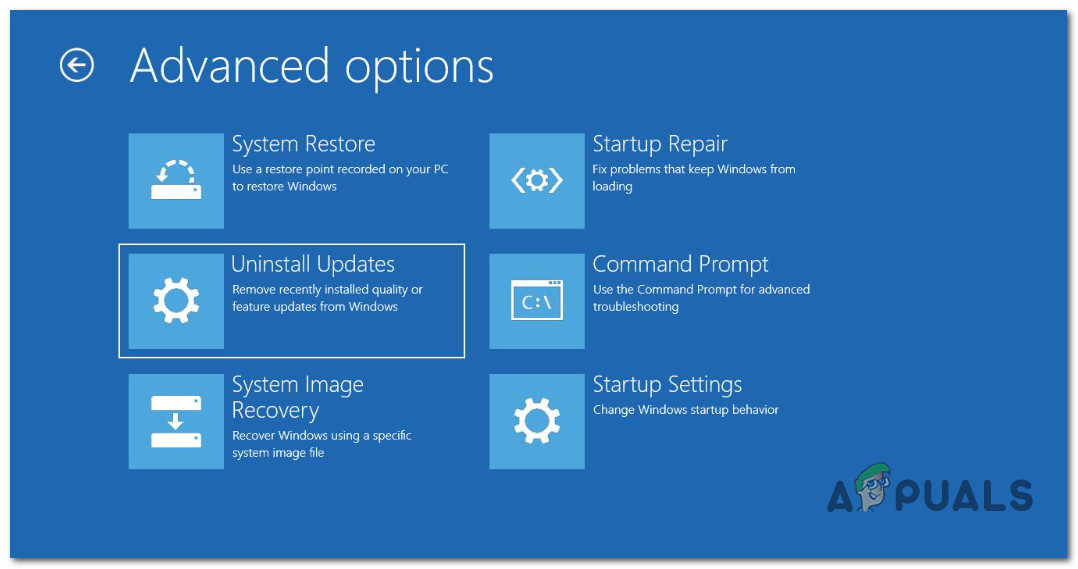
Uninstalling Updates via the Recovery Menu - On the Uninstall Updates screen, choose the most recent update, click on Uninstall, and click on confirm.
Note: Investigate which type of update (cumulative, feature, or optional) was installed the latest and get rid of it. - When uninstalling the feature update, let your Windows computer restart and allow it to boot normally
- Once your PC boots back up, open Microsoft Teams again and see if the issue is now fixed.
If you’re still experiencing the 80080300 error, move to the next method below.
If this method was not applicable or you already uninstalled the latest update with no effect, move down to the next method below.
3. Run Teams in compatibility mode (Windows 10 Only)
If you are experiencing this issue on Windows 11, there’s a chance you will be able to fix the issue by forcing the Microsoft Teams UWP app into compatibility mode with Windows 8.1.
There’s no official explanation from Microsoft on why this method eliminates the 80080300 Teams error, but affected users put the blame on a bad UWP version that is maintained by the Microsoft Store component.
To fix this issue, you need to access the Properties screen of Microsoft Teams and force it to run in compatibility mode with Windows 8.
Important: If you’re on Windows 11, you will not be able to use this fix since Microsoft Teams comes pre-installed as a UWP app in an inaccessible location.
Follow the instructions below for specific steps on how to do this on Windows 10:
- First, sign out of Microsoft Teams, close the app, and ensure it’s not running in the background.
- Right-click on the Microsoft Teams shortcut and select Properties from the context menu that just appeared.
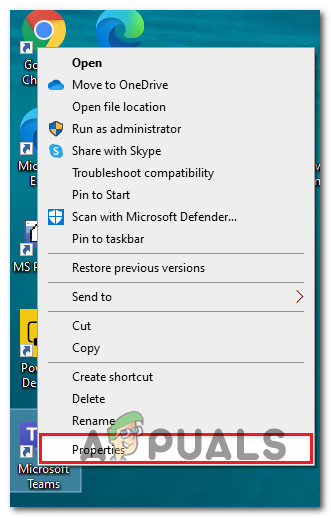
Access the Properties screen Note: If you open Microsoft Teams from multiple locations, it’s best to modify the behavior of the executable. In this case, navigate to the installation folder (default location is %LocalAppData%\Microsoft\Teams) and right-click on the main executable.
- Next, from the Properties screen, go to the Compatibility tab (using the horizontal menu at the top).
- Check the box associated with Compatibility Mode and set it to Windows 8.
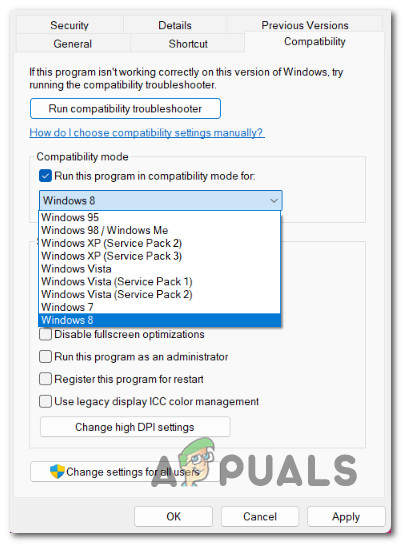
Run in Compatibility mode - Save the changes and reboot your PC.
- Once the next startup is complete, open up Microsoft Teams again and see if the 80080300 is now resolved.
If the problem is still not fixed, move to the next method below.
4. Delete the Microsoft Teams cache folder
If running Microsoft Teams in compatibility mode with Windows 8 was not an option, one easy fix you can implement on Windows 11 is clearing the cache folder.
This fix is confirmed to work on both Windows 10 and Windows 11. You can enforce it from the Apps panel by resetting the app from the Advanced options.
Here’s how:
- Press Windows key + I to open the Settings app on Windows 10 or 11.
- Next, click on App from the vertical menu on the left.
- Go to the right-hand pane and click on Installed apps.
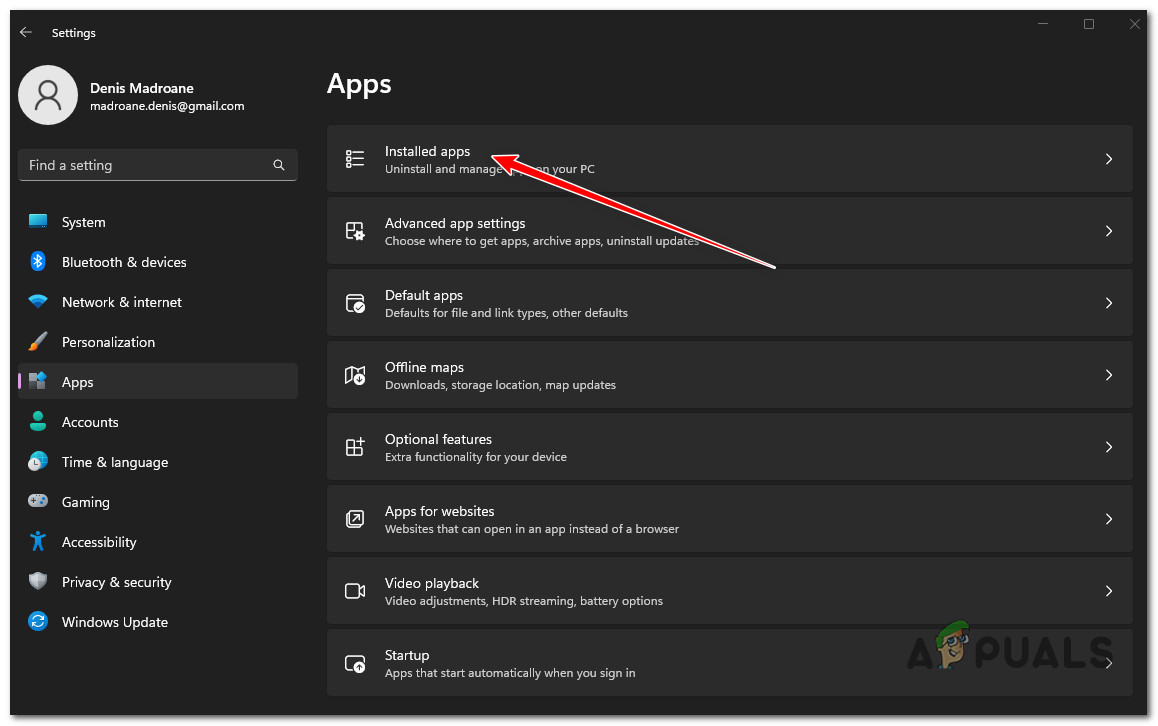
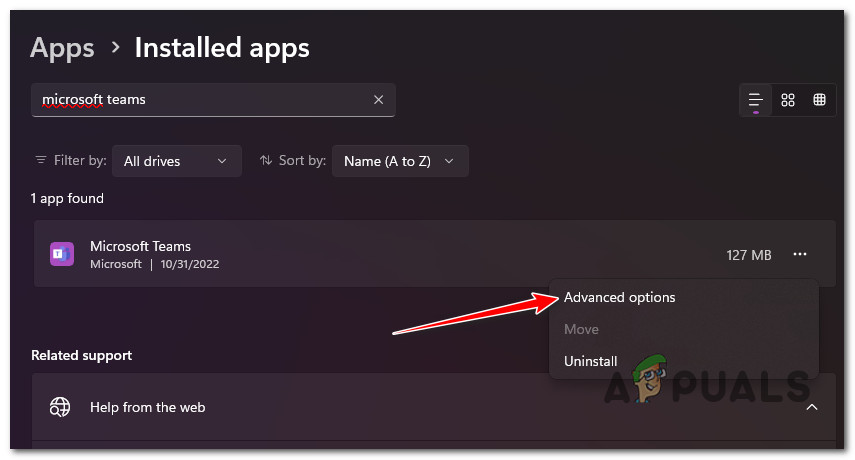
Access the Installed apps menu - Use the search function on top to search for ‘microsoft teams’.
- From the results list, click on the action button (three-dot icon), then click on Advanced Options.
Access the Advanced Menu of Microsoft Teams - From the Advanced Options menu, scroll to the rest tab and click the Reset button.
- Confirm the reset procedure, then wait until the operation is complete.
- Reboot your PC and open Microsoft Teams at the next startup.
If you still see the 80080300 after the login fails, move down to the next method.
5. Reinstall Microsoft Teams
If none of the potential fixes below have worked for you, it’s time to start troubleshooting for a potential issue caused by system file corruption.
Although cases are rare, it has been confirmed that reinstalling the application before downloading & installing the latest version from the official Microsoft update is effective in fixing the 80080300.
Note: This method is confirmed to work on both Windows 10 and Windows 11. The instructions below should work on both versions.
Follow the steps below to uninstall your current Microsoft Teams version and install the latest version from the official channels:
- Make sure Microsoft Teams is closed and not running in the background.
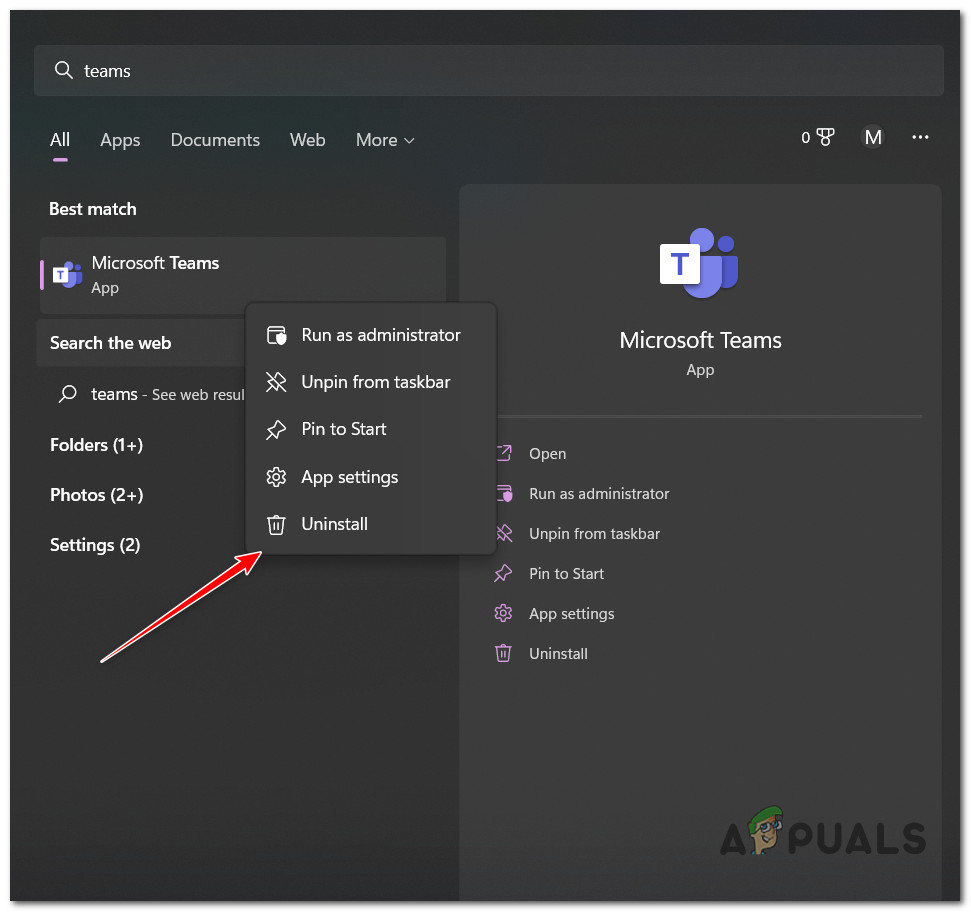
- Press Windows key on your keyboard, then type ‘teams’ in the search bar.
- From the list of results, right-click on Microsoft Teams and click on Uninstall from the context menu that appeared.
Uninstalling Microsoft Teams - At the confirmation prompt, click Uninstall, then wait until the uninstallation is complete.
Note: You should see Microsoft Teams disappearing from your taskbar once the operation is complete. - Open your favorite browser and navigate to the official download page of Microsoft Teams.
- Click on Download for Desktop from the context menu that just appeared.

Downloading Microsoft Teams from Desktop - From the next page, click one of the download buttons depending if you’re using Teams Home & or Small Business or Teams work or school.
- Wait until the main executable is downloaded, then right-click on it and choose Run as administrator from the context menu.
Note: Since this app is built on the new UWP platform, the installation will happen automatically as soon as the executable is opened. - Microsoft Teams will automatically open once the UWP installation is complete.
If you still see the 80080300 error, try the next potential fix below.
6. Remove Saved MS Teams Credentials
In case you’ve troubleshot using every method above, and you’re still seeing the 80080300 error every time you attempt to log in, start looking into Credentials Manager.
Newer versions of Microsoft Teams are known to sometimes corrupt saved credentials if the same Teams account is used across multiple devices connected to the same network.
If this scenario is applicable, you can fix this issue by going into Credentials Manager and deleting every saved Microsoft Teams credential on this device.
Note: If you are experiencing this issue with a shared network, you should repeat this process on every PC throwing the 80080300 error.
Here’s what you need to do:
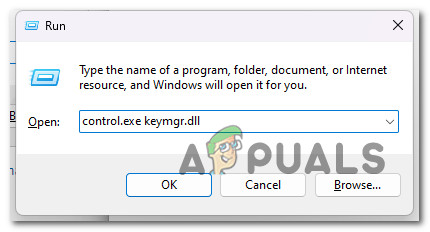
- Press the Windwows key + R to open up a Run dialog box.
- Next, type ”control.exe keymgr.dll’ inside the Run text box, then press Ctrl + Shift + Enter to open it with admin access.
Open Credential Manager - When you see the UAC (User Account Control) prompt, click Yes to grant admin access.
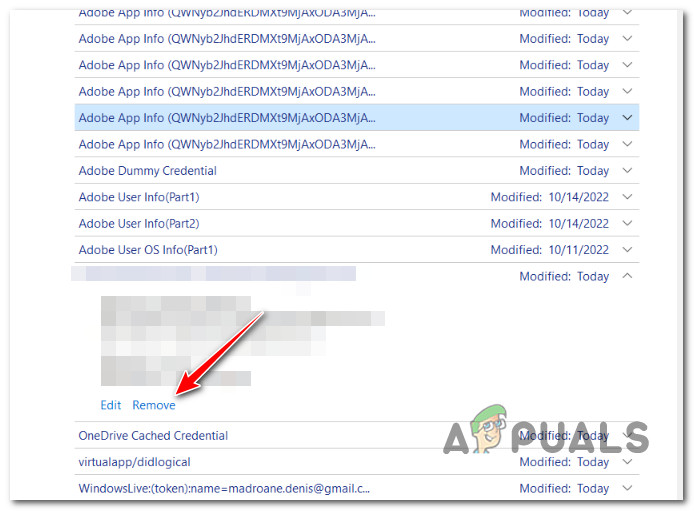
- Once you’re finally inside Credential Manager, click on Windows Credentials.
- Scroll down to Generic Credentials and remove every saved Microsoft Teams and Microsoft Office account by selecting each listing and clicking Remove.
Removing the saved credential - Close the Credentials manager and reboot your PC.
- At the next startup, open Microsoft Teams and see if the issue is now fixed.


