Fix: Microphone keeps muting itself
We would all wish that our PCs worked perfectly because it would definitely save us a lot of time and money. However, a complex machine such as a computer running Windows 10 is definitely fragile, and imagining a PC with zero errors is impossible. On the other hand, it’s the users who are to blame for certain issues and they are caused by installing certain apps, etc.
However, a lot of errors occur when even the slightest of settings on your Windows PC is misconfigured. Microphone issues occur rarely but they can be quite annoying, especially if they are important for your gaming, or attending online interviews and webinars. Let’s see how to solve this particular issue.
Microphone Automatically re-adjusts Itself
This particular issue usually occurs on Windows 10 PCs but it’s not unique to this particular OS. There are several reasons why this occurs but this is definitely an issue in need of fixing, especially if you depend on your microphone for your job or if you want to stay in touch with your friends and family.
This problem appears with both internal and external microphones so it doesn’t matter if you are using a laptop or a computer. Check out our solutions below!
Solution 1: Dealing With Malware
In a majority of similar cases, the problem was caused by malicious software that existed on your computer and it was interfering with your microphone. There is a good way to deal with this malware and fix the issue permanently.
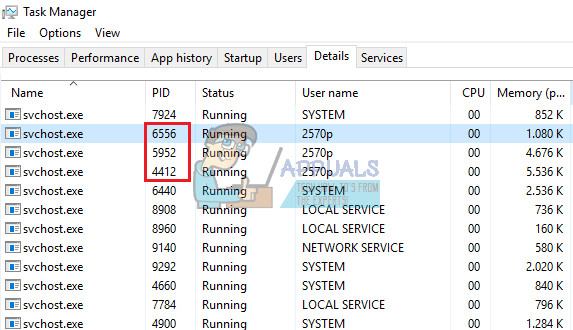
- Open your Task Manager by using the Ctrl + Shift + Esc key combination.
- Navigate to the Details tab and align your processes in alphabetical order.
- Check out your svchost.exe processes and take a look at the column saying “User name”.
- A majority of svchost.exe processes will be owned by the system or they will be labeled as LOCAL SERVICE but try to locate some of them with the name of your computer listed under the “User name” column.
- Don’t close Task Manager. Open Command Prompt by typing this in your Search bar, right-clicking on it, and selecting “Run as administrator”.
- Use the following command to kill these svchost.exe processes; the ones running as user processes:
taskkill /F /PID ####
- Instead of these hashes, you should type the four numbers located under the PID column in Task Manager. Do this for all svchost.exe processes running under your username.
- After you have successfully completed this, take a look at the Task Manager, and see if there are any processes remaining. If there are, repeat the same process for all of them.
Now that we have successfully stopped the malware from running, it’s time we have a chance to deal with it properly. We recommend using Malwarebytes and you can download a free trial version and this antivirus scanner has proven to fix this issue in particular.
- Download Malwarebytes from their site.
- Install the software by opening the file you downloaded and following the directions on-screen.
- Click on the Scan Now button and wait until the process finishes.

Solution 2: Fixing Misconfigured Settings
If you are certain that there is no malware running on your computer after several scans, the issue may be with your Windows settings. We will try to show you the correct configuration needed for your microphone to work properly.
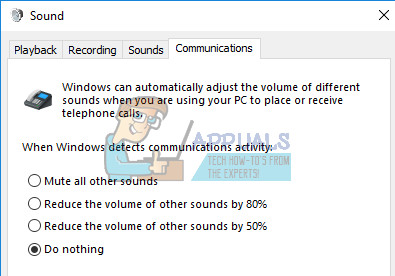
- Locate the Volume icon on the right part of your taskbar, right-click on it, and open Playback devices.
- Navigate to the Communications tab and click on the “Do nothing” radio button.
If this does not fix your issue, you can try an test your microphone in order to see just whether the problem occurs because of your device or because of Windows.
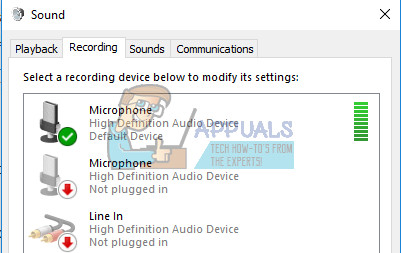
- Open Control Panel by searching for it.
- Use the View by Category view and click on Hardware and Sound.
- Under the Sound section, open Managing audio devices.
- Switch to the Recording tab and make any sound.
- If the green bars appear, the device is working properly and the problem is not hardware related.
- If the bars remain grey, your microphone might not be working properly so consider fixing it or replacing it.
This final method regarding Windows settings fixes the issue if you accidentally switched one of your microphone or speaker devices off.
- Navigate to the Hardware and Sound section in Control Panel by following Steps 1 and 2 from the previous method.
- Click on Sound and remain in the Playback tab.
- Click on Speakers and open its Properties by clicking below.
- Navigate to the Levels tab and turn off the muted button if it’s active and use the slider to turn on the Microphone to at least 75.
- Check to see if the issue still persists.
Solution 3: Changing Some Advanced Settings
If the issue is still not resolved, we will have to try and tweak some more settings in order to fix this.
- Click on the Sound option in Control Panel >> Hardware and Sounds
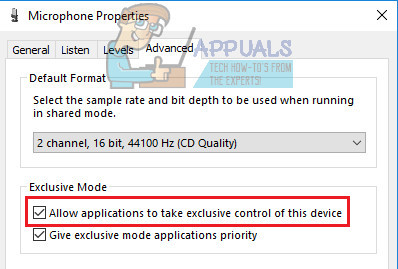
- Switch to the Recording tab, right-click on the active microphone, and open Properties.
- Navigate to the Advanced tab and turn off the “Allow applications to take exclusive control of this device” option.
- Apply these changed and see if the issue remained.
Sometimes certain audio formats are not supported by your microphone, leading to problems similar to this one. Luckily, you can turn these off easily.
- Right-click on the Volume button located at the right part of your taskbar and open Recording devices.
- Right-click on the microphone you are using and navigate to the Advanced tab.
- Under the Default Format option, choose any of the 16-bit options and check if your microphone is working properly. Try a couple of them just to make sure.
Solution 4: Driver Issues
It’s quite possible that one of your sound drivers is responsible for these issues so your best bet is to simply uninstall them.
- Open your Run dialog box and type devmgmt.msc.
- After Device Manager opens, expand the Sound, video, and game controllers list and uninstall your sound card. Alternatively, you can also uninstall drivers under the Audio inputs and outputs option.
- Restart your computer and you will see that these drivers were automatically reinstalled.
Solution 5: Performing a Clean Boot
It is possible that a third-party application or service is interfering with the microphone drivers due to which they are automatically muted. In a “Clean” boot only the necessary services and applications are loaded. All third party applications and services are not loaded at startup, due to which, any interference from a third-party service can be prevented. Therefore, in this step, we will be booting the computer in a “Clean” state. For that:
- Log in to the computer with an Administrator account.
- Press “Windows” + “R” to open up the “RUN” prompt.
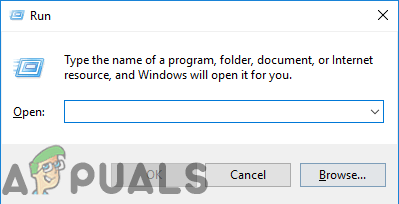
Opening Run Prompt - Type in “msconfig” and press “Enter“.

Running MSCONFIG - Click on the “Services” option and uncheck the “Hide all Microsoft Services” button.
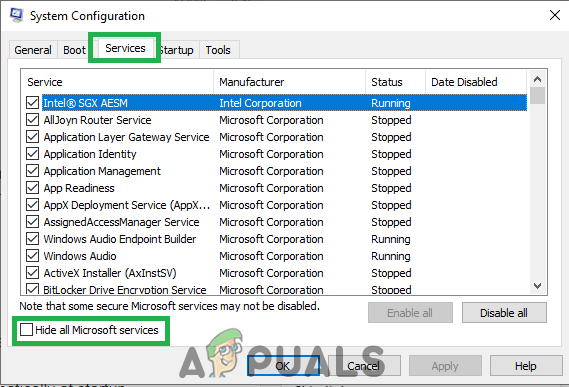
Clicking on the “Services” tab and Un-checking the “hide all Microsoft Services” option - Click on the “Disable All” option and then on “OK“.

Clicking on the “Disable All” option - Click on the “Startup” tab and click on the “Open Task Manager” option.

Clicking on the “Open Task Manager” option - Click on the “Startup” button in the task manager.
- Click on any application in the list that has “Enabled” written next to it and select the “Disable” option.

Clicking on the “Startup” tab and selecting an application listed there - Repeat this process for all applications in the list and restart your computer.
- Now your computer has been booted in the “Clean Boot” state.
- Use the computer in this state and check to see if the issue goes away.
- If the issue goes away, repeat the above process and enable one service at a time.
- Identify the service by enabling which the issue comes back and keep it disabled to fix the issue
Alternative Solution:
If none of the solutions above work for you, you might need to reset your Windows installation which will uninstall your programs and apps but you will be able to keep your personal files.


This happens when I unconsciously pressed volume up or volume down keys on my Logitech K520 keyboard. Are you using Logitech Keyboard? If yes, try to update to latest Logitech SetPoint, it solves the problem for me.