How to Locate the WPS button your Canon Printers
The WPS method OR (push button method) is an easy and quick method for connecting the printer to the wireless router, access point, or gateway. Generally, the way it works is that you press this button on the printer first, and then on the router within 2 minutes, allowing both devices to connect to each other.
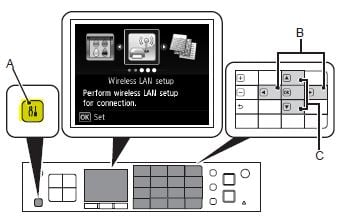
There are two ways you can access the WPS settings: either through the Setup or by pushing the WPS button on the printer. On some printer models, this button is not available; therefore, to access it, you will need to enter the printer’s setup menu, which is usually indicated by a Tools/Wrench icon on the printer’s panel.
If the button is available, how do i connect my printer to my router?
If the button is available, take a close look at the buttons on the printer to identify a button with a wireless icon. Press this button and then press the WPS button on your router within two minutes.
If the WPS button is not available, what do I do then?
If the button is not available, you can connect by entering the printer’s setup through touch. This article does not cover specific models but serves as a general guide.

(A) indicates the setup button, which is what you will need to press. Once you are in the settings, use the arrow keys to enter “Wireless LAN Setup,” “Wireless Setup,” or “Network Setup“.
Once inside, locate the Push Button Method or WPS method and proceed with it.
You will then be told to press the WPS button on your router within 2 minutes.
Press the WPS button on the router for the connection to take place.