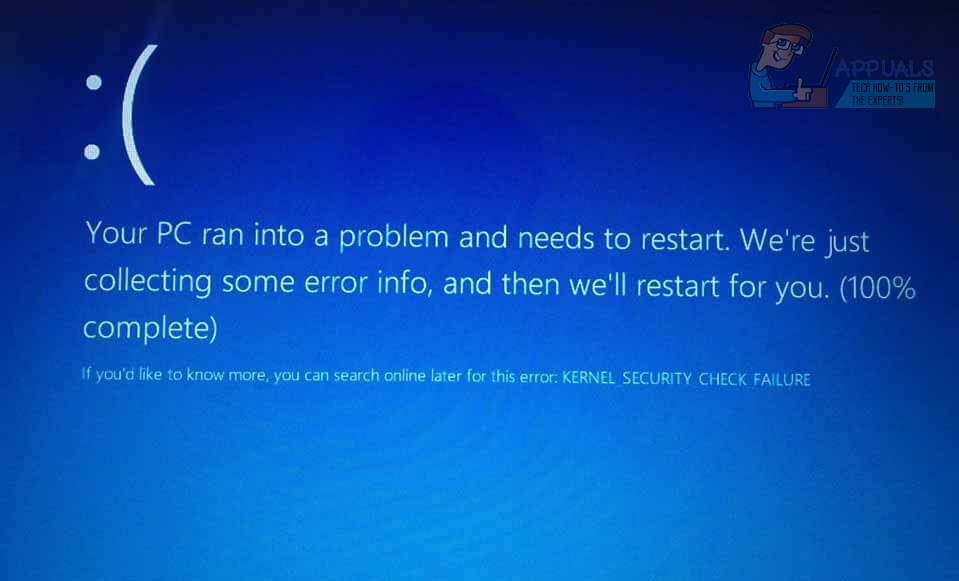
FIX: KERNEL_SECURITY_CHECK_FAILURE BSOD in Windows 10
Ever since late last year, many Windows 10 users have been suffering from and continue to suffer from a problem where their computer randomly shuts down, displaying a KERNEL_SECURITY_CHECK_FAILURE BSOD (Blue Screen of Death). In most cases, this issue is seen on computers with both an integrated Intel HD Graphics Processor and an NVIDIA GPU when launching Photoshop, another Adobe program or a completely unrelated program that is quite demanding of the host computer’s GPU. For some users, this issue starts wreaking havoc over their everyday lives out of the blue, whereas others start experiencing this issue after updating their NVIDIA GPU’s driver software to a version that contains this bug.
Blue Screens of Death not only cause a loss of progress and data but, in this case, also hinder an affected user from using affected programs. On the bright side, this Blue Screen of Death, like many others is completely fixable. However, on the not so bright side, there is not one universal cause behind this problem – there are quite a few different things that can give birth to this problem. That being the case, there is not one universal solution for this issue – there are quite a few, each of which has a pretty significant chance of being able to fix this problem for you.
The following are the most effective solutions that you can use to try and resolve this problem:
Solution 1: Change the default graphics processor for the affected programs
In most of the cases where the affected computer has two graphics cards, the cause of this problem is the fact that the program(s) that the affected user tries to launch right before they are faced with this BSOD are trying to use the integrated Intel HD graphics processor instead of the (probably) more powerful NVIDIA GPU. If that is the case, this issue can be resolved by simply changing the default graphics processor for any and all applications affected by this issue. If it wasn’t clear already, though, only affected users with computers that have both an Intel HD graphics processor and an NVIDIA GPU should use this solution. In order to apply this solution, you need to:
Right-click on the shortcut to an application that produces the KERNEL_SECURITY_CHECK_FAILURE BSOD whenever you try to launch it.
In the context menu, hover over Run with graphics processor.
Click on Change default graphics processor….
The NVIDIA Control Panel will open up in the right section and will already have the affected application selected.
Open the dropdown menu underneath Select the preferred graphics processor for this program.
In the dropdown menu, click on High-performance NVIDIA processor to select it.
Click on Apply to save the changes that you have made.
Restart your computer.
After your computer boots up, launch the affected application that you just changed the default graphics processor for, and it should be launched successfully. If you see the KERNEL_SECURITY_CHECK_FAILURE BSOD again, try one of the other methods listed and described.
If this issue is affecting more than one application on your computer, you are going to have to repeat the process described above for every single one of those applications.
Solution 2: Update your NVIDIA GPU’s driver software
More often than not, the cause of this issue is a bug in the version of your NVIDIA GPU’s driver software that you have installed on your computer. More than one of the many versions of driver software that have been released for NVIDIA GPUs have played host to this bug, and this bug has, in turn, wreaked havoc on the lives of many a Windows 10 user. If this issue is being caused by the specific version of your NVIDIA GPU’s driver software that you have on your computer, the easiest fix would (obviously) be to update the GPU’s driver software to the latest version. If you want to try and fix this issue using this solution, you need to:
Navigate to the NVIDIA GeForce website using an internet browser of your choice.
Click on Drivers.
In the Manual Driver Search section, select the kind of NVIDIA GPU that you have, the series that your NVIDIA GPU belongs to, the exact model number of your NVIDIA GPU, the Operating System that your computer is currently running on and your preferred language using the dropdown menus provided, and then click on Start Search.
The search will return the four most recently-released drivers for your NVIDIA GPU. Click on any one of them (it doesn’t matter which one as long as the one you select was released after the driver that you are currently having problems with).
Click on *Agree & Download.
Download the installer for the driver.
Once the installer for the driver has been downloaded, launch it and go through the onscreen instructions to install the newer version of your NVIDIA GPU’s driver software. During the installation, the installer will delete the driver that you previously had on your computer and install the newer driver.
After the upgrade is successful, check to see whether or not the issue has been fixed.
Solution 3: Roll back to an older version of your NVIDIA GPU’s driver software
In the case of many computer problems where a specific version of a device’s driver software is at fault, one of the most advisable plays – after, of course, updating the driver software – is rolling back to an older version of the driver software. The thing about older versions of driver software is that, if anything, they are pretty stable. If you failed to fix this issue using Solution 2 because there were no available updates for your NVIDIA GPU’s driver software, you may just be able to resolve this problem by rolling back to an older, more stable version of your NVIDIA GPU’s driver software. If you want to go ahead and try to solve this issue by rolling back to an older version of your NVIDIA GPU’s driver software, here’s what you need to do:
Right-click on the Start Menu button to launch the WinX Menu.
In the WinX Menu, click on Device Manager.
Double-click on the Display Adapters section to expand it.
Right-click on your NVIDIA GPU.
Click on Properties in the context menu that shows up.
Navigate to the Driver
Click on Roll Back Driver.
Click on Yes.
Follow the onscreen instructions (if any) and Windows will roll back your NVIDIA GPU’s driver software to the version that was previously installed on your computer.
Solution 4: Delete the sniffer.exe file
Many users suffering from this problem – in particular users suffering from this problem when launching Photoshop – have had incredible success with fixing this issue by deleting a file named sniffer.exe (or sometimes sniffer_gpu.exe) from the directory where Photoshop is installed. To use this solution, you need to:
Hold down the Windows Logo key, and while doing so, press E to launch the File Explorer.
Navigate to the following directory:
X:\Program Files\Adobe (or Adobe CC)\Adobe Photoshop CC 2015
Note: X is to be substituted with the drive letter corresponding to the partition of your HDD/SSD that Windows is installed on.
Locate a file named exe. The file may also, in some cases, be named sniffer_gpu.exe.
Move this file to your Desktop.
Restart your computer.
Once your computer boots up, try launching Photoshop. If Photoshop launches successfully and you don’t see the KERNEL_SECURITY_CHECK_FAILURE BSOD, delete the exe or sniffer_gpu.exe file from your Desktop.