How to Increase Signal Strength for Weak Wifi Signal on Linux
WiFi signal integrity is a major issue for many Linux users, but there’s unfortunately a great deal of static regarding the issue. Some people actually shy away from using any distribution of Linux because they believe they’ll lose the ability to work with wireless Internet if they do so. This isn’t the case at all. There are four different primary ways of improving wireless signal reception on Linux, and they all involve software driver fixes. If you’re experiencing problems you may wish to look elsewhere first, however. Users of internal WiFi cards, like those present in most notebooks and netbooks, should ensure that they’re tightly attached. Take a moment to locate the panel that conceals the card on the bottom side of your device if needed, and open it only after switching your machine off. Make sure that it’s attached properly. Likewise, if you’re using some kind of USB WiFi dongle, then you’ll want to make sure it’s making a good connection before going ahead with any of the Linux software methods of improving wireless signal reception.
Method 1: Using a Proprietary WiFi Driver
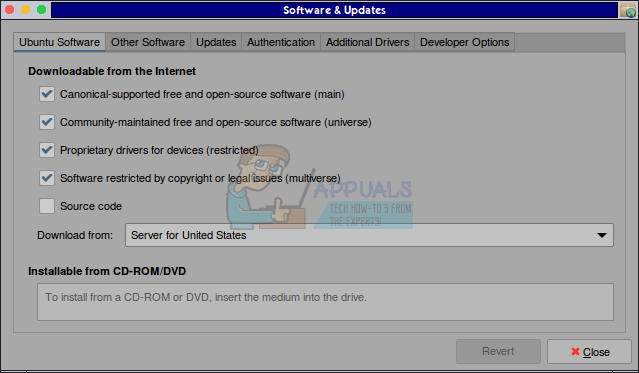
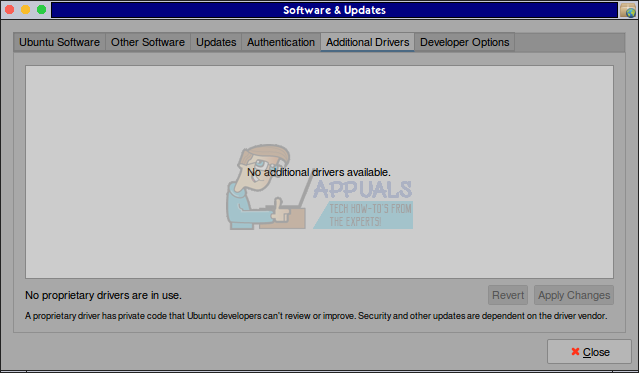
Users of Ubuntu will want to open up the Software & Updates application by either clicking on the Dash and selecting it from Applications or by searching for it by typing in the Dash bar. Xubuntu, Kubuntu and Lubuntu users can click on the Applications menu or hold down Alt+F1 and navigate to Preferences to find the application. Click on the Additional Drivers Tab and wait a moment. A message telling you that it’s currently searching for additional drivers will greet you. If you’re having trouble getting any WiFi connectivity at all, then you’ll need to attach an Ethernet cord to get the program enough of a connection to the Internet to look for drivers. Should any driver names appear in the box, then you have the option of clicking on them and selecting the Apply Changes button to install the driver. Make sure that the name of the driver in question matches the name of the wireless adapter you’re using. Most users dealing with these issues will probably have Realtek, Broadcom, Marvell, Lucent or Intel hardware. Users of Qualcomm Atheros devices shouldn’t proceed with the installation in most cases.
You may see a message about not having found any additional drivers, which could indicate that you’ve already installed a driver. It might also mean that your kernel didn’t detect your hardware, or you’re using Qualcomm Atheros hardware that’s fully supported by an open-source solution.
Wait a few moments if you’ve selected a driver so that it can install. You’ll receive a message that installation has completed. Click on the close button to exit the window. Should the gksu prompt have come up at any time during this process, then you can simply use your normal administrator password and the enter key to proceed. Please note that users of Free Software Foundation approved Linux distributions won’t have this option. Those who use Trisquel or Fedora will have to immediately move on to Method 4 in order to proceed.
Method 2: Removing Proprietary WiFi Drivers
Users of Linux Mint, the various *buntu distributions, and some Debian-derived distributions might sometimes have installed some type of proprietary hardware drivers when configuring their system for the first time. Alternatively, you might find that the steps in Method 1 actually caused some sort of unexpected problem. In either case, the same process run in reverse will clear up the issue. Open the Dash, Applications or Whisker menu and select the Software & Updates application a second time. Select the Additional Drivers tab a second time. Either click on the alternative driver you installed or use the cursor keys to highlight it and then select the Revert button to roll your previous driver back. Once again this will take a few moments, and the kernel will need to detect your wireless hardware once again. You may be told that the system needs to restart before refreshing the driver. If this is the case, then you’ll need to save all work in any open programs before proceeding. You’ll be using the previous open-source driver as soon as the system comes back up. While running the Software & Updates application you’ll potentially run into the gksu prompt, because you’re not currently operating as root. Users of *buntu distributions may also have the root user hashed out. If this is the case, then you’ll simply need to enter your administrator password and push the enter key to continue.
Method 3: Choosing Proprietary Drivers During the Installation Process
Many Linux distributions allow users to search for additional drivers when installing the operating system. Assuming you have written an ISO file to a USB memory stick or SD card and booted from it, you may go so far as to select your language. The graphical installation software used by *buntu distributions, Linux Mint and Bodhi Linux offers a check box that reads “Install this third-party software,” which you should check by clicking on it. This will also install MPEG Layer-3 codecs as well as Flash player. Individuals using the alternate installer ISO image for Lubuntu will receive the same prompt in a window generated by ncurses. Highlight the check box by pushing the down key until the cursor flashes over it and then push the space bar to select it. This will ultimately have the same effect on the installation software and should install proprietary wireless drivers. In either case, proceed with the installation as normal. You may have the installer ask you to connect to a wireless connection during the process, though this is somewhat unlikely if you’re already using an Ethernet cord for connectivity. Should this be the case, use the cursor keys to highlight your connection and then push the enter key to select it. Type in the code found on your WiFi modem to continue. Users of the aforementioned graphical installer can instead click on the connection to make use of it. Naturally, if you’ve changed your code then you’ll need to use the new one you’ve set. Once again, the Free Software Foundation won’t give its seal of approval to software solutions relying on these sorts of drivers. Therefore, if you’re using Fedora, Trisquel or any other distribution that relies solely on free software like the Arch Linux derivative Parabola GNU/Linux Libre you won’t be able to use this technique. You may find that the openSUSE installer doesn’t have it either.
Method 4: Improving Wireless Signal Reception with the Command Line
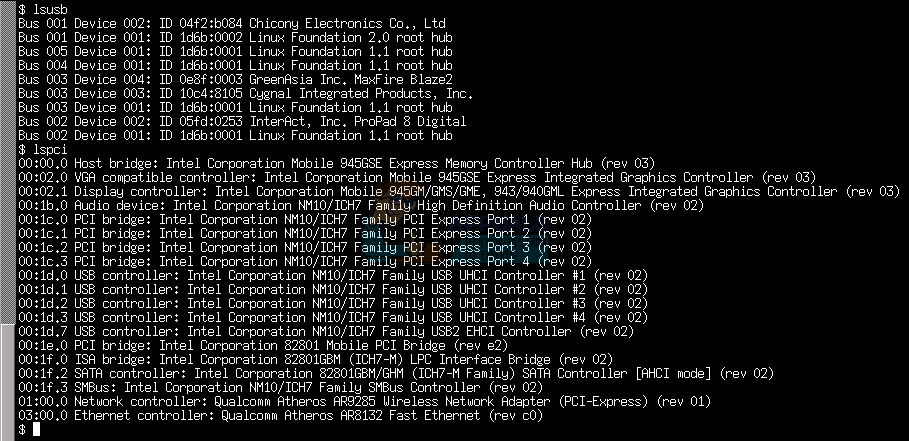
You might find that Windows 10, OS X or another operating system you can boot your machine to works fine with your WiFi card, but you have some sort of weak signal reception conditions in Linux. The other methods might also not have worked. You can try using a couple of commands from the command line to fix the issue if that’s the case. This will more than likely only work if you’re using an open-source wireless driver. You’ll need to know the name of your wireless device to continue. Open a standard command terminal by holding down Ctrl, Alt and T at the same time. You might also want to alternatively select the Dash, Applications or Whisker menu and open Terminal by clicking on it or selecting it with the cursor keys and pushing the space bar. Type lspci to find a list of PCI devices attached to your system. If you know the name of the hardware vendor, then you can type lscpi | grep -i name while replacing the name label with the name of the vendor in question, like Realtek or Intel. In most cases, you won’t have enough devices to worry about searching through the list. You can usually just glance at the output and find it quickly. This will only work if you’re using a built-in wireless adapter. Users of USB equipment should run lsusb or lsusb | grep -i wireless to find the adapter’s name. Most users will have even less USB equipment attached to their system, so the list should be short. If you’re finding that your adapter isn’t at all listed amongst the output in lsusb, then you should go back and try lspci anyways.
Note that you don’t need to operate as root to run either of these commands. Once you’ve found the number of your particular wireless adapter, you can try typing sudo modprobe -rv NAME at the command line and pushing enter followed by sudo modprobe -v NAME ant_sel=1 and pushing enter a second time. For instance, if you were using the Realtek 8188eu driver you could try sudo modprobe -rv rt18188eu followed by sudo modprobe -v rt18188eu ant_sel=1 while pushing the enter key after each of these. Users of the Realtek 8723be wireless driver would want to use rt18723be in place of rt18188eu in those commands. Note that GPL drivers for Ralink equipment should work the same way, but you may have some issues if you don’t use Realtek hardware. Fortunately, all Realtek drivers should function more or less the same.
Don’t worry about messing up the system when trying this. If you’ve found that you’ve lost the Internet totally, then you can always hold down Alt+F4 at the desktop and select restart, restart from the Applications menu or type reboot at the CLI prompt and push enter to reboot your system and reload the standard drivers. Make sure to save any progress in any other software before continuing. Note that this process doesn’t make the changes permanent. There are some guides out there that claim you should add the commands to a startup script, but this isn’t right and they’ll just be negated that way. From the command line, run
to make it permanent, replacing the name with what worked before. Only use this option if it previously worked. For instance, using one of those realtek drivers, you might want to use the command:
Once you’ve done so, try manually rebooting again to make sure that the options stuck. If you got any sort of error about tee not being installed, then you can try this line:
Owners of single-user Fedora systems who are having some difficulty with their administrator password after running sudo can set their system up to allow their user account password to work with sudo the same way it does on some other distributions. Type su – to become the root user and enter the root user’s separate account password. From the # prompt you receive, type usermod myName -a -G wheel while replacing myName with your actual user name. Then you can run the
command from before like normal.
What about laptop windows