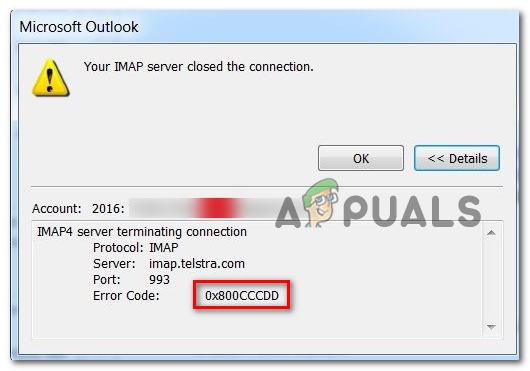
Resolving Outlook Error 0x800CCCDD ‘Your IMAP server closed the connection’
Some Outlook users are reporting that they consistently get the 0x800CCCDD error (‘Your IMAP server closed the connection‘) whenever they send or receive emails via an IMAP account. This particular error code is signaling that the Send/Receive feature has failed.
As it turns out, there are several different causes that might end up causing this Outlook IMAP problem:
- Error is triggered by Send/Receive Groups – Most commonly, this error will be caused by an outlook feature called Send/Receive Groups. In this case, you can fix the issue with no repercussions simply by accessing the Send/Receive Groups settings in Outlook and turning the feature off.
- Glitched temporary data – In case the problem started to occur after an unexpected machine interruption or after an AV scan, it’s likely that you’ll be able to fix the problem simply by re-adding the problematic email account in Outlook in order to clear any temp data.
- Corrupted PST file – Your Outlook Data File can also be the root cause of this issue if it becomes corrupted. If you can’t afford to delete it, you can attempt to repair it with the ScanPST.exe utility.
- Corrupted Outlook Profile – If you’re only seeing this error while connected through IMAP protocol, you should start considering that you might be dealing with a corrupted Outlook profile. In this case, create a new Outlook profile and re-sync your account to fix the issue.
- Insufficient Server Timeout – By default, Outlook is forced to complete send & receive operations in a certain timeframe. If your Internet connection doesn’t make this possible, you might see the error after a server timeout. If this scenario is applicable, you should stop any error messages of this kind from appearing by extending the default server timeout.
- IMAP not supported by email provider – You might also see this error if your email provider is restricting IMAP communications. One workaround, in this case, is to use the POP protocol instead.
- Incorrect Time & Date – This error can also appear in your local time & date is way off when compared with the date & time on your server. To fix this issue, simply change your local time to the correct date & time values.
Method 1: Disabling Send & Receive Groups Feature
As it turns out, in the majority of documented cases experiencing this issue, the issue turned out to be caused by the Send / Receive feature. Keep in mind that this feature isn’t meant to work with IMAP connections – IMAP has the ability to sync on itself without the help of Outlook.
So if you receive the 0x800CCCDD error with an IMAP server, the error you receive isn’t actually something that will inhibit the sending or receiving of emails on your email box. All you need to do in this case is to turn off the Send / Receive feature manually from Outlook’s settings in order to allow your IMAP server to take full control of the operations.
Going this route will not resolve the issue since you will still get the error at every Outlook startup. But on the upside, you will be able to send or receive emails with no issues.
Note: If you are looking for a permanent fix that will fix the underlying cause of the issue, move directly to Method 2.
Here’s a quick step by step guide on turning off the Send / Receive feature from your Outlook settings in order to fix the issue:
- Open Outlook and wait for it to sync with your IMAP account. If you’re not signed in, sign in with the account that you’re having issues with.
- Once you are successfully signed in, click on the Sign / Receive tab from the ribbon menu at the top. Next, click on the Send/Receive Groups drop-down menu and click on Define Send/Receive Groups from the list of available options.
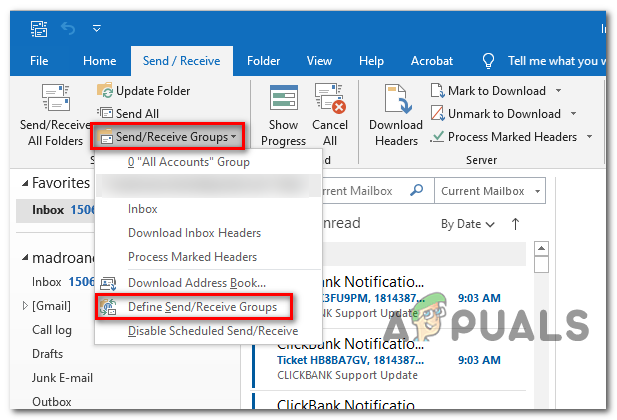
Accessing the Define & Receive Group - Once you’re inside the Send/Receive Groups menu, select All Accounts from under Group Name, then move to the Setting for group ‘All Accounts’ and uncheck the box associated with Schedule an automatic send/receive every * minute.
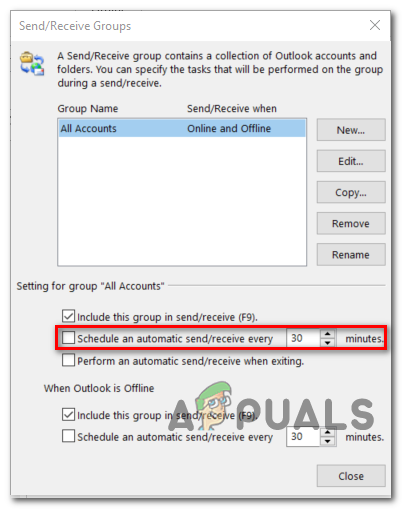
Stopping Automatic Email Sending in Outlook for IMAP - After you make the modification, click the Close button and restart Outlook.
- Attempt to send an email or send yourself a test and see if you’re still encountering the 0x800CCCDD error code.
In case the same problem is still occurring or you’re looking for a permanent fix, move down to the next potential fix below.
Method 2: Re-adding Email account
As it turns out, this issue can also occur due to corrupted temporary data belonging to the email account that is currently connected with Outlook. After an AV scan or after an unexpected machine interruption, some temp files might become corrupted so Outlook will be unable to sync data properly.
In this case, you can fix the issue swiftly by recreating the email account once again (from scratch) using the Mail menu in Control Panel. This method was confirmed to be successful by a lot of affected users.
Here’s a quick step by step guide on re-adding the problematic email account using the Mail Windows program:
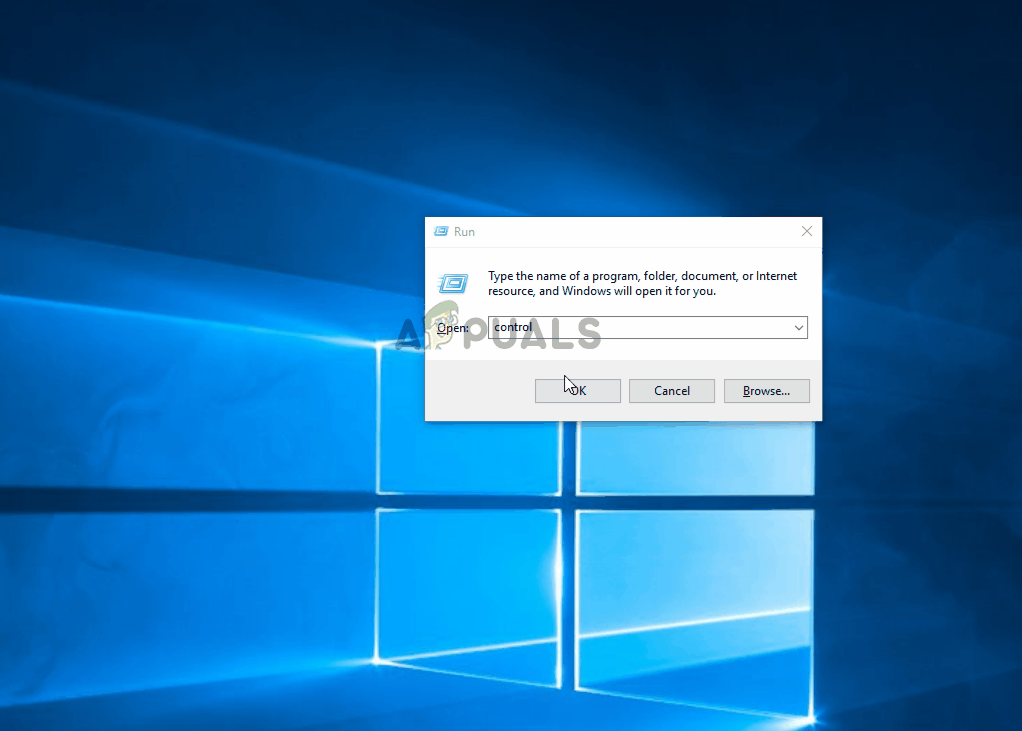
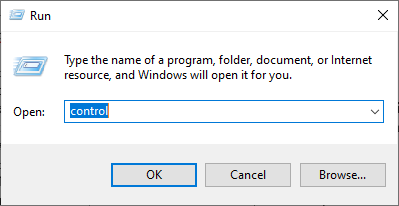
- Open up a Run dialog box by pressing Windows key + R. Next, type ‘control’ and press Enter to open up the Classic Control Panel interface.
- After you arrive inside the Classic Control Panel interface, use the search function in the top-right corner of the screen to search for ‘mail’.
- Next, from the list of results, click on Mail (Microsoft Outlook) from the list of results.
- Once you’re inside the Account Settings window, select the Email tab and click on the New… button.
- From the Add Account window, go ahead and insert the name, the email address and the password before clicking next to complete the process of adding a new account.
- After the new account is successfully configured, return to Account Settings > Email and delete the old account (the one that you suspect of being corrupted). You can do this by selecting and clicking on Remove.
- Finally, select the newly created email and click on Set as Default.
- Open Outlook again, sign in with the same email that you were previously having issues with and see if the problem is now resolved.
In case you’re still encountering the 0x800CCCDD error, move down to the next potential fix below.
Method 3: Running the ScanPST.exe utility
If the first to methods above weren’t effective in your case, you might be able to fix the issue using the built-in email repair tool – Inbox Repair Tool (ScanPST.exe). This tool is present in every recent Outlook version and is capable of performing general troubleshooting on .PST files.
In case the problem originates from the personal folder profile, scanning the Outlook data with the ScanPST.exe utility should allow you to fix the issue swiftly.
Here’s a step by step guide on repairing the Outlook data file with the ScanPST.exe utility:
- Start by closing Outlook and any related processes.
- Next, open File Explorer and navigate to one of the following locations (depending on the OS architecture that you’re using):
C:\ Program Files - 64-bit Versions
C:\ Program Files - 32-bit Versions
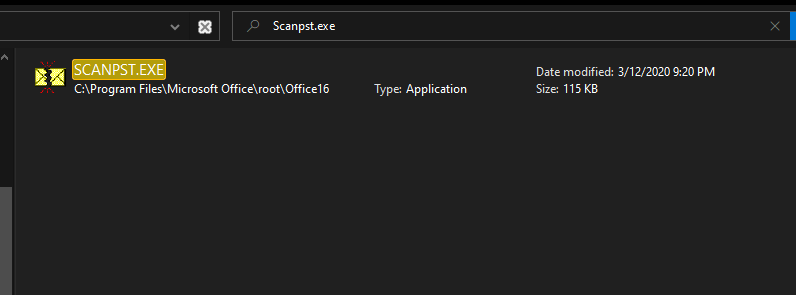
- Once you get to the correct location, use the search function in the top-right corner to search for ‘SCANPST.exe‘ and double-click on it from the list of results.
Opening the ScanPST.exe utility Note: In case you can’t find the SCANPST executable via the search function, you can attempt to find it manually in one of the following locations:
2016: C:\Program Files (x86)\Microsoft Office\root\Office16
2013: C:\Program Files (x86)\Microsoft Office\Office15
2010: C:\Program Files (x86)\Microsoft Office\Office14
2007: C:\Program Files (x86)\Microsoft Office\Office12
- Once you manage to find the PSTScan.exe utility, open it and click Browse to set the path of your PST file. After you manage to load the correct file into the Inbox Repair tool, click Start to scan for corruption.
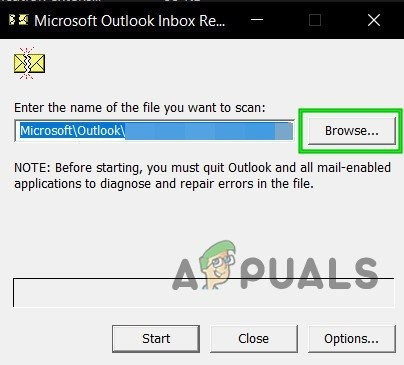
Browse to Corrupted PST File Note: The default location of the PST file is in Documents \ Outlook Files.
- After the operation is complete, you will be shown a dialog box with the errors and inconsistencies that were found. Before you click Repair to start the process, it’s a good idea to check the box associated with Make backup of scanned file before repairing.
- Once the operation is completed, start Outlook and see if the problem is now resolved.
In case you’re still encountering the same 0x800CCCDD error, move to the next potential fix below.
In case the problem is still not resolved, move down to the next potential fix below.
Method 4: Creating a new Outlook Profile
If the first two fixes didn’t work and you’re still encountering the 0x800CCCDD error consistently while your IMAP account is connected to Outlook, you might want to remove the current local Outlook profile completely before re-syncing your account once again.
This operation has been confirmed to be successful for a lot of users that we’re consistently encountering the Your IMAP server closed the connection‘ error.
Here’s a quick step by step guide that will show you how to remove the current Outlook profile and create a new one from scratch:
- Start by closing Outlook and any associated services.
- Next, press Windows key + R to open up a Run dialog box. Next, type ‘control.exe’ and press Enter to open up the Classic Control Panel window.
Accessing the Classic Control Panel interface - Inside Control Panel, scroll down through the list of items and click on Mail (Microsoft Outlook).

Opening up the Mail app Note: You can use the search bar to find it easily.
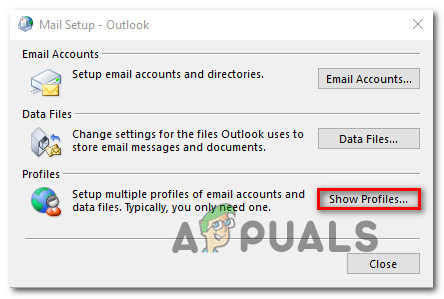
- Once you arrive inside the Mail Setup window, click on Show Profiles under Profiles.
Accessing the Profiles menu - From the main Mail menu, select the Outlook Profile that you are actively using and click on Remove to get rid of it.
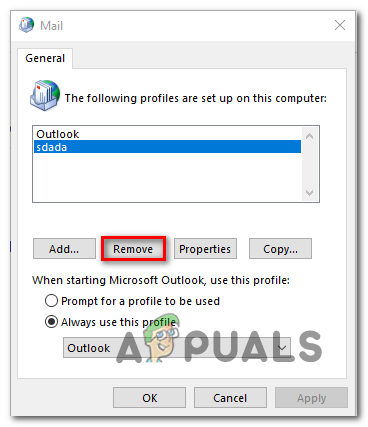
Removing your Outlook email profile Note: If you have any important information on the local email account data file (.PST or .OST), it’s a good idea to back it up at this point.
- At the confirmation window, click Yes to finish the removal process.
- Start Outlook again and complete the steps required to configure your email account again. Keep in mind that since you previously deleted the Outlook data file, your email client will be forced to create a new one from scratch and attach it to the new profile.
- Sync Outlook and attempt to send or receive a test email to see if the problem is now resolved.
In case the same problem is still occurring, move down to the next potential fix below.
Method 5: Extending server Timeouts
In case you are only encountering the 0x800CCCDD error when you use a Gmail account with Outlook, it’s likely that you’re dealing with a server timeout issue.
Outlook is built to work with a certain timeframe in which it needs to complete sending and receiving procedures. By default, that time is set to 1 Minute, but depending on the Internet connection and the load on your network, that might not be enough.
If this scenario is applicable, you should be able to fix the issue by making some amendments to the default Send/Receive Groups settings, boosting the Server Timeout to 10 minutes in order to avoid the Your IMAP server closed the connection error.
Here’s a quick step by step guide on ensuring that you give your email client enough time to complete the exchange of data by boosting the Server Timeout value:
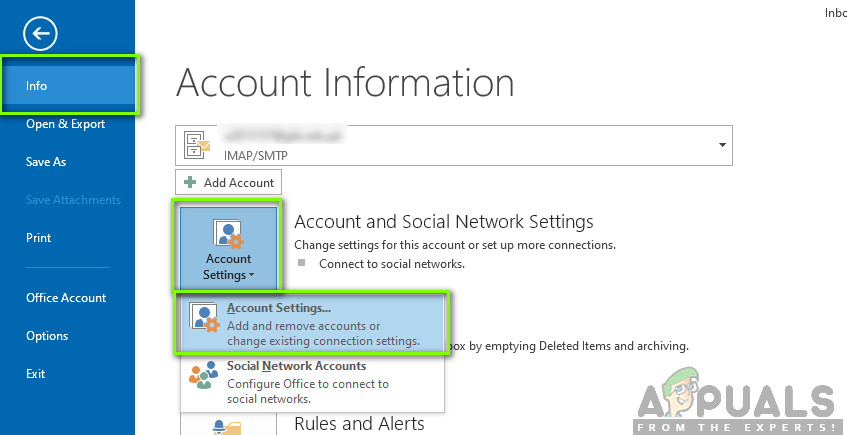
- Open your Outlook program and click on File from the ribbon bar at the top. Once you get there, go to the Info tab and click on Account Settings > Account Settings.
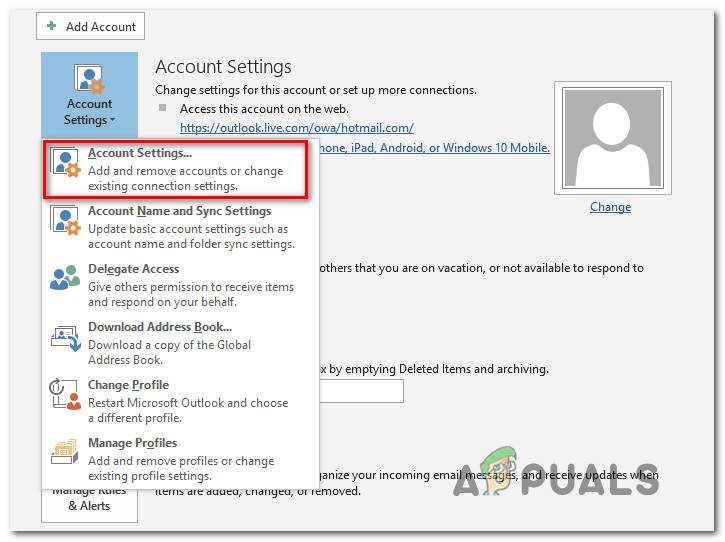
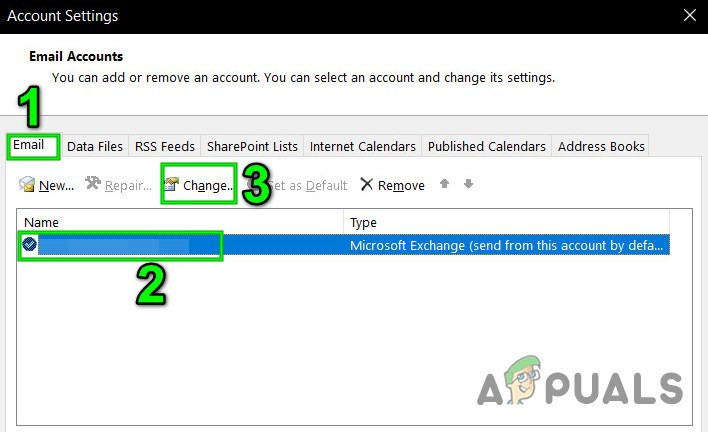
Accessing the Account Settings menu of Outlook - From the Account Settings menu, click on the Email tab, then select the email that you’re having issues with and hit the Change button from the list of context options available.
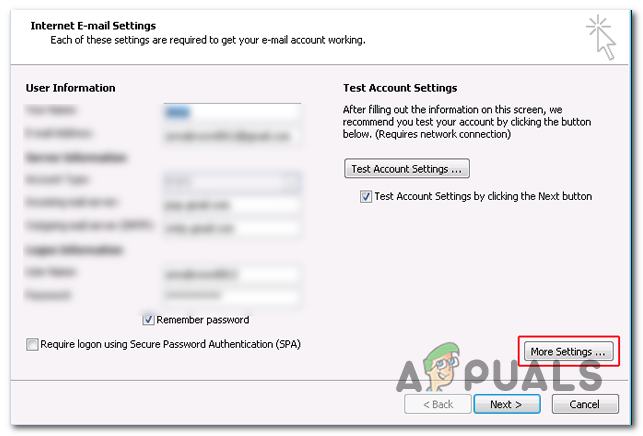
Click Change in Outlook Account Settings - After you get to the next menu, click on the More settings button (bottom-right section of the screen).
Accessing the More Settings menu of Outlook - From the Internet E-mail Settings menu, select the Advanced tab and change the slide bar associated with Server Timeouts to Long (10 Minutes).
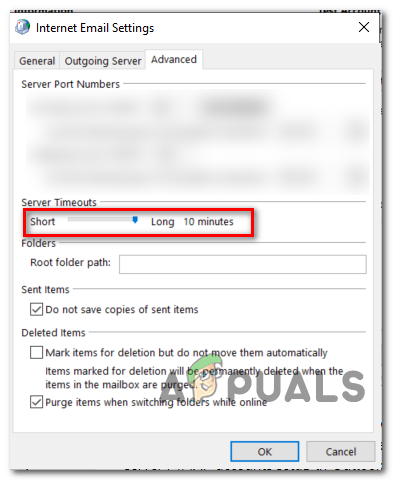
Modifying Server Timeouts to Maximum Value - Click Ok to save the modifications.
- Reboot your machine and see if the problem is resolved once the next startup is complete by opening Outlook and trying to send a test email.
In case the same 0x800CCCDD error, move down to the next potential fix below.
Method 6: Using POP Instead of IMAP
In case you are encountering this issue with a Gmail account and none of the potential fixes above have worked for you, you can simply switch to a POP manual connection instead of IMAP (Internet Message Access Protocol) and eliminate the 0x800CCCDD error.
This is more a workaround rather than a fix, but a lot of affected users have confirmed that this was the only thing that allowed them to get rid of the Your IMAP server closed the connection‘ error for good.
Keep in mind that with Gmail, you will need to enable POP (Post Office Control) from your Gmail account settings before you can connect it with Outlook.
Here’s a complete guide on enabling POP in your Gmail Settings and then connect it with your Outlook account:
- Access Gmail (here) and connect with your Google account.
- Next, click on the gear icon (top-right corner) and then click on Settings from the newly appeared context menu.
- Once you’re inside the Settings menu, select the Forwarding and POP/IMAP tab from the horizontal menu at the top.
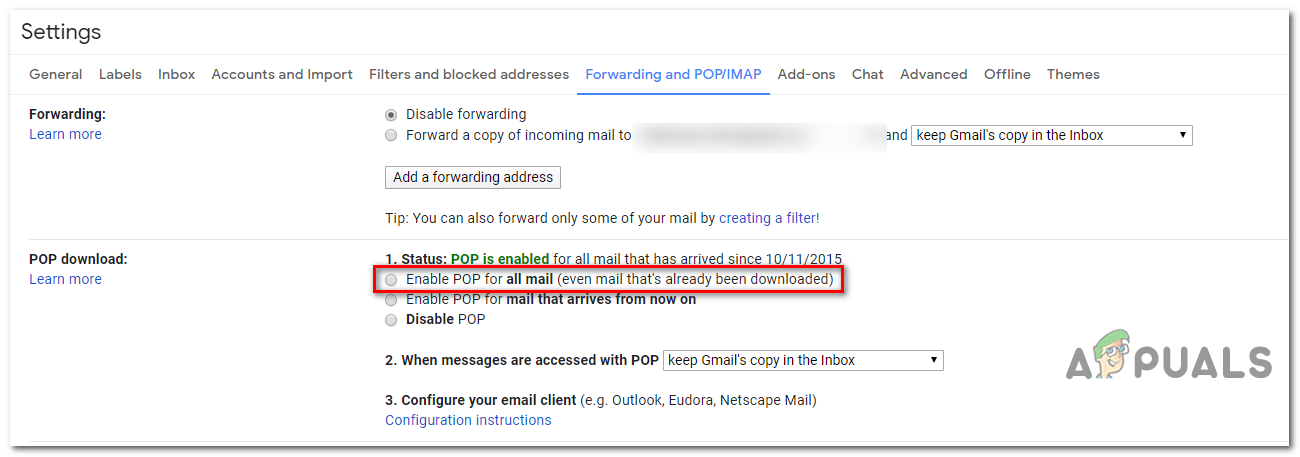
Accessing the POP/IMAP settings - Next, scroll down to the POP download section and select the toggle named Enable POP for mail that arrives from now on.
- Then, click on the drop-down menu associated with When messages are accessed with POP and click on keep Gmail’s copy in the Inbox.
- After you made the necessary changes, click on Save Changes, then exit Gmail’s settings.
- Open Outlook and click on the File tab at the top, then click on Info from the newly appeared menu.
- Next, click on Account Settings to reveal the drop-down menu, then click on Account Settings.
Account Settings – Outlook - Once you’re inside the Account Settings menu, click on the Email tab and then click on New.
- Inside the Add Account dialog box, enter your name, Gmail address, and password. Outlook should then fill the rest of the details for you.
Note: In case the details aren’t filled in automatically, select Manual setup or additional server types and click Next. - At the Choose Service screen, select POP op IMAP and click on Next.
- Use the following settings for Gmail POP:
Gmail POP server address: pop.gmail.com
Gmail POP username: Your Gmail address (e.g. example@gmail.com)
Gmail POP password: Your Gmail password
Gmail POP port: 995
Gmail POP SSL required: Yes
- Click Next in order to allow Outlook to test the connection to determine if it’s able to download an email from Gmail.
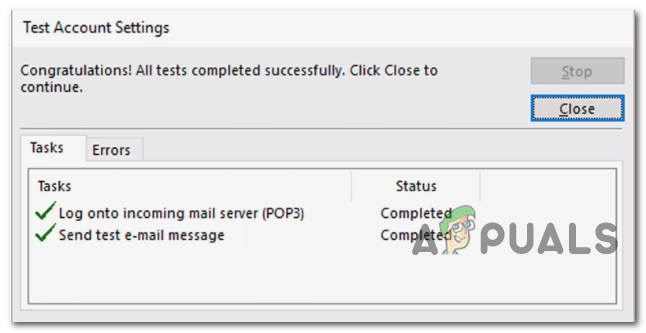
Testing the POP email connection - If you get a success message, you have successfully managed to connect with GMAIL POP and eliminated the 0x800CCCDD error.
In case the same issue is still occurring, move down to the next potential fix below.
Method 7: Adjusting the Date & Time
One other cause that might end up causing the 0x800CCCDD error is a big difference between your local time when compared with the time on the server. This can be facilitated by a bad CMOS battery.
If this scenario is applicable, you should be able to fix the issue by bringing the date, time and timezone values to the correct values from the Date & time settings menu. Several affected users have confirmed that this operation finally allowed them to get the issue resolved.
Follow the instructions below to set the correct date & time:
Note: The instructions below are universal and will work regardless of your Windows version.
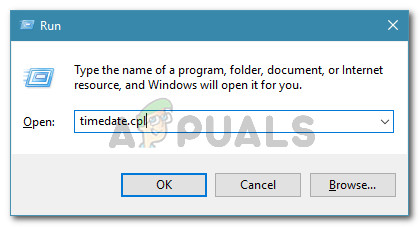
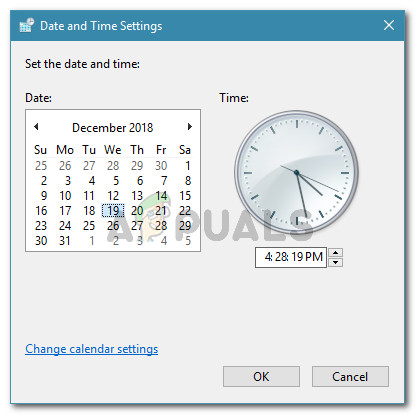
- Press Windows key + R to open up a Run dialog box. Next, type ‘timetable.cpl’ and press Enter to open up the Date & Time window.
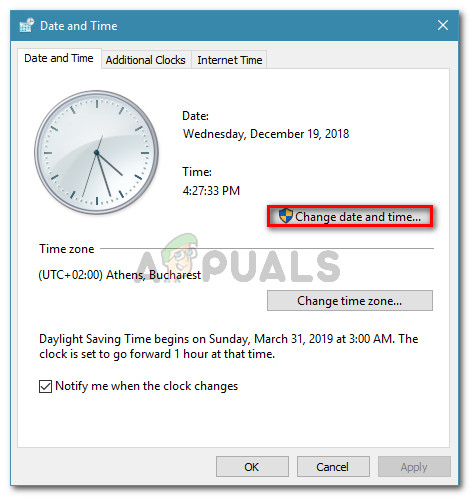
Opening the Date and time window - Once you find yourself inside the Date & Time window, select the Date and Time tab and click on Change date & Time.
Setting the correct date and time Note: When you are prompted by the UAC (User Account Control) window, click Yes to grant administrative privileges.
- At the next menu, set the correct time, then use the calendar to select the appropriate values according to your own timezone and click Ok to save the change.
Modifying Time & date - After the settings have been modified successfully, restart your computer and see if the 0x800CCCDD error is resolved by opening Outlook.