How to Use a Mouse with Your iPad or iPhone?
With the release of iPadOS & iOS 13 in September 2019, the iPad & iPhone can now use mice & external trackpads (the user experience is not like desktops). The feature will not add full mouse support to the devices and will not turn them into MacBook replacement. It’s just an accessibility feature that was in demand for quite a time and it is an expansion of the existing capabilities of AssistiveTouch and will make it quite easy to interact with Apple devices. but it will not make your mobile device work as a laptop.

Mouse support on iPad & iPhone is still in the early days and is not enabled by default. It is hidden deep within the iPad & iPhone’s Accessibility settings. And even after attaching a mouse, either through a Bluetooth or wired connection, you have to deal with an ugly circular cursor mimicking a human fingerprint & a few more interface complications. The feature does not quite work as per the expectations until now, after all, it is an Accessibility feature. Keeping that in mind let us explore the feature
Connecting a Mouse to Your iPhone/iPad
Any type of mouse can be connected to the iPhone or iPad, including:
- Bluetooth mice
- Wired USB (even PS-2 with adapter) mice
- Wireless mice by using an RF dongle
Connecting a Bluetooth Mouse
Before moving on make sure the Bluetooth mouse and the iPad/iPhone device are in the range, the Bluetooth has sufficient charge and not paired with any other device (if so, unpair it). Apple’s Magic Mouse 2 will work through a wired connection, but considering the awkward charging method, it is not going to work. The good news is that the 1st generation Magic Mouse works fine. Now on your iPhone or iPad:
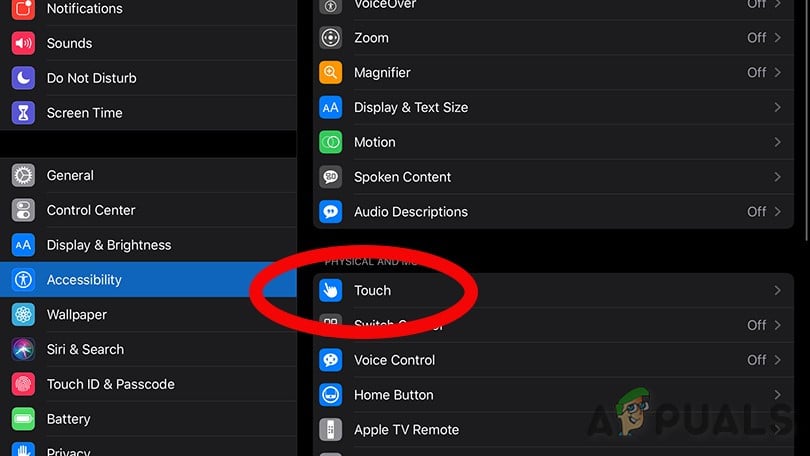
- Open Settings
- Then tap Accessibility
- Then under Physical and Motor tap Touch.
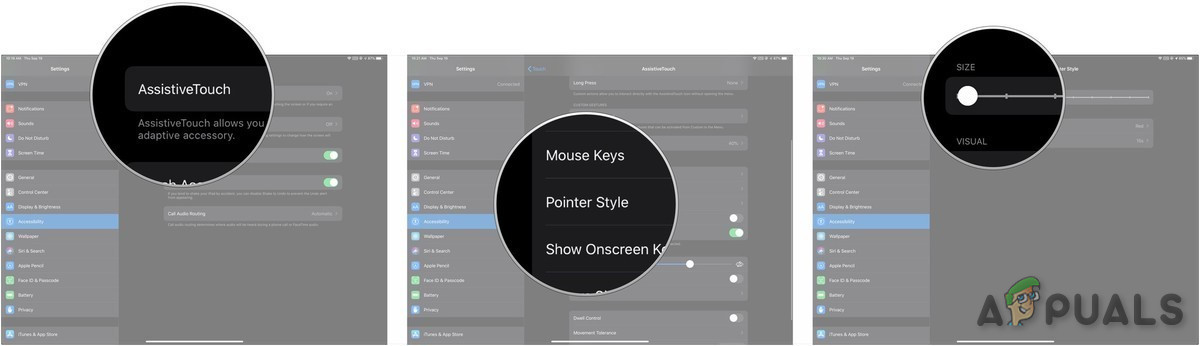
Touch Settings - Now Find AssistiveTouch then Tap the switch next to AssistiveTouch to turn it in green ‘on‘ position (if not in on position).
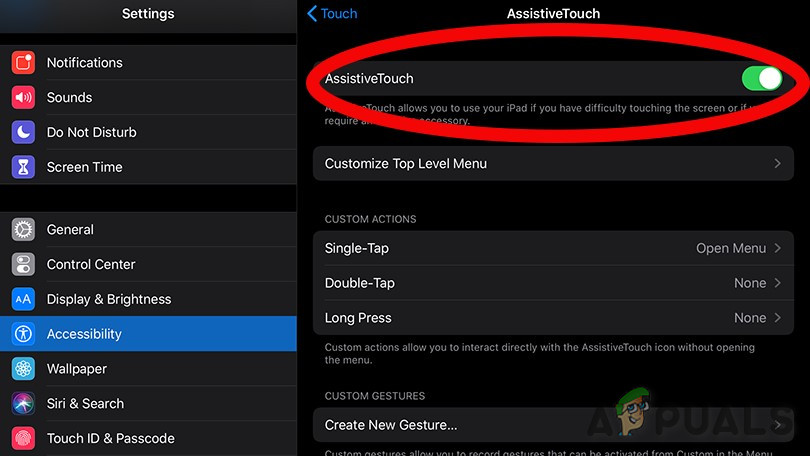
Turn on the AsssisttiveTouch - A small white circle (AssistiveTouch home button) will appear on the screen of the device, which is normal. You can tap this button to perform many iPadOS & iOS tasks one-handed.
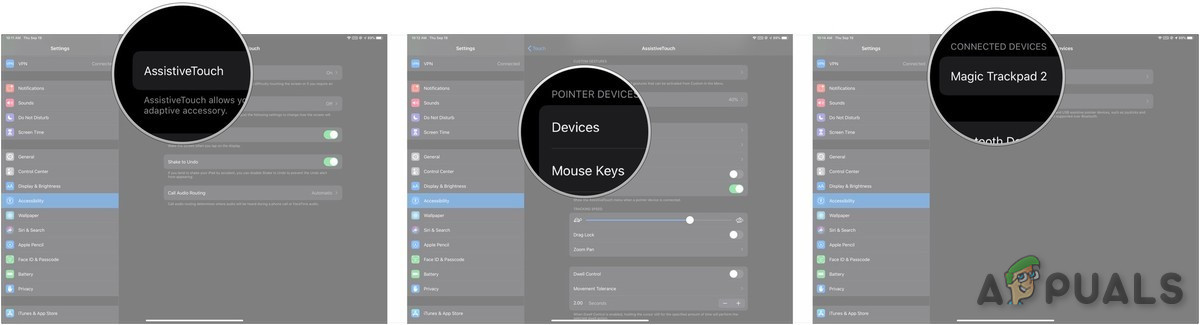
- Now tap on “Pointer Devices”
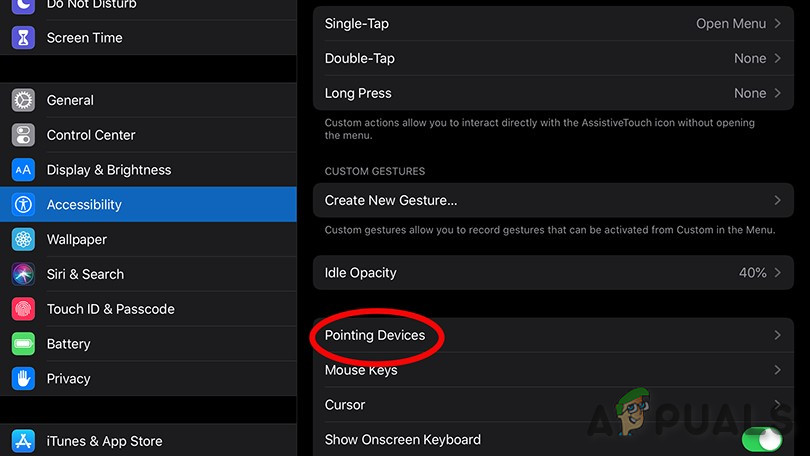
Pointing Devices - And tap on the “Devices.”
- Now turn the Bluetooth mouse to discoverable/pairing mode & on iPad/iPhone Tap on “Bluetooth Devices” to start the pairing process.
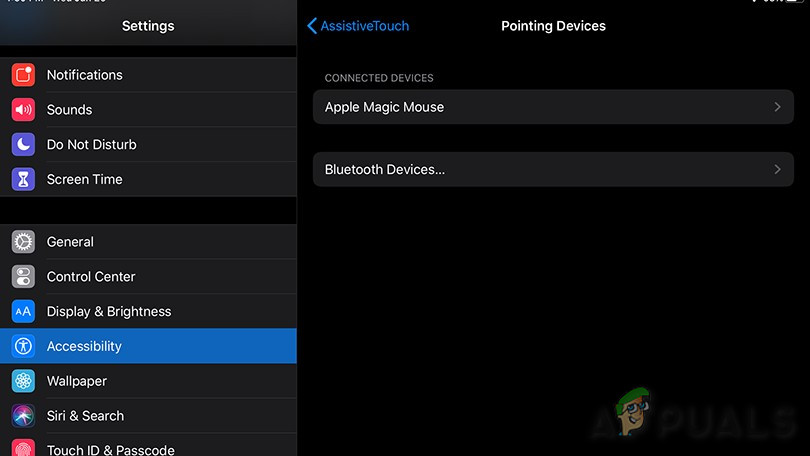
Bluetooth Devices - Now a list of available Bluetooth devices to pair with will appear. Find out the Bluetooth mouse & tap on it. If a request for a PIN pops up, enter the PIN of the devices e.g. for Magic Mouse 1 the PIN is 0000.
- Now the Bluetooth mouse will be paired and should be good to go. A circular cursor will appear on the device’s screen. Now start using the mouse to check its functionality.
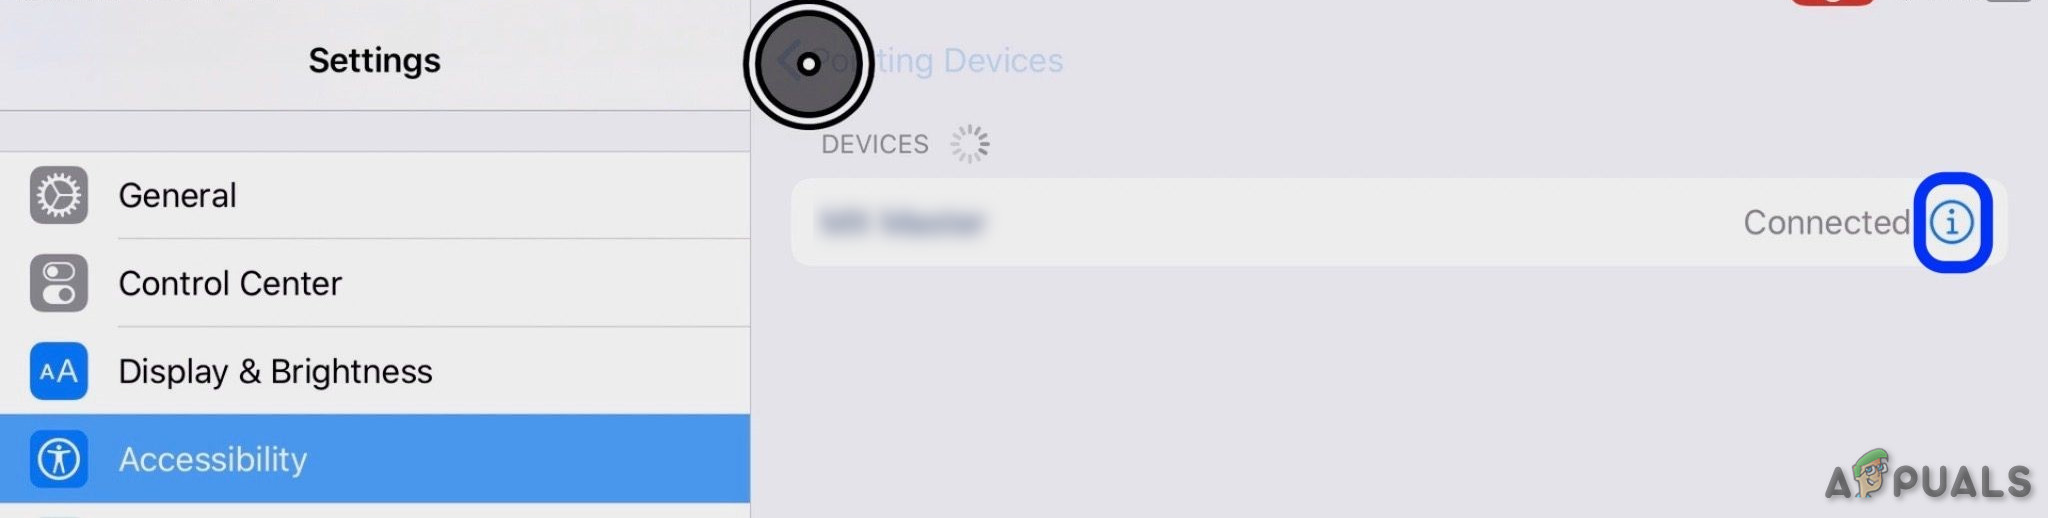
- You can also unpair the mouse from the iPad/iPhone. To do so, go to Settings>Bluetooth, next to the name of the Bluetooth mouse, tap the blue letter “i” icon and then tap the “Forget This Device”.
If the iPad/iPhone cannot be paired with the Bluetooth mouse, then restart the iPhone/iPad device & the Bluetooth mouse. Now once again try to pair then. Hopefully, now they will be paired. Moreover, there is no list of compatible mice with IOS 13/ iPadOS 13 is issued by Apple, the only way to know the compatibility is by trial and error.
Connecting a Wired Mouse
To set up a wired mouse to use with the iPad/iPhone is awkward than it to set up a Bluetooth mouse. Keep in mind that anything hooked up below a generic laser mouse will get you a message “Cannot use accessory, this accessory requires too much power”.

Apple’s Camera Connection Kit, which is now called Apple’s Lightning to USB Camera adapter, is required to connect a wired mouse to the iPhone/iPad. This Lightning-to-USB accessory was designed for transferring images to your device’s storage from a digital camera.
If iPad Pro used is one of the latest that have a USB Type-C connector, and the mouse, to be used, has an older USB Type-A mouse, then a USB-C to USB adapter will be used. And if the mouse, that will be used, is compatible with USB-C then just plug the mouse straight in. Basic instructions to follow are
- Connect the mouse to the USB port of the Lightning jack.
- Then connect the Lightning jack to the iOS/iPadOS device.
- Go to Settings
- Then tap Accessibility
- Then tap
- Select “AssistiveTouch” & switch it on.

Connecting a Wireless Mouse with a Dongle
Wireless mice with dongles use a small radio frequency to communicate over short distances. Since the mouse & the dongle are already paired out of the box, the instructions to connect a wireless mouse are the same as of wired mouse.
- Connect the dongle to the USB port of the lightning jack.
- Then connect the Lightning jack to your iOS/iPadOS device.
- Turn on the wireless mouse. Make sure the mouse has power/charge.
- Go to Settings
- Then tap on Accessibility
- Then tap on Touch
- Now select “AssistiveTouch” & switch it on.
Configuring Your Mouse
The mouse attached to the iPhone/iPad would not work the way it will work on a Mac/PC. The mouse cursor itself is a big, grey circle cursor which is a mimic to a fingerprint. And you can only make it bigger & change its color. It is not easy to get the same precision of mouse that one can get with a desktop cursor, but it takes a lot of practice. Mouse has many more options to change like either button on a standard two-button mouse can be programmed to do a number of tasks, from the standard single-tap to a pinch action, and many others besides, then the Cursor section, tracking speed, There are many settings in AssistiveTouch and the Accessibility menus, but let us cover the basics.
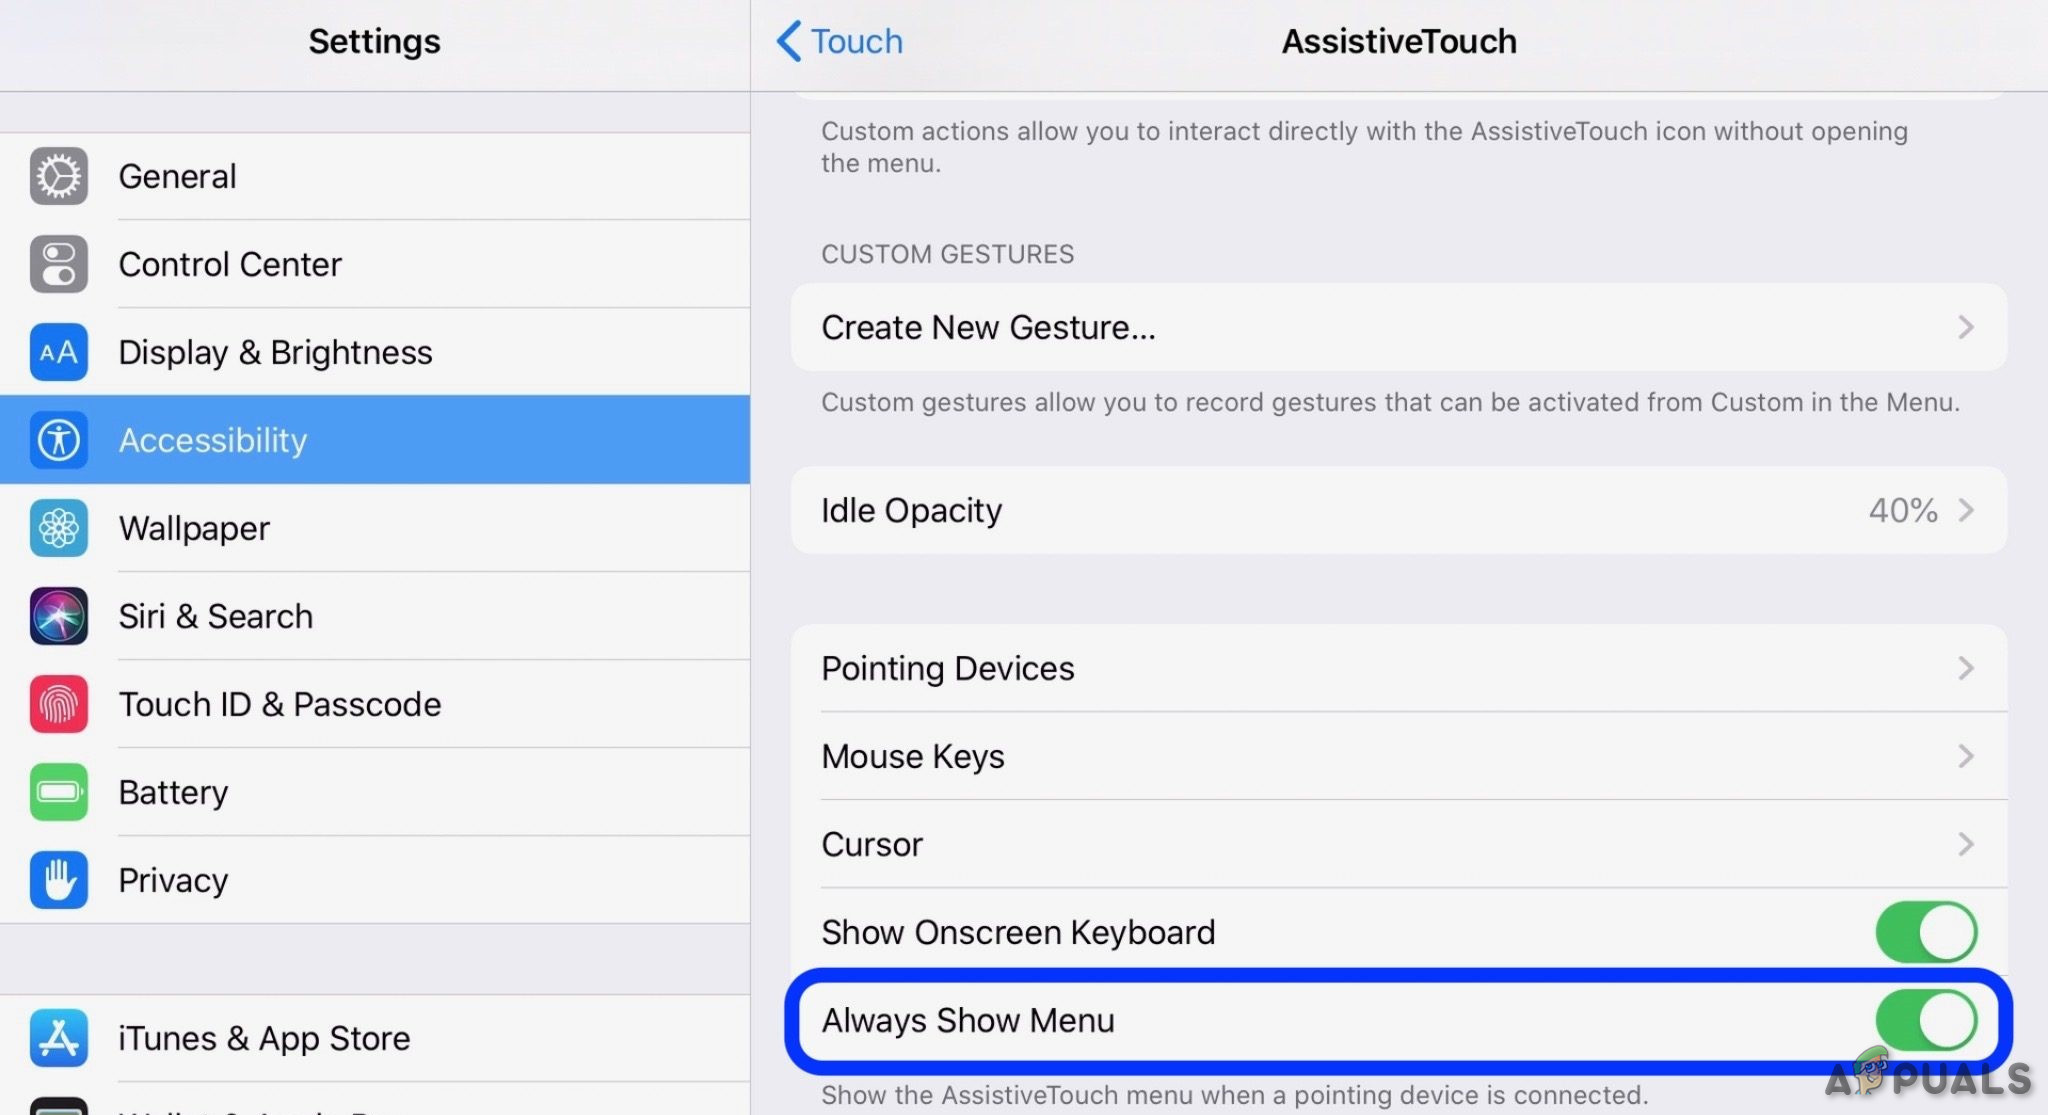
Hide circular AssistiveTouch menu
The circular AssistiveTouch menu stays on the screen by default when AssistiveTouch is in use, although it can be moved around the display. Also, the menu for AssistiveTouch can be activated by right-clicking your mouse. The AssistiveTouch menu can be hidden
- Go to Settings
- Then tap on Accessibility
- Then tap on Touch
- Then tap on AssistiveTouch
- And now un-toggle the “Always Show Menu”
There is a lot about this setup that will take some getting used to it.
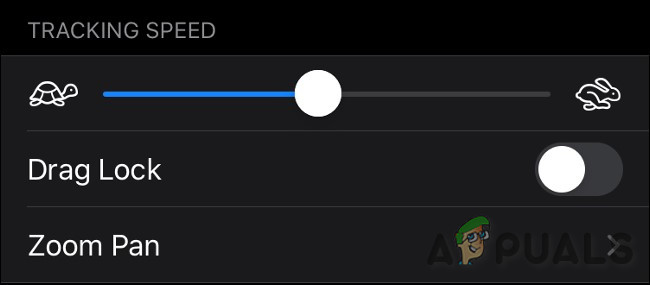
Adjust the tracking speed, Drag Lock, Zoom Pan
The tracking speed for the mouse can be very fast or slow for the iPad/iPhone. Also, you may want to change the settings of Drag Lock & Zoom Pan. If you cannot cope with the speed, it can be easily changed
- Open Settings of iPhone/iPad.
- The Tap Accessibility.
- Then under Physical and Motor Tap on “Touch”.
- Tap on “AssistiveTouch”
- Under Tracking speed, move the slider right or left to increase or decrease the speed of the cursor moves.
- To turn Drag lock on or off, toggle the switch to on or off.
- Now Tap on Zoom Pan
- Then tap on Continuous, Centered, or Edges as per your liking.
Customize the buttons on your mouse
Usually, the default buttons of the mouse are:
- Left-click (Single-Tap for selection)
- Right-click (open AssistiveTouch menu)
These settings can also be customized. Follow the below steps to do so.
- Open Settingsof iPhone/iPad.
- The Tap Accessibility.
- Then under Physical and Motor Tap on “Touch”.
- Then Tap on AssistiveTouch.
- Then tap on Devices.
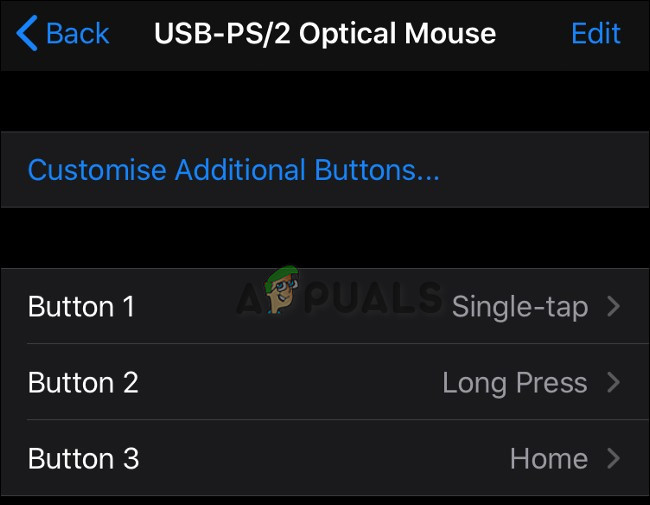
- Then tap the name of the pointing device you like to adjust.
Open Connected Devices - Now tap on the labels of “Button 1”, “Button 2”, etc. to customize each button what it does.
- Now tap on the action for each button of the pointing device that you want to change when it’s pressed. The “action” options range from simple actions e.g. single-tapping to opening the dock. A particular Siri Shortcut can also be assigned to one of your mouse buttons.
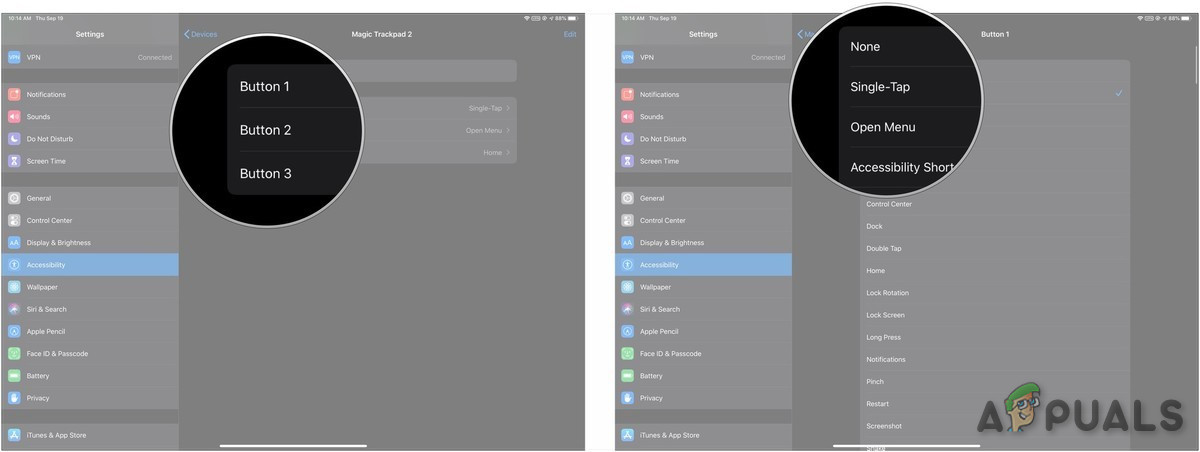
Customize Button - Tap the name of the pointer device in the upper-left corner of the menu pane.
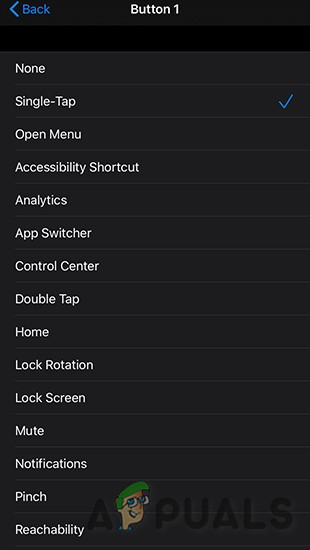
- If your mouse has more buttons than those listed, you can tap “Customize Additional Buttons” to configure them. You’ll be asked to press one of the buttons on your mouse and then pick an action. Keep going until you’ve configured your mouse the way you want it. Tap Customize Additional Buttons…
Cursor
With your pointing device connected, you should be able to see the “cursor” onscreen as a fingertip-sized circle. You can configure the cursor as per your liking.
- Open Settings on your iPhone or iPad.
- Tap Accessibility.
- Tap Touchunder Physical and Motor.
- Tap AssistiveTouch.
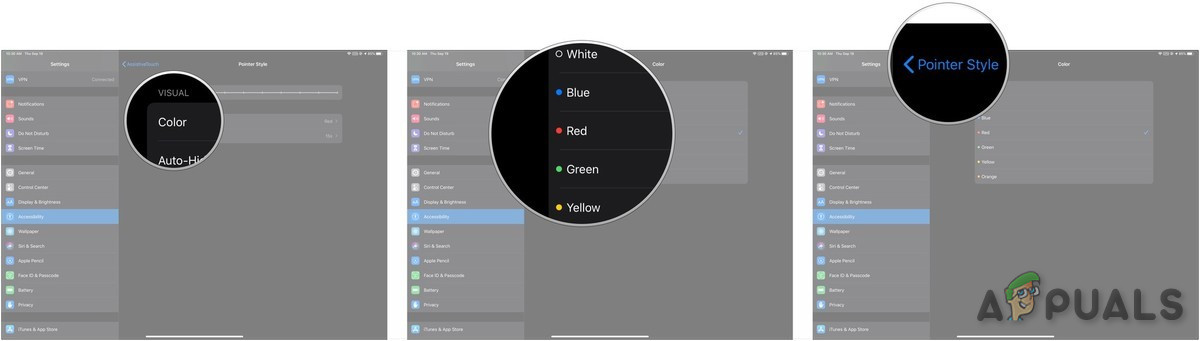
- Tap Pointer Style.
- Drag the slider right & left to increase or decrease the size of the cursor.
Open Pointer Settings - Tap Color.
- Now Tap on the colour that you want for your cursor. You can choose the colour of the outer ring as well as the inner dot of the cursor.
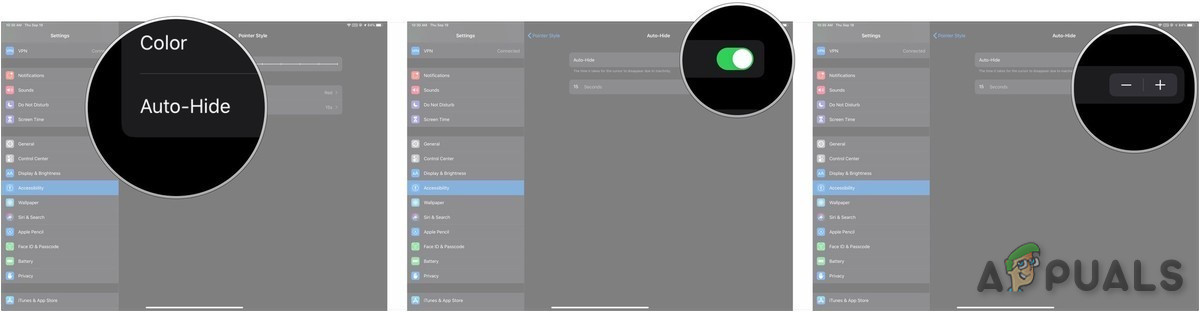
- Tap Pointer Style in the upper-left corner of the panel.
Change Color & Pointer Style - Tap Auto-Hide.
- Tap the switch next to Auto-Hide to the green ‘on’ position to allow your cursor to hide automatically.
- Tap the +or – buttons to raise or lower the time until the cursor automatically hides.
Pointing Devices that Work with iOS 13/iPadOS
There is no list by Apple of compatible mice devices which are iOS/iPadOS compatible, the only way to find is to try it. iOS 13 & iPadOS 13 is a big step by Apple to allow the use of both wired and third-party wireless peripherals, with both mouse support and gamepad support arriving in the same update. This means that most generic USB and Bluetooth mice should just work.
Apple’s Magic Trackpad 2 does work with iPhones and iPads, but only over a wired connection. The Magic Mouse 2 also works
The Mouse Support on iPad or iPhone
Make no mistake about it, mouse support on iPhone and iPad is first and foremost an accessibility feature. Currently, mouse support feels more like finger simulation than proper mouse control or it is better to say that it is not a computer mouse but it is a remote finger. Apple hasn’t made any changes to the way the operating system works when you’re using it with a mouse. iOS and iPadOS are each still a pure touch-based OS. The mouse cursor interacts with the screen in the way your finger does. You can tap, drag, but you cannot select batch items on the iPad/iPhone. Swipe gestures can also be performed by the mouse e.g. to open the Notification Center you will swipe down from the mouse.
Mouse support provides a more accurate method of selecting and editing large chunks of text, even if it doesn’t work quite like a standard computer. This is the one area where the feature stood out the most, but that could just be down to how cumbersome touch-based text manipulation usually is.
One example of this is in how text manipulation works with the mouse. On a regular computer, you would move your pointer over the text you want to select and then click and drag. But that doesn’t work on the mobile OS.
You have to double click on a line of text that would highlight the entire section & then grab the paddles /markers on either side of the selected area to trim it down.
It is a small issue and it is not very difficult to adjust to it, but it still feels more like touch simulation than proper mouse control.

Some creatives might benefit from the added precision of a mouse when editing photos or working with vector graphics. Since many creative types purchase an iPad Pro for the Apple Pencil support, this isn’t such a big deal.
If you remotely access other computers over the local network or internet, a mouse will make the experience feel a little more native. Unfortunately, you will still lack proper mouse button support, but you might be able to configure your mouse to mirror the input methods used by your favorite remote access tool.
It’s unclear whether Apple will expand the concept in the future and equip its mobile OS’ with the ability to accept proper mouse inputs. This would undoubtedly push the iPad Pro further into laptop replacement territory, a path that Apple has been treading very carefully.
Remember that Some swipe gestures are harder to pull off than others. Swiping up from the bottom of an app to close it, or open the lock screen, proved very difficult. I often clicked on the. It’s very good for navigating your phone and interacting with apps without using your hand directly, and as an Accessibility feature, that makes a lot of sense. Maybe that will change in the future, but for now, this feature is designed to fulfill the needs of Accessibility users, not to emulate a desktop.
A Good Start
Mouse support is perfect for its intended use as an accessibility tool. For productivity purposes, there aren’t too many advantages, but who knows what Apple has planned for the future. The company is slowly pushing the iPad and iPad Pro as a tablet that can perform many tasks you’d typically do on a laptop, without transforming it into a laptop-tablet hybrid.