How to Unlock and Root OnePlus 5T
The OnePlus 5T, heralded as a “flagship killer” device, is a premium high-end smartphone with an “affordable” price compared to other brand’s flagship devices. It boasts a whopping 8GB RAM, 128GB internal storage, and the Qualcomm MSM8998 Snapdragon 835 chipset.
Many owners of the OnePlus 5T may be wondering “how to root the OnePlus 5T”, and this guide will walk you through all of the necessary steps, from unlocking the bootloader to rooting the OnePlus 5T using TWRP Recovery. This guide will also show you how to create and restore Nandroid backups for the OnePlus 5T, incase something goes wrong and you need to restore your phone to a previous state.
Warning: Unlocking the bootloader will wipe all of your user-data and factory reset your device – make sure you backup all important personal data before proceeding!
Pre-Requisites / Before You Begin
- Make sure you have ADB installed on your computer – see the Appual’s guide How to Install ADB on Windows
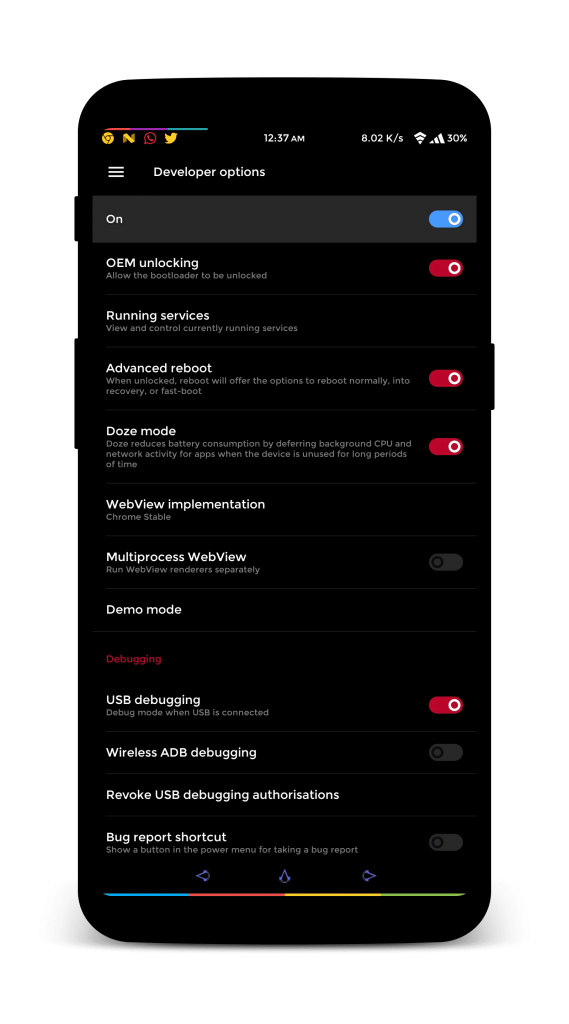
- Enable OEM Unlock, USB Debugging, and Advanced Reboot on your OnePlus 5T’s Developer Options. To enable Developer Options, go to Settings > About Phone > tap on Build Number 7 times until Developer Mode is confirmed as being activated. Then go into Developer Options and enable those above mentioned settings.
Requirements
How to Unlock the OnePlus 5T Bootloader
- First shut down your phone, and boot into Fastboot Mode (press and hold Volume Up + Power, or choose ‘Reboot to Bootloader’ if you’ve enabled Advanced Reboot in Developer Options). Your phone will display “Fastboot” across the screen to indicate it has entered that mode.
- Connect your OnePlus 5T to your PC via USB cable, navigate to your ADB install folder, hold Shift + Right Click and choose “Open Command Window Here”.
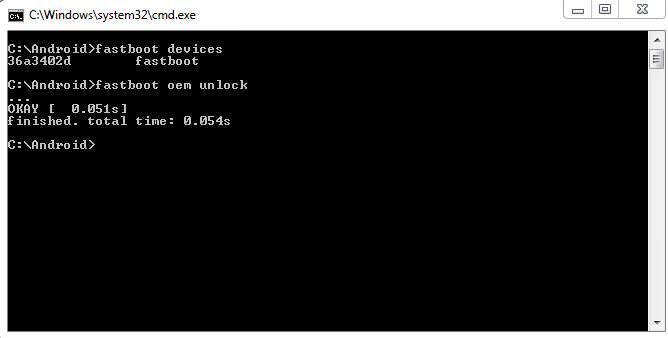
- When the ADB command prompt launches, type the following command to make sure that ADB properly recognizes your device: adb devices
- If your device is successfully recognized, the ADB prompt will display your device’s serial number. If not, you may need to troubleshoot your ADB installation or USB connection (make sure you enabled USB Debugging in Developer Options, for example)
- Now the next step is going to FACTORY RESET your device, so make sure you have a backup of all your important user-data. Begin the reset and unlock process by typing into the ADB terminal: fastboot oem unlock
- Your phone will display a Bootloader Unlock Warning, use the Volume button to highlight Yes and the power button to confirm.
- Your OnePlus 5T will reboot and display another Secure Boot warning, then boot into Stock Recovery and choose to Wipe All Data. When it’s done, you can reboot your phone into the OS.
Flashing TWRP Recovery on the OnePlus 5T
- When your device has fully booted into the Android system, adjust these settings on your phone:
- Re-enable Developer Options, USB Debugging, OEM Unlocking, Advanced Reboot
- Now download all of the required files (your choice of TWRP version, and your choice of SuperSU or Magisk for root). Place the SuperSU.zip on your device’s internal memory, and the TWRP image file in your main ADB installation folder.
- Reboot your device into Fastboot Mode again (remember, by pressing Volume Up + Power or using the Advanced Reboot menu).
- Now open a new ADB command window (Shift + Right Click and ‘Open a Command Window Here’ from inside your main ADB installation folder) and type the following command: fastboot flash recovery twrp_xxxxx.img (replace the twrp_xxxx.img with the actual filename of the TWRP .image file you downloaded)
- Once TWRP has been successfully flashed, do not use the Fastboot Reboot command. Just unplug your phone from your PC, and manually boot into recovery by pressing the Volume button a few times, until you see Recovery in red text at the top of your screen, and use the Power button to confirm the reboot.
Rooting the OnePlus 5T
- When your phone boots into TWRP Recovery, you have two options – we can perform a systemless root (rooting does not touch the /system partition on your device) or a full system-root. There are pros and cons to both kinds of roots, so research them both. If you want to systemless root, proceed through TWRP without swiping right on the screen that asks to enable modifications to /system partition.
- In the TWRP main menu, choose Install > and confirm to install either SuperSU or Magisk for rooting.
- Swipe to confirm the flash, and when its finished, choose Reboot System.
- The first time rebooting after wiping the phone may take around 5 to 10 minutes, just leave your device alone – during this initial boot process, your device is rebuilding the dalvik cache, and it may reboot a few times if you rooted with SuperSU. Just leave it alone until you’re booted fully into the Android system.
- Congratulations! Your OnePlus 5T is now rooted and has TWRP installed as the custom recovery.
From now on, do not flash partial OTA updates – if you want to flash a partial OTA, you must first flash a complete OTA that it applies to, and then flash the partial OTA from stock recovery. You will most definitely brick your device if you flash a partial OTA from TWRP, but if this happens, you can recover your device by flashing a full OTA .zip from stock recovery.
How to Create a Nandroid Backup for the OnePlus 5T
A Nandroid backup is an extremely useful thing to have before installing any kind of custom ROM on your device (or tinkering with /system stuff). Basically, it’s a full backup of your stock /system partition that will save your device in the event of a /system screwup, or you need to reinstall your original stock firmware.
Warning: Before creating a Nandroid backup with TWRP, you must remove all lockscreen security. If you fail to do this, you will be unable to unlock your device after restoring a backup, and you will need to perform a factory reset to get into the Android system. This is because if you create a backup with lockscreen security enabled, the pin will become scrambled during the backup process, so you will have an incorrect pin error when you restore the device from a backup with lockscreen security enabled.
- So to start, go to Settings > Security > Screen Lock, and set it to Swipe/None.
- Now reboot your OnePlus 5T into TWRP Recovery, go to the Backup menu, and select all of the partitions that are presented.
- Give your backup a name, and swipe to begin the backup process – this will take around 5 to 10 minutes, depending on the size of your data.
- When its done, you can simply Reboot System – your Nandroid backup file will be saved in /SDCard/TWRP/Backups path on your phone’s external memory.
How to Restore a Nandroid Backup from TWRP
- Boot your OnePlus 5T into TWRP Recovery and go to the Restore menu.
- Choose the Nandroid backup you created, and select the partitions you want to restore.
- Swipe to begin the Restore process, which will take around 5 to 10 minutes.
- When its done, you can Reboot System.
If you created a Nandroid backup while lockscreen security was enabled (which I expressly said don’t do), you may still be able to get into the Android system by deleting the files that contain your (scrambled) lockscreen security.
You will need to boot into TWRP and go to File Manager.
Navigate to /data/system/ and delete the following files:
- Locksettings.db
- Locksettings.db-shm
- Locksettings.db-wal
- Gatekeeper.password.key
- Gatekeeper.pattern.key
Now reboot your OnePlus 5T and enter your PIN to decrypt the storage – now you can simply unlock the phone via swiping. Go into Settings > Security and set a new lockscreen method / PIN.
How to Create an EFS Backup for the OnePlus 5T
It’s not uncommon for people tinkering with their /system or flashing things to corrupt the EFS Partition, which typically results in the IMEI being lost, and no cellular activity on the OnePlus 5T. This is extremely difficult to fix without an EFS Backup, so you can protect yourself from this happening by following this guide as a precaution.
Note: This must be performed on a rooted device!
- Install the Terminal Emulator app on your phone from HERE
- Launch the Terminal Emulator app and enter the following commands:
- Su
(this will grant root access to the Terminal Emulator app)
Now enter:
- dd if=/dev/block/sdf1 of=/sdcard/modemst1.bin bs=512
- dd if=/dev/block/sdf2 of=/sdcard/modemst2.bin bs=512
- Two files will be created on your internal storage – modemst1.bin and modemst2.bin
- Copy these two files to your PC and keep them safe.
- To restore these EFS Backup files, boot into Fastboot Mode and connect your OnePlus 5T to your PC via USB.
- Place the modemst1.bin and modemst2.bin files in your root ADB folder, and opened an ADB command window.
- Now type the following commands:
- Fastboot flash modemst1 modemst1.bin
- Fastboot flash modemst2 modemst2.bin
- Now disconnect your phone from your PC and reboot to system, and your IMEI / cellular activity should be working again.