How to Transfer Microsoft Office to a New Computer
Moving an older existing Office installation to another computer can be a daunting task if you’re not sure where to start. Microsoft has simplified the process with the latest Office iterations, but transferring a Microsoft Office 2010 or Office 2013 license is not as intuitive as we’d like.

To move your Office installation to a different computer, you need to meet the following three conditions:
- You need to own the 25-character Product Key given to you when you purchased the license.
- Your license type must be transferable. Only “retail” and “FPP” (Full Package Product) license types are transferable.
- An installation media (disk or file) for Office that matches your Product Key.
Note: The above conditions do not apply to the new Office 365 subscriptions or Office 2016. Microsoft now associates licenses with the client’s email account (not the hardware). You can easily move it via the My Account page (here). Detailed steps on managing your Office 365 / Office 2016 subscription can be found at the end of this article.
Now, back to the old way of transferring an Office installation. Microsoft has sold a variety of different Office license types over the years. Before licenses were linked to the user’s email account, figuring out which license you owned was challenging—all the more reason to pay attention to the process we’ll outline below.
Below are three important steps that will help you determine if you’re able to move your Office license to a new computer. Go through them to check your eligibility. If everything is in order, you can proceed with the transfer guide.
Note: As mentioned, the following steps only apply to Office 2010 and Office 2013 licenses. If you have an Office 365 or an Office 2016 license, you can skip these steps, as your license is definitely transferable.
Step 1: Identify Your Office License Type
Before we examine the license types, you need to understand that buying a Microsoft Office license doesn’t mean you own it outright. License terms state that you are effectively leasing the Office software, which comes with several restrictions.
Here’s a short list of the most popular Office license types:
- FPP (Full Product Pack) – Commonly sold in a plastic yellow box or online.
- HUP (Home Use Program) – A discounted FPP, typically hard to get.
- OEM (Original Equipment Manufacturer) – License type pre-installed on some computers and not available on physical media.
- PKC (Product Key Card) – Usually sold online or in stores in card format, cannot be purchased on CD.
- POSA (Point of Sale Activation) – Commonly obtained from online stores and some retail outlets, including a product key but no installation media.
- ACADEMIC – Previously sold to education students, now discontinued.
- ESD (Electronic Software Download) – Only available for download from online retailers, includes a product key but no installation media.
- NFR (Not For Resale) – Licenses are usually promotional and not meant for sale.
Out of all these Office license types, only FPP, HUP, PKC, POSA, and ESD can be moved to another computer. Here’s a quick guide to check if your license is transferable:
- Access the Start menu (bottom-left corner) and search for “cmd“. Right-click on Command Prompt and choose Run as Administrator.

- Using an elevated Command Prompt, navigate to the Office installation folder location. Note that your location might differ if you set a custom path. Type “cd ‘Office location path’” and press Enter.

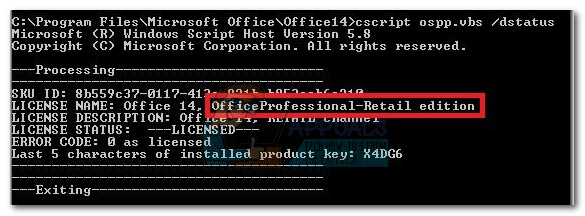
- When you’re in the correct folder, enter the following command into the elevated Command Prompt and press Enter:
cscript ospp.vbs /dstatus

- It may take a moment to see the results. Check the License Name and License Description. If they include “Retail” or “FPP“, your license can be moved.
Step 2: Verify the Number of Concurrent Installations Allowed
Most Office licenses allow just one installation on one computer. However, older retail licenses permitted installation on a second device, and the “Home and Student” bundle once allowed activation on up to three home computers.
With this in mind, if you have an Office 2010 license, you might install it on another machine without needing to transfer. Starting with Office 2013, however, concurrent installations were reduced to just one for all retail bundles.
Step 3: Verify Your Right to Transfer the License
If you’re limited to a single concurrent installation, you might have the option to transfer your license to another device. This is typically valid for retail licenses. For other license types, the license often expires with the hardware.
For additional information about installation and transferability rights, consult this link (here). Once you confirm your right to transfer the license, move to the guide below for your specific Office version.
How to Transfer an Office 2010 / Office 2013 License
Following are the steps necessary to move an Office 2010 or Office 2013 license to a new PC:
Note: Remember, activating an Office suite saves a hardware snapshot that Microsoft uses for random checks to verify the software hasn’t been moved.
Note 2: You’ll need to retrieve your Product Key, often found in the container with installation media or via your online purchase record. Utilities like KeyFinder and ProduKey can also extract the key from an installed license.
- Completely uninstall the Office installation from your current computer via Programs and Features.

- Ensure the new computer doesn’t have a trial copy of Office installed. If present, uninstall it before migrating your license.
Note: The MS activation system may have issues activating an Office copy where an inactive trial also exists. - Install the Office suite associated with your license using the CD or other installation media.
- Open any Office program and go to File > Account, click Change Product Key (Activate Product), and enter your product key.
 Note: If you encounter an error about “too many installations,” activate over the phone. Use Microsoft’s link (here) to find and call the activation center number for your country. Explain that you’re transferring the license from one computer to another; the agent should be able to assist you.
You’ve now successfully moved your Office 2010 / Office 2013 license.
How to Transfer an Office 365 / Office 2016 License
Transferring an Office 365 / Office 2016 license is more straightforward than older versions. You’ll deactivate and uninstall the old license before migrating. Here’s a quick guide:
- Log into Microsoft Office and access the My Account page via this link (here).
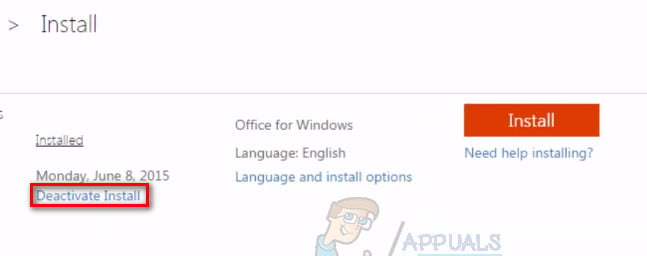
- Find the Install section and click the Deactivate Install button for your subscription.

- Confirm deactivation when prompted.
- Uninstall the current Office installation via Programs and Features (Press Windows key + R, then type “appwiz.cpl“), assuming you are still using the old computer.

- On the new computer, access the Install Information section again in My Account and select Install.

- Wait for the setup.exe file to download, run it, and follow the prompts. Sign in with your Microsoft account during the setup process.
Congratulations! You’ve successfully migrated your Office 365 / Office 2016 installation to a new computer.