How to Set Wifi Priority on iOS and MacOS
Wi-Fi has become so common that we’re starting to take it for granted. Internet access has improved worldwide with the apparition of Wi-FI networks that allow users to grab internet from thin air. Nowadays, public places without a Wi-Fi network are quickly becoming extinct.
But sometimes, having too many Wi-Fi options can actually end up hurting your internet surfing speed. This happens because each Wi-Fi has its own particularities in relation to your device. One might have better coverage while the other might have superior speed. If you frequently visit a place that has multiple Wi-Fi connections, it might be a good idea to prioritize them.
Most operating systems have some type of feature that prioritizes Wi-Fi network according to various calculations. This is also the case with macOS and iOS. But let’s say you work in an office building with Wi-Fi networks on every floor. It’s entirely possible that your device will tend to use the network below you, even if the signal strength is better with the Wi-Fi on your floor. This happens because the OS takes into account other factors like network stability and availability.
In cases like this, it’s a good idea to prioritize certain networks over others, to ensure you have the best connection possible. You’d be pleased to know there’s a native way of prioritizing a Wi-Fi connection on MAC computers. Even more, we can expand that capability to iOS devices – iPhones, iPads, and iPods.
How to prioritize Wi-Fi networks on macOS (MAC)
Apple is keen on offering its users with the best possible user experience. In comparison with more technical operating systems like Windows and Android, all of Apple’s efforts are focused on user-friendliness. But below that good-looking layer that keeps most things simple, there are some hidden options that are not explored by most macOS and iOS users.
Such is the case with MAC’s ability to prioritize the list of saved networks. As it turns out, you can instruct your MAC to follow a certain order when it needs a Wi-Fi connection. By following the guidelines presented below, you will be able to predetermine the networks that have the highest priority and make your computer act accordingly. Here’s what you need to do:
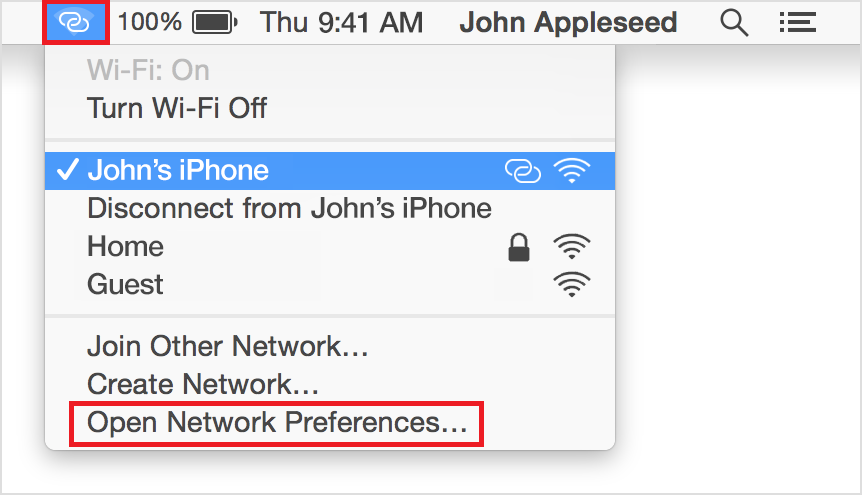
- Click the Wi-Fi network from your Mac’s menu bar from the top section of the screen. From there, tap on Open Network Preferences.
 Note: You can also launch the Settings app and click on Network.
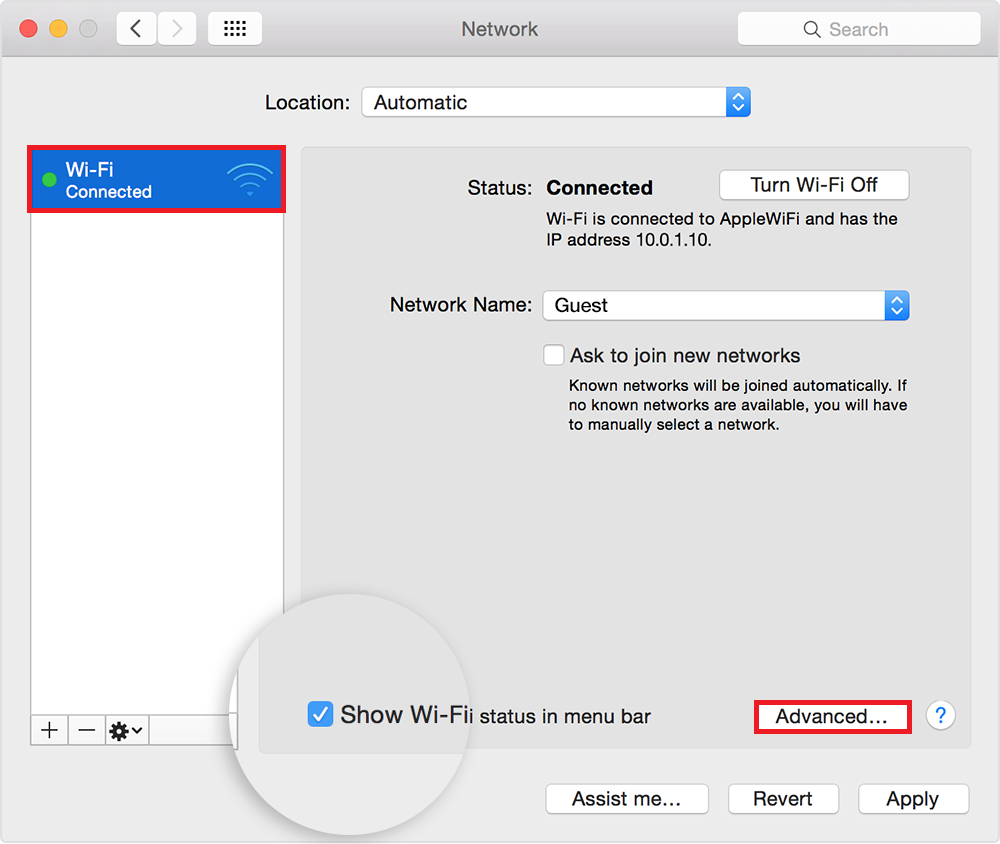
 - Now click on the Wi-Fi entry from the left column. With Wi-Fi selected, click on Advanced.

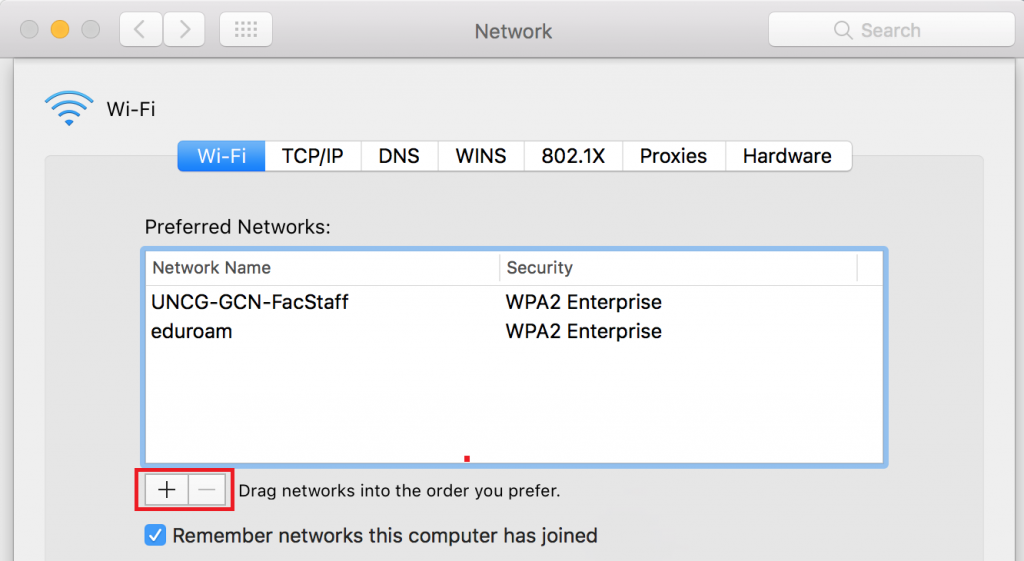
- Now you should be able to see a column of networks under Preferred Networks. The list should comprise all the networks saved by your MAC and other device associated with the same iCloud account. Notice how there are two buttons (plus and minus) underneath the column. Click on a network from the list a use the two buttons to move a network up or down.
 Note: The network at the top of the list has the highest priority and the one at the bottom the lowest priority. With this information, order your networks in the order that you prefer. If you want to elevate the priority of a network, select it and hit the plus sign until you move it to the top. In the event that you need to downgrade a network, use the minus button to move it to the bottom.
 - Once you’re done, hit OK in order for your settings to be saved.
Prioritizing networks on iOS (iPhone, iPad, iPod)
Given the fact that an iPhone is considerably more prone to connect to the wrong Wi-fi than a Mac, it’s important to make your iPhone aware of your Wi-Fi preferences. Well, the truth is there’s no way to prioritize Wi-Fi netwoks from an iOS device. It’s definitely disappointing seeing that Apple avoids implementing a way to do this from their mobile devices.
Luckily, most settings and preference options are automatically shared across Apple devices. This means MAC and iOS devices will both update their preferences as you tweak a setting. This works to our advantage, because any Wi-Fi network prioritization we might do on a MAC, will be automatically adopted by our iPhone, iPads, and iPods. The only catch is, the devices need to use the same Apple ID (iCloud account).
With this information, chances are your iPhone is already up to date with your Wi-Fi preferences if you followed Method 1 from a MAC. If you did, make sure both devices are using the same Apple ID.
If you don’t own a MAC, you have one other chance of updating the Wi-FI preferences, but it’s rather awkward. Try convincing a friend/acquaintance who owns a MAC to let you log in with your Apple ID. Once you do, update your preferences like we previously did in Method 1, save and log out. The new Wi-Fi preferences should be updated to your iOS device in a matter of minutes.
I know that this seems severely limiting, and it truly is. But so far this is the only method of prioritizing Wi-Fi networks on iOS.
Wrap Up
So far, these are the only feasible steps of adjusting a Wi-Fi network priority on a MAC, iPhone, iPad or iPod. Seeing how easy the whole procedure is on a MAC, it makes you wonder why Apple refuses to include a similar function on iOS. Is it part of a marketing scheme meant to keep you from leaving the Apple ecosystem? I don’t really know, but it’s entirely possible.
Until Apple releases an update (if it ever does), there’s no other native way of changing priorities on Apple devices. If you found this content helpful or you know of another 3rd party way of achieving this, let us know in the comment section below.