How to Scan Documents on Android Easily
 Reviewed by Huzaifa Haroon
Digitizing paper documents no longer requires a bulky scanner or a complicated multifunction printer. The hassle of figuring out traditional scanning methods can now be easily replaced by simply using your Android device. With just a smartphone and reliable scanner software, you can efficiently scan any document and manage your paperwork with ease.
How to Scan Documents on Android Using Google Drive
The Google Drive app offers one of the easiest and most convenient ways to scan documents on Android. Most Android devices come with this app pre-installed, but if yours does not, you can download it from the Google Play Store. Google Drive not only makes scanning quick but also ensures your documents are instantly backed up and easily shared.
- Open Google Drive and tap the plus sign (+).
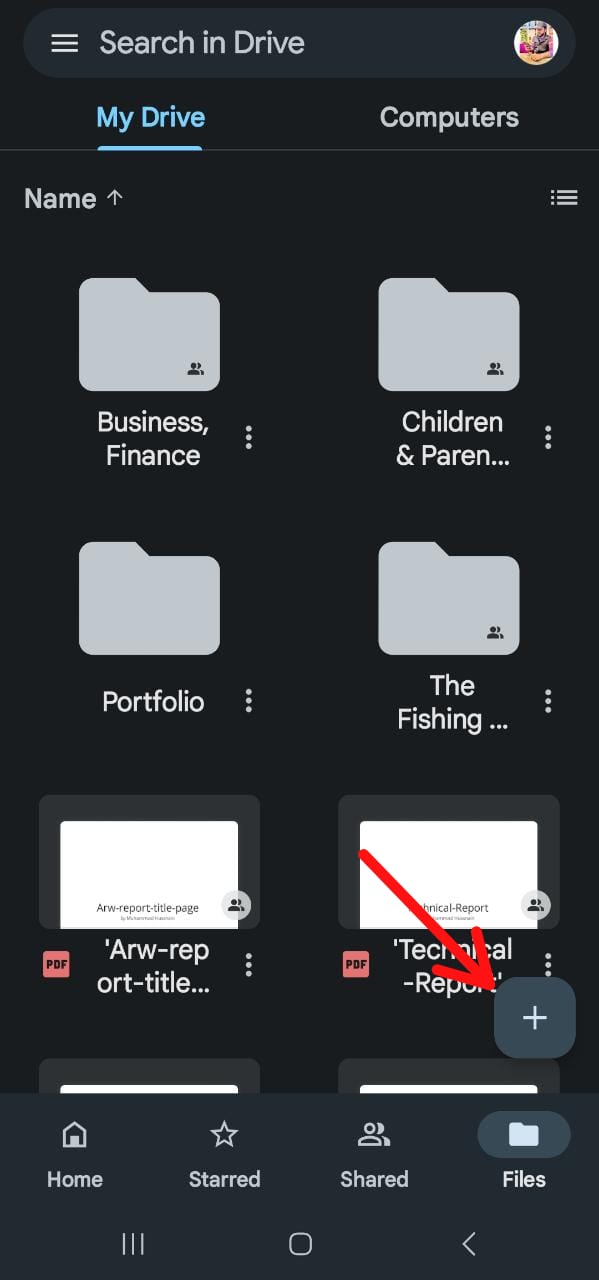
Scan Documents on Android Using Google Drive by clicking plus sign - In the Create New menu, select “Scan” from the options.
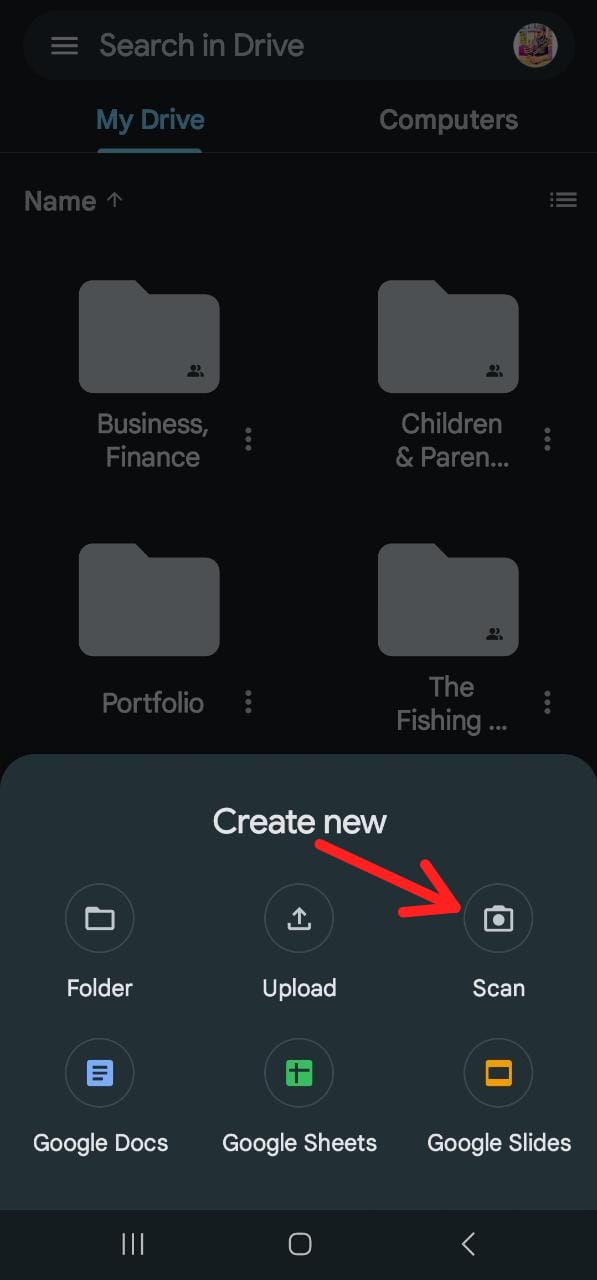
Click at Scan - Align your phone’s camera with the document you wish to scan, and press the shutter button to capture the image. Make sure the document is clearly visible within the frame for the best results.
- After capturing the scan, you have several options: tap the plus sign to add another page, tap the circular arrow to retake the scan, or tap the checkmark to confirm and proceed to upload your document to Google Drive.
- Google Drive provides real-time editing tools. You can adjust colors for different document types by tapping the painter’s palette icon in the top-right corner. This feature helps optimize scan quality for receipts, forms, or images.
- Once your scanning is complete, enter a file name and select “Save” to upload your new PDF to Google Drive.
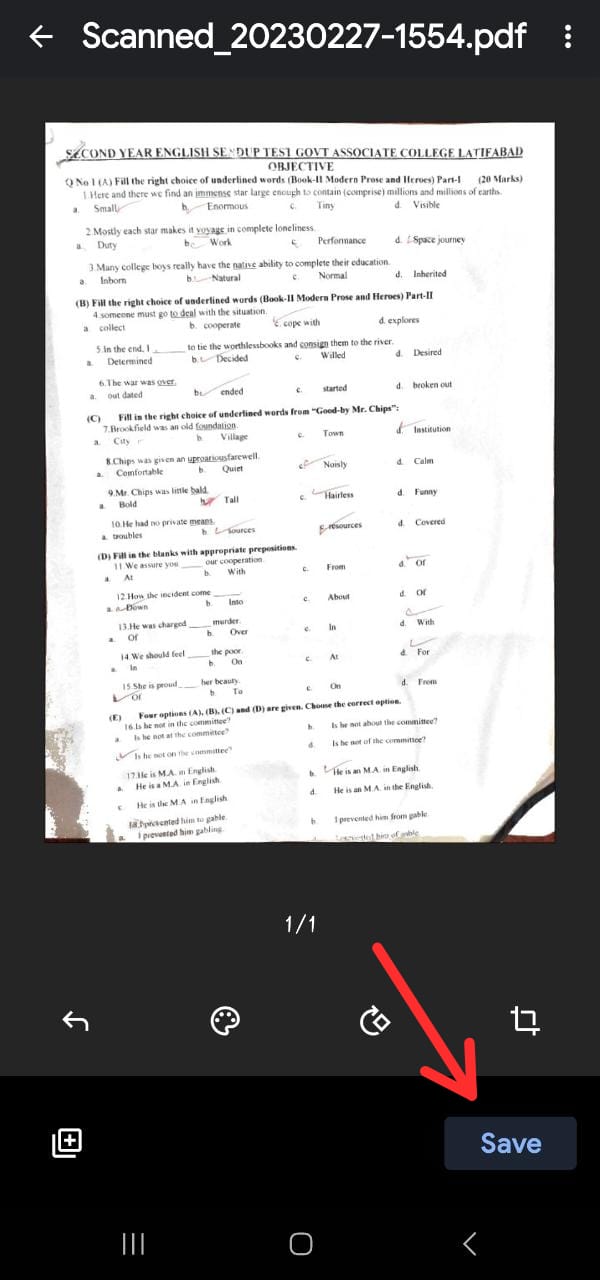
Click at Save
This method is ideal for anyone seeking a secure and seamless way to scan, store, and share documents directly from their Android device.
How to Scan Documents on Android Using Microsoft Lens
Microsoft Lens is another outstanding tool for scanning documents on an Android device. Unlike Google Drive, Microsoft Lens allows you to save scanned documents directly to your device, giving you greater control over your file storage. It is an intuitive document scanner designed specifically for Android, making digitization both simple and flexible.
To get started, download and install Microsoft Lens. Upon first launching the app, you will see a brief introduction, after which you must grant access to your camera and photos. After this setup, you are ready to begin scanning documents.
Microsoft Lens stands out because it offers dedicated scanning modes suited to different types of files. These include modes for Whiteboard, Document, Actions, Business Card, and Photo, accessible via the tabs at the bottom of the screen. Each mode optimizes the scanning process for its specific document type.
- Open Microsoft Lens and use the bottom menu to navigate to the “Document” mode.
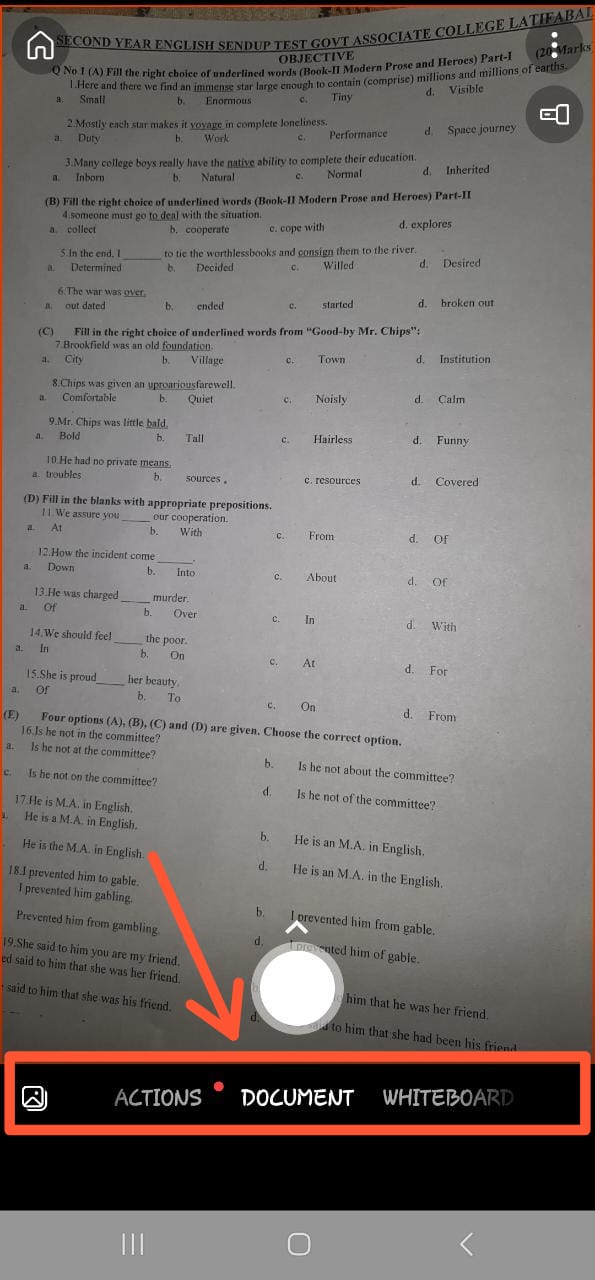
Scan Documents on Android Using Microsoft Lens - To scan a document, select the appropriate scanning mode, align your document within the viewfinder, and hold the device steady until the app recognizes the document area.
- Once the document is properly aligned, tap the shutter button to capture the scan.
- After scanning, you can modify the scanned image or add extra pages to your document by selecting the Add button. When your document is complete and edits are finished, tap Done to continue.
- On the following screen, you can rename your file and select from a variety of export formats, such as saving to your device’s Gallery or exporting as a PDF. Choose your preferred option to finalize and save your scanned document.
Scan Documents with Third-Party Apps
In addition to Google Drive and Microsoft Lens, there are numerous third-party applications designed to help you scan, sign, and share documents from your Android device. Each of these apps offers unique features—some focus on specialized formats or editing capabilities, while others offer integration with various cloud services. Most are available free of charge, though certain advanced features may require in-app purchases.
1. Scanner Pro
Scanner Pro ranks among the top Android scanning apps for reliability and versatility. It quickly scans PDFs and other documents using your device’s camera, then lets you save digital copies directly to popular cloud services like Google Drive, Dropbox, Evernote, and OneDrive, or store them locally on your Android device. This ensures your scans are accessible, secure, and easily shareable.
Get it on Google Play2. Dropbox
Dropbox is well known for its cloud storage features, but it also offers an excellent built-in document scanner. Your scans are automatically converted to PDFs and stored in your Dropbox account, making them accessible from any device. This feature allows for quick sharing and reliable backup of your digitized documents.
3. Adobe Scan
Adobe Scan allows users to quickly digitize paper documents, take photos, or create digital versions of existing images. With advanced optical character recognition (OCR), Adobe Scan can instantly convert text in your images to editable, searchable text. All scans are exportable as PDFs and can be conveniently stored in Adobe’s secure cloud storage.
Get it on Google Play4. CamScanner
CamScanner turns your Android device into a versatile, high-powered scanner with integrated optical character recognition (OCR). This application makes it simple to scan documents to PDF, JPG, Word, or TXT formats instantly after scanning. CamScanner is valued by professionals in numerous fields, including accounting, real estate, management, and law, thanks to its comprehensive feature set that streamlines digital document management.
Get it on Google Play5. Genius Scan
Genius Scan is a high-quality Android scanning app that supports both JPG and PDF file formats. It is notable for scanning multiple pages in one session and for supporting a range of paper sizes—from business cards to legal documents and A5. Genius Scan includes powerful features such as perspective correction, page detection, and enhanced scan quality, as well as the ability to save and restore your scan data. It is compatible across iOS, Android, and Windows platforms.
Get it on Google PlayMobile Device Scanning Tips
Scanning documents with a mobile device is efficient and fast, but image quality may sometimes fall short of that produced by a desktop scanner. By following a few best practices, you can consistently achieve high-quality scans:
- Ensure the document is well-lit with direct light. Shadows or insufficient lighting can result in unclear or unreadable scans.
- Hold the device directly above the document, avoiding any tilt or angle. Angled shots can result in distortion and prompt the app to request repositioning for a more accurate scan.
Reviewed by Huzaifa Haroon