How To Save Electricity Using Human Detection?
With the increase in the human population, the consumption of energy has also increased therefore energy-efficient lighting system is the most important field of research. There are so many ways in which we can save electricity in our homes. The best way is to automate the lights and fans of the room based on Human Detection.
In this project, if a human is detected in the room, the lights and fans will work normally but when no human is detected, these electric appliances will automatically switch off.
How to Automate Lights Through Human Detection?
As we now know the abstract of our project, let us move a step further and collect some more information to start working.
Step 1: Gathering the Components
The smartest way to start a project is to make a full working plan in the beginning. It is better to make a list of apparatus and buy them at first place is always the best approach. The following are the components that we will use in our project.
- No products found.
- No products found.
- No products found.
- Breadboard / Veroboard
- No products found.
Step 2: Studying the Components
Now as we have a list of all the components we will use in our project, let’s go through a brief study of these components to make a better understanding of our project.
Arduino Nano is a microcontroller board that has an ATmega328p microcontroller on it. This board is used to carry out various operations in a circuit. We burn a C Code on Arduino and tell it what to do.
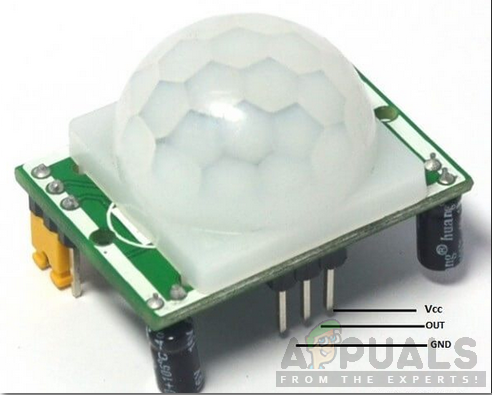
A Passive Infrared (PIR) sensor is an electronic sensor that detects the infrared rays radiating from objects in its field of operation. These sensors are most commonly used in motion detecting devices. The word passives indicate that these sensors do not emit energy to detect, they work entirely by detecting the IR rays emitted by different objects. The sensitivity of the PIR sensor can be adjusted by the potentiometer on it. You can also change the time delay of this sensor by that potentiometer.
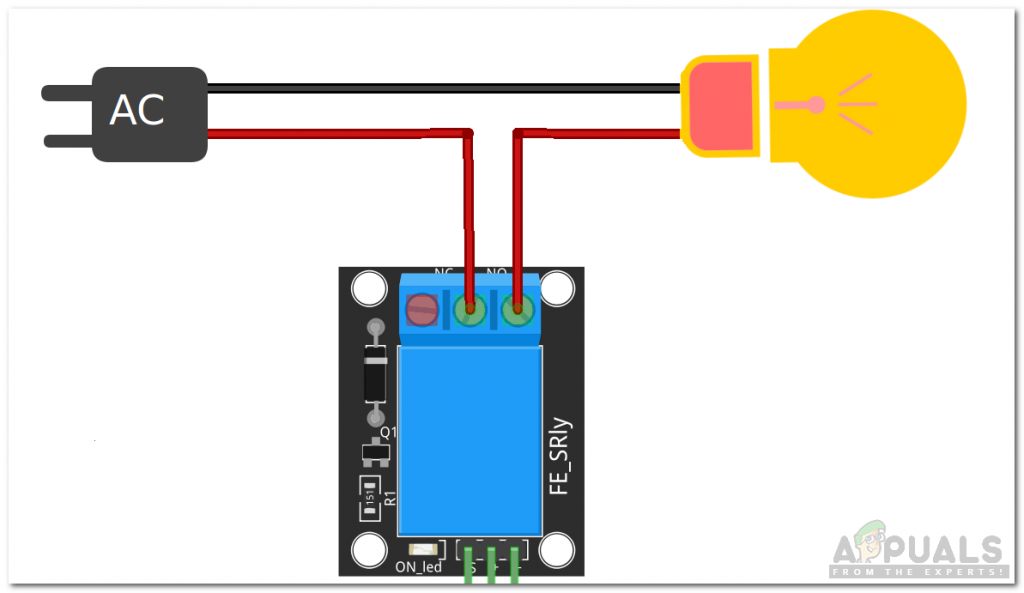
A Relay Module is a switching device. It receives a signal and switches any electronic device or appliance according to the input signal. It works in two modes, Normally Open (NO) and Normally Closed (NC). In Normally Open mode, the circuit is broken initially when the input signal to relay is LOW. In Normally Closed mode, the circuit is initially complete when the input signal is LOW.
Step 3: Assembling the Circuit
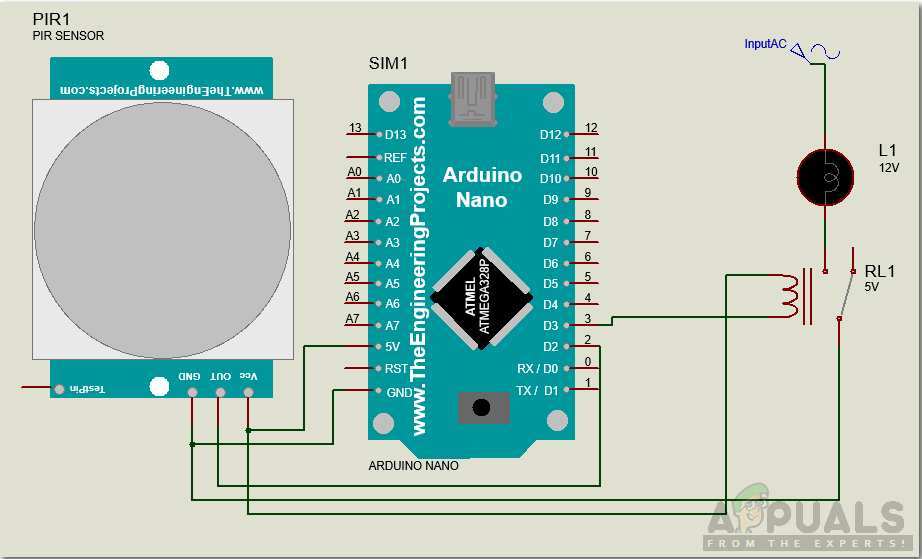
- The PIR Sensor has three pins on it. Connect the Vcc and ground of the PIR sensor to the 5V and ground of the Arduino nano and connect the OUT pin of the PIR to the pin2 of Arduino Nano.
- Power up the relay module through Arduino and connect the IN pin of the relay to pin3 of Arduino Nano.
- Connect the NO pin of the relay module to the positive wire of your electric appliance. Your connection should be like:
Step 4: Getting Started with Arduino
If you are not already familiar with Arduino IDE, don’t worry, we will go through a step by step procedure to setup Arduino IDE.
- Download the latest version of Arduino IDE from Arduino
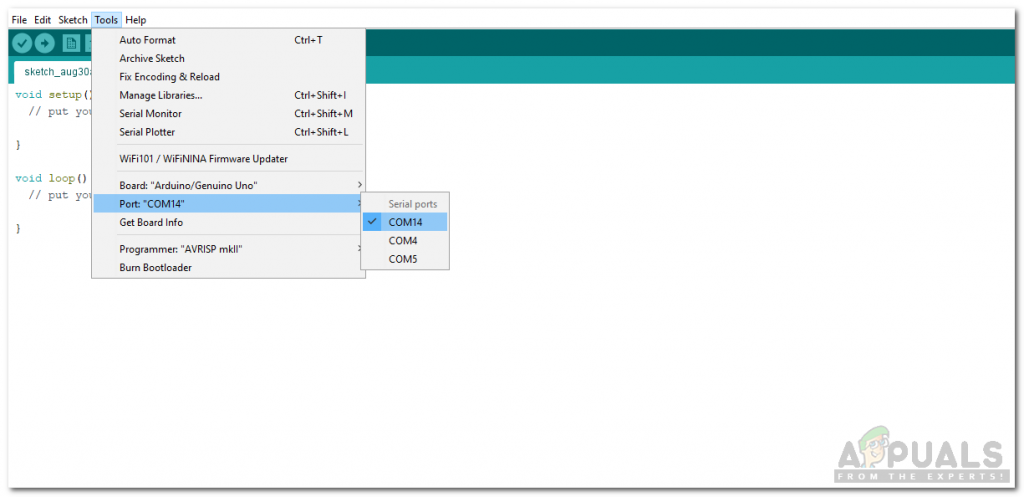
- connect your Arduino board to the PC and open Control Panel. Click on Hardware and Sound and View Devices and Printers. Find the name of the port to which your Arduino board is connected.

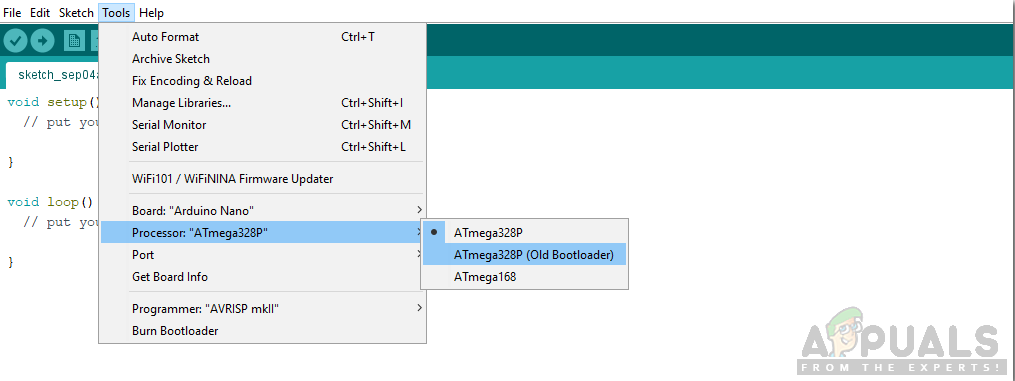
Fin Port - In the Tool menu, Set the board as Arduino Nano.
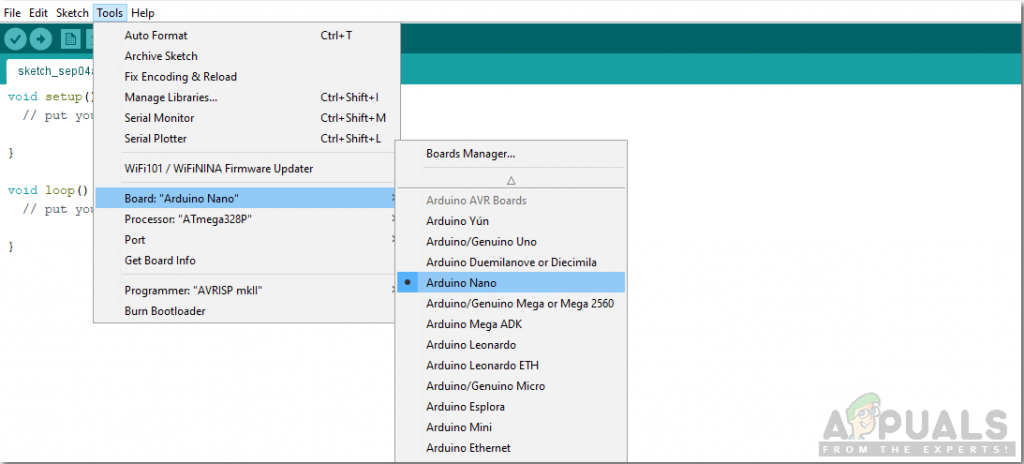
Set Board - In the same Tool menu, set the port that you observed before in the Control panel.
Set Port - Set the processor as ATmega328P (Old Bootloader).
Set Processor - Download the code attached below and click on the Upload button.

Upload
To download the code, click Here
Step 5: Code
The code is very simple and well commented but still, it is briefly described below.
- In the start, the variables and pins of Arduino will be initialized.
int pirOut=5; // output of pir sensor
int relay=13; // relay pin
2. void setup() is a function in which pins of microcontroller board are initialized to be used as INPUT or OUTPUT. Baud rate is also set in this function using Serial.begin. Baud rate is the speed at which the microcontroller board communicates with the other components attached.
void setup() {
pinMode(pirOut, INPUT);// setting pir output as arduino input
pinMode(relay, OUTPUT);//setting led as output
Serial.begin(9600);//serial communication between arduino and pc
}
3. void loop() is a function that runs repeatedly in a cycle. In this loop, we give instructions to the Arduino Nano what operations to carry out.
void loop() {
if(digitalRead(pirOut) == HIGH) // reading the data from the pir sensor
{
digitalWrite(relay, HIGH); // setting led to high
Serial.println("motion detected");
}
else
{
digitalWrite(relay, LOW); // setting led to low
Serial.println("scanning");
}
}
Here we are reading the status of the OUT pin of the PIR sensor. If it is high, it means that the human is detected, so the lights will remain switched on. If the OUT pin of the PIR sensor is low then it means that there is no human detected. This will result in switching the electronic appliances off automatically.
Now as you know how to use a PIR sensor to detect a human in a room. Enjoy making your own energy-efficient lighting system to save electricity. This can cut your electricity bill by 30 percent.


