How to Root the Samsung Galaxy Note 8 Exynos
The Samsung Note 8 is the latest high-end premium device from Samsung’s Note series, sporting 6GB RAM, 64GB storage, and the Samsung Exynos 8895 or the Snapdragon 835 CPU variants, depending on the region. This guide is only for the Exynos CPU variant, so if you have a Snapdragon version model, do not proceed with this guide!! Disastrous things will happen to your device.
Please be aware before following this guide:
- You will lose access to Samsung Pay and Secure forever on this device, even unrooting the device won’t bring it back. Blame Samsung and their notions of ‘security’.
- You will not be able to receive OTA updates, unless you manually flash them.
- This guide will involve wiping the internal data of your device and factory resets, so make sure you have backups of all your personal data such as contacts, photographs, etc.This guide is split up into three sections – one for those who want root with SuperSU and custom recovery like TWRP, one for those who want to root with Magisk, and one for those who want root through stock recovery. I highly recommend rooting with TWRP recovery, but it’s not necessary, TWRP just adds a more convenient way of flashing other mods or custom ROMs in the future.
How to Root with TWRP + SuperSU
Downloads:
- So the first step is to enable Developer Options on your Note 8. Go into Settings > About Phone > Software Information > tap on ‘Build Number’ 7 times to activate Developer Options.
- Now go into Settings > Developer Options > enable OEM Unlock. If your Note 8 does not have OEM Unlock, there is currently no workaround for this, blame your carrier for locking it down.
- Now connect your Note 8 to your PC via USB, and transfer the SuperSU.zip file to your device’s external SD card. Save the TWRP.tar on your desktop.
- Turn off your Note 8, then press and hold Volume Down + Bixby button + Power to reboot into Download Mode, and press volume up when asked to continue.
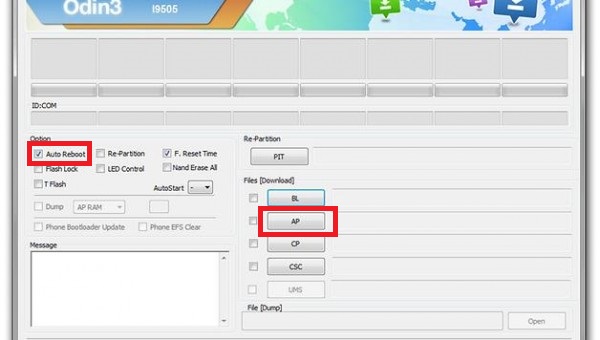
- Now launch the Odin .exe on your computer, and disable the ‘Auto Reboot’ checkbox from the option menu. You should also see that Odin confirms it detects your device as being connected, via a green box.
- In the AP tab of Odin, choose the TWRP image, and press Start.
- Odin will flash the TWRP image and confirm when it is successful by saying “Passed!”. When that is done, disconnect your Note 8, and hold Volume Down + Power until your screen turns off. Immediately press Volume Up + Bixby + Power to boot into Recovery Mode, which will now be TWRP instead of the stock recovery.
- Swipe to allow TWRP modifications, and then in the main menu of TWRP, go to Wipe > Format Data > type ‘Yes’ into the confirmation dialogue. Please be warned this will erase all data from the internal storage of your device.
- Once the formatting is completed, go to the Reboot option on the main menu, and choose reboot to Recovery. This will reboot you back into TWRP.
- Now go to Install, navigate to your external SD card, and choose the SuperSU.zip file you transferred earlier. Swipe to flash it.
- Once SuperSU has been successfully flashed, you can now reboot to system. Be patient, as the first time booting a freshly rooted device can take anywhere from 5 to 15 minutes, just leave it alone! But once you’re in the Android environment, congratulations, you have root!
How to Root with TWRP + Magisk
Note: This method is almost exactly like the one above, but we are flashing Magisk in TWRP instead of SuperSU.
Downloads:
- So the first step is to enable Developer Options on your Note 8. Go into Settings > About Phone > Software Information > tap on ‘Build Number’ 7 times to activate Developer Options.
- Now go into Settings > Developer Options > enable OEM Unlock. If your Note 8 does not have OEM Unlock, there is currently no workaround for this, blame your carrier for locking it down.
- Now connect your Note 8 to your PC via USB, and transfer the Magisk .zip file to your device’s external SD card. Save the TWRP.tar on your desktop.
- Turn off your Note 8, then press and hold Volume Down + Bixby button + Power to reboot into Download Mode, and press volume up when asked to continue.
- Now launch the Odin .exe on your computer, and disable the ‘Auto Reboot’ checkbox from the option menu. You should also see that Odin confirms it detects your device as being connected, via a green box.
- In the AP tab of Odin, choose the TWRP image, and press Start.
- Odin will flash the TWRP image and confirm when it is successful by saying “Passed!”. When that is done, disconnect your Note 8, and hold Volume Down + Power until your screen turns off. Immediately press Volume Up + Bixby + Power to boot into Recovery Mode, which will now be TWRP instead of the stock recovery.
- Swipe to allow TWRP modifications, and then in the main menu of TWRP, go to Wipe > Format Data > type ‘Yes’ into the confirmation dialogue. Please be warned this will erase all data from the internal storage of your device.
- Once the formatting is completed, go to the Reboot option on the main menu, and choose reboot to Recovery. This will reboot you back into TWRP.
- Now go to Install, navigate to your external SD card, and choose the Magisk .zip file you transferred earlier. Swipe to flash it.
- Once Magisk has been successfully flashed, you can now reboot to system. Be patient, as the first time booting a freshly rooted device can take anywhere from 5 to 15 minutes, just leave it alone! But once you’re in the Android environment, congratulations, you have root!
How to Root with Stock Recovery + Patched Boot.img
This method will give root access without installing a custom recovery, but we’ll still need to install Magisk. If this is the route you choose, just know that you can still flash custom ROMs and mod zips with FlashFire or similar app, but not via stock recovery. This method also requires a device capable of enabling OEM Unlock in the developer options.
Downloads
- Magisk Manager
- Note 8 Stock Firmware – make sure you download the correct firmware for your region!
- Odin
- First download the stock firmware for your region, and extract it using a tool like WinRAR or similar.
- From the extracted firmware, copy the boot.img.tar over to your Note 8’s external SD card.
- Install the latest Magisk Manager app on your device, and launch it.
- Go into Magisk Settings > Patched Boot Output Format > choose the boot.img.tar
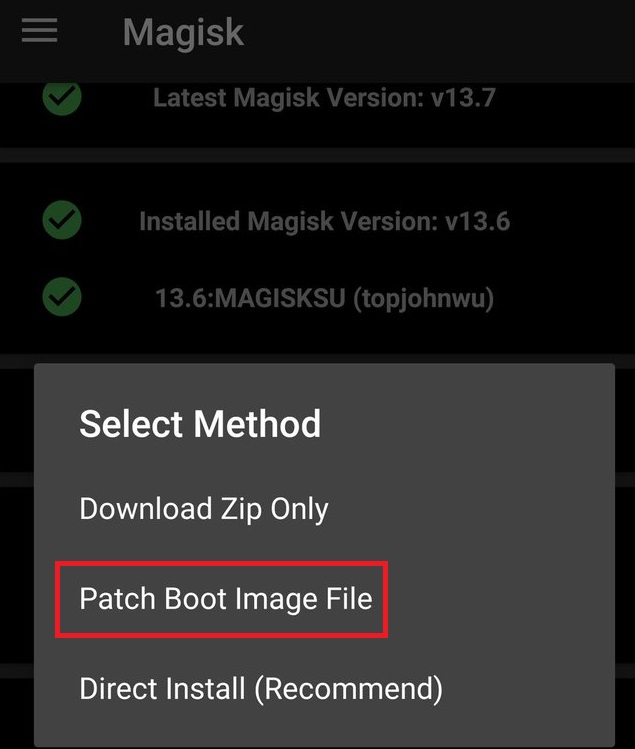
- Run the Install > Install > Patch Boot Image File, and let Magisk process the boot.img.tar
- Now go into your Android Settings > Developer Options > enable OEM Unlock.
- Now on your computer, navigate to the Magisk Manager directory on your device’s internal storage, and copy the patched_boot.img.tar to your desktop.
- Launch the Odin app on your computer, and in the AP box, choose the patched_boot.img.tar. Also disable the “Auto Reboot” checkbox in Odin’s options menu.
- Turn off your Note 8, then press and hold Volume Down + Bixby button + Power to reboot into Download Mode, and press volume up when asked to continue.
- Press the Start button in Odin, and allow it to complete the process. It will notify you with “Passed!” when it is successful.
- Reboot your Galaxy Note 8, and it will warn you about a security inconsistency and it needs to perform a factory reset. Agree to the factory reset.
- When the factory reset is complete, your phone will reboot again. Now you can re-install the Magisk Manager app, and it will verify that you have root!
Hi, I would like to ask you about this part: “If your Note 8 does not have OEM Unlock, there is currently no workaround for this, blame your carrier for locking it down.” Well, I got OEM unlock out of the box. It was 4 weeks ago. Of course thanks to OEM unlock I was happy owner of rooted N8, with custom rom installed and running. But… 2 weeks ago OEM unlock just dissapeared… And it won’t come back. That has nothing in common with part I’ve quoted? I mean I am desparately need OEM unlock to be back. It was there from the start but now it is lost… Can you say anything more about whole this? Thanks in advance.