How to Remove Bloatware on Windows 10
Bloatware apps usually do nothing more than take up space on a user’s hard drive so many users wonder how to get rid of the apps which they find no use for. Uninstalling bloatware apps from Windows 10 is not a difficult process and it’s something that can be performed even by amateurs which don’t possess any extraordinary computer skills.
Preinstalled apps which arrive with each copy of Windows 10 can de uninstalled easily if you follow the set of instructions which appear in the continuation of this article. Note that not every app can be uninstalled even if its displayed on your computer and not every app should be uninstalled since some of them are crucial for the normal functionality of your PC. Please refer to the methods below:
Solution 1: Uninstalling Apps Using Elevated PowerShell
You can delete most of the preinstalled apps—even the ones that don’t normally offer an “Uninstall” option straight from the Settings App or from Control Panel—with a PowerShell set of commands. Note, however, that this method won’t allow you to remove some of the most important built-in apps, like Cortana, Microsoft Edge or the Start Menu. If you try, you’ll see an error message saying the operation was not successful.
Follow the set of steps below in order to successfully get rid of any app installed on your Windows 10 PC:
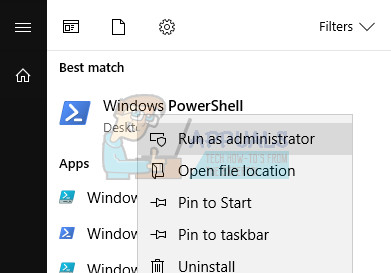
- Type PowerShell in the Search bar located at the bottom left part of your taskbar, right-click on the first result, and select Run as administrator option.

- Copy and paste the following command in order to receive the full list of the apps you have installed along with detailed info regarding every single one. Make sure you click Enter after pasting the text in order to run the command.
Get-AppxPackage -AllUsers | Select Name, PackageFullName
- The output of the above command will be a list with two columns. Under the first column the full name of the App (Name) is displayed and at the second column the Full Package Name (PackageFullName) is displayed.

- Wait for the list to load and try to search for the apps which you consider to be unnecessary for your PC. Locating the apps you want to remove might take a while but please be patient
- When you find it, copy everything next to the PackageFullName line by selecting the entire text and using the Ctrl + C key combination.
- Use the following command in order to uninstall the app from your PC. Replace the bolded PackageFullName with the actual name you just copied and click Enter.
Remove-AppxPackage -package PackageFullName

- Repeat the same steps for each app you want to get rid of. Don’t be alarmed if the method won’t work for certain apps, it’s probably because Windows has protected them.
Note: These apps can be restored and reinstalled.
Solution 2: A Similar Method With DISM
Some users have suggested that the method above is not that efficient since the user can reinstall them at any time. The same users have suggested using DISM in order to completely remove the apps for all users and this option won’t let you restore these apps by running any commands. Follow the steps below and be careful not to do something you might regret!
First, we need to obtain the PackageName of each app you have installed. When you run this command, you will receive a list of apps installed with their associated PackageName.
- Navigate to the Start menu, search for PowerShell, right-click on the first result and Run it as Administrator.

- Now enter this command to get PackageName of all of the apps you currently have installed on your PC.
- DISM /Online /Get-ProvisionedAppxPackages | select-string Packagename
- Copy this command and right-click to paste the code in the PowerShell window. Next, click Enter to execute the command.

- Now use the following command to delete the app.
- DISM /Online /Remove-ProvisionedAppxPackage /PackageName:$Package
- Copy this command and replace the “$Package” text with the associated ID of the app you want to uninstall. This ID can be found if you scroll up to locate the app of your choice on the list which appeared above.
- DISM /Online /Remove-ProvisionedAppxPackage /PackageName:Microsoft.ZuneVideo_2019.6.12101.0_neutral_~_8wekyb3d8bbwe
- Now enter this command to delete the app and repeat these steps for each app that you want to remove.
Solution 3: Removing Bloatware Before You Even Install Windows 10
If you always wanted to work with a clean version of Windows 10 instead of having deal with bloatware in the form of preinstalled applications, you should know that there is a way of never seeing the apps if you choose to disable them before you even install Windows.
This solution is especially useful if you are about to install Windows 10 so make sure you follow the info below properly:
- You will need ADK tools in order to mount the media and work with it. You can download this useful tool by clicking here. Go to the bottom and click on the black Download now button. Know that you will only be using the Deployment Tools and not the entire tool.

- Because of the fact that you are making changes to installation files of Windows 10, you will need to copy the contents of the .iso file or the DVD to your local drive. You should only copy the files located here:
- X:\sources\install.wim , where X represents the disc where the Windows 10 installation files are located. Let’s say that you have copied the files to E:\\Windows10
- You will also need to provide the location where you should mount the .wim at. Let’s use E:\mount.
- Now let’s use the DISM tool in order to mount the .wim so we can work with it. From a Powershell window with administrator permissions, which you can access by clicking Windows Key + X and choosing this option, use the following:
- dism /mount-wim /wimfile:E:\Windows10\install.wim /mountdir:E:\mount /index:1

- The .wim image you copied is now mounted. In the same Powershell window, run this command in order to list all off the apps you have installed
- Dism.exe /image:E:\mount /Get-ProvisionedAppxPackages > apps.txt
- This will display the installed apps in a text file called apps.txt. The template for each app should look like this:
- DisplayName : Microsoft.3DBuilder
- Version : 2015.624.2254.0
- Architecture : neutral
- ResourceId : ~
- PackageName : Microsoft.3DBuilder_2015.624.2254.0_neutral_~_8wekyb3d8bbwe
- Here comes the fun part – you can remove anything you want. BE careful not to choose some of the important apps such as the Windows Store as you won’t be able to reinstall it without reinstalling Windows.
- To uninstall an app, you need its PackageName. Type in the following command with any package you want to delete:
- dism.exe /image:E:\mount /Remove-ProvisionedAppxPackage /PackageName:Microsoft.3DBuilder_2015.624.2254.0_neutral_~_8wekyb3d8bbwe

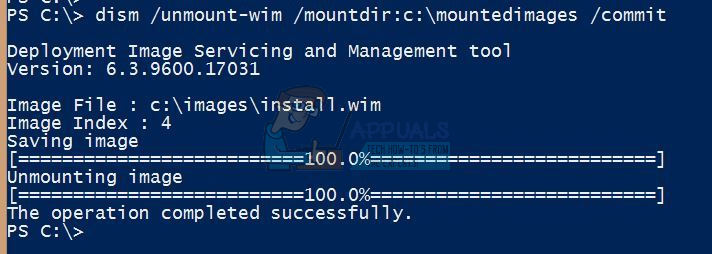
- After you have deleted all of the apps you wanted gone, you can use the command below in order to unmount the .wim and commint to your changes.
- dism.exe /unmount-wim /mountdir:E:\mount /commit

- If you have changed your mind, use /discard at the end of the command to unmount and discard changes.
- Now all you need to do is to copy the .wim file you have mounted and edited back to its original location of your Windows 10 installation disc and you have successfully deleted these apps from the Windows 10 installation. Enjoy the Windows OS without bloatware!