How to Reduce the Size of WinSxS in Windows Client and Windows Server
Have you ever experienced that your physical or virtual disk is being consumed by a bunch of files inside of the WinSxS directory and you weren’t able to delete any of them, because you didn’t have enough permission, even with an Administrator account? Probably, you were.
Whenever you are updating your Windows operating system, it will download and store files at C:\Windows\WinSxS. According to Microsoft, previous versions of some components are kept on the system for a period of time, allowing you to rollback if necessary. After a period of time, these older components are automatically removed from the installation. But, we realized that this is not always the case, and you need to do it manually.
Please note that you shouldn’t delete files within the WinSxS folder, because deleting files from the WinSxS folder or deleting the entire WinSxS folder may severely damage your system so that your PC might not boot and make it impossible to update. Even if you do it, you should do only if you have a backup of your system image.
I have a scenario where my virtual machine does not have enough free space to operate properly because WinSxS has consumed 30% of disk space. The virtual machine has a 50 GB disk size and it is running Windows Server 2016 since December 2016. The WinSxS is consuming 15 GB of free space as it still has a lot of downloaded updates since December 2016. The goal of this article is to explain how to reduce the size of the WinSxS folder and free up some disk space.
The same procedure applies to the client operating system from Windows 7 to Windows 10, and server operating systems from Windows Server 2012 to Windows Server 2019.
Method 1: Run Disk Cleanup
In the first method, we will do disk cleanup by using a native Windows utility known Disk Cleanup.
- Hold Windows Explorer and press E to open File Explorer
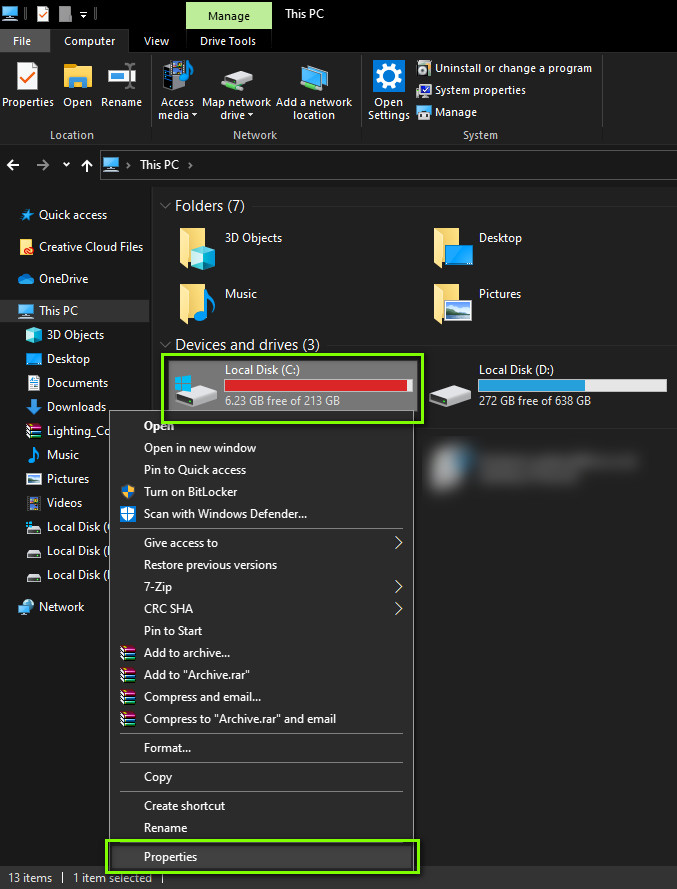
- Click on This PC and navigate to your system partition, by default it is Local disk (C:\)
- Right-click on partition C:\ and then click Properties
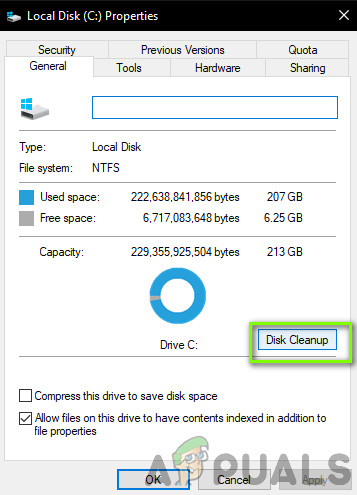
C Partition Properties - Under General click on Disk Cleanup and wait until Disk Cleanup calculates how much disk space is consumed on your Windows machine. This may take a few minutes to complete.
Disk Cleanup - Select files you want to delete and click OK
- Click on Delete Files to confirm the permanent deletion of files. The Disk Cleanup utility is cleaning up unnecessary files on your machines
- Open File Explorer and verify if some space is being free up
Method 2: Reduce the Disk Size of the WinSxS by using DISM
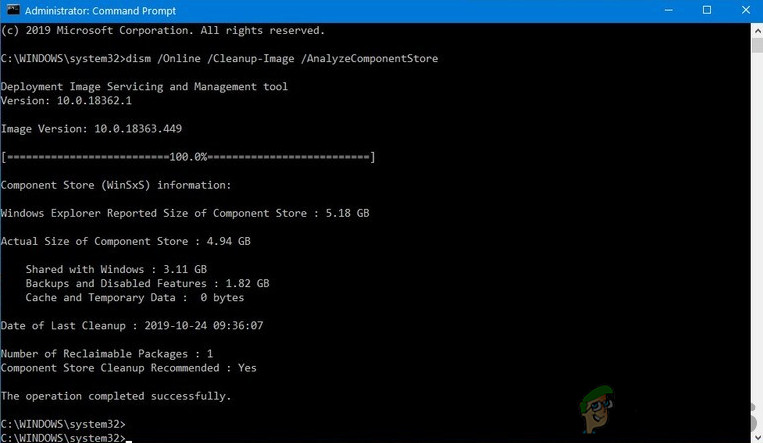
In the second part, we will reduce the disk size of the WinSxS by using DISM. DISM (Deployment Image Servicing and Management) is a command-line tool used to mount and service Windows images.
- Left-click on Start Menu and click Windows PowerShell (Admin) or Command Prompt (Admin). In our case, we will use the Command Prompt (Admin). It is mandatory to run the command-line tool as Administrator and not Standard user account.
- Type the following command and press Enter to reduce the size of the WinSxS folder.
dism.exe /online /Cleanup-Image /StartComponentCleanup
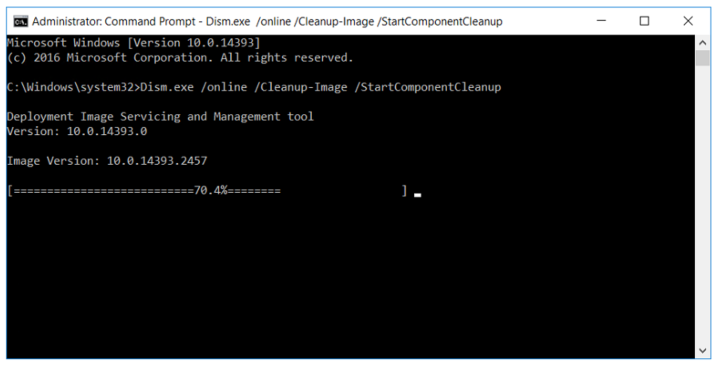
- Once it is finished, type the following command and press Enter to remove all superseded versions of every component in the component store. Please note that all existing service packs and updates cannot be uninstalled after this command is completed. This will not block the uninstallation of future service packs or updates.
dism.exe /online /Cleanup-Image /StartComponentCleanup /ResetBase
- Restart Windows Server. Open File Explorer and verify how much free space you have
Method 3: Delete Old Files from WinSxS. Use with Caution!
In this method, we will delete old update files that are download and installed in 2016, 2017, and 2019. Before proceeding with this method, please do a backup of your image or create a snapshot of your virtual machine. We do not recommend performing this action in a production environment, but the testing environment to see how Windows will behave after deletion of the files and folders in the WinSxS.
- Hold Windows Explorer and press E to open File Explorer
- Navigate to C:\Window, right-click on WinSxS, and then click Properties.
- Click on Security and then click Advanced to open special permissions.

Advanced Permission Properties - Under Owner: TrustedInstaller click on Change.
- Enter the object name that is Administrator and that you use on running Windows machine, click on Check Names, and then click on OK.
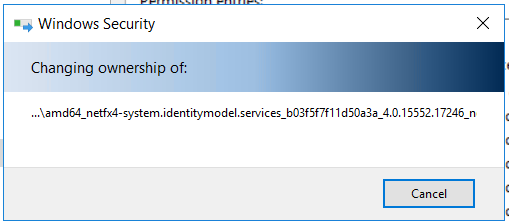
- Click Apply and then click If you have just taken ownership of this object, you will need to close and reopen this object´s properties before you can view or change permissions.
- Click on Edit and click on Add. Now Enter the object name that is Administrator and that you use on running Windows machine, click on Check Names, and then click on OK.
- Select account and allow full control permissions
- Click Yes to change permission settings on system folders. Click Apply and then OK. Close all open windows
- Delete old files. In our case, we will delete all files from 2016, 2017, and 2018 year which will free up around 11 GB.


Hi Kevin thanks for your post and Method 3 !
But you may have seriously crashed your system or apps cause DLL files from winsxs are used, or you are very luky !
Deletion must be done with a search of files with last date accessed file given more of 1 year or 6 month or whenever you want according how you are using your system.
In this way you will not have crash system.
Second point is that you should immediatly after having reduce size of this folder, install the new fresh update version from windows 10, this way permits starting with a new clean and 200% sure WinSxs folder files.
I am doing this those days on my laptop with few disk space to update win10 from 1803 version to latest 20H2 where 13Go free espace on C: is needed absolutly.