How to Recover an Unsaved Word Document on Mac
Microsoft Word is arguably the best and most commonly used word processor for computers out there. While it is true that Word is a word processor developed and distributed by Microsoft, it is available not only for the Windows Operating System but also for the Mac Operating System on computers and also works on various mobile Operating Systems. Microsoft Word for Mac is just as good as Microsoft Word for Windows – just as feature-rich and just as powerful a word processing tool. However, just like Word for Windows, Word for Mac is also prone to losing unsaved progress in a document or an unsaved document in its entirety if Word crashes or if either the program or the computer are shut down unexpectedly.

No one likes losing progress on a Word document they’re working on, let alone losing an entire document that they had not yet saved. While it is true that the chances of recovering an entire unsaved Word document are slim at best since unsaved documents aren’t moved from a computer’s RAM to its hard disk until they are saved and because Word for Mac’s document recovery features don’t actually kick in until a document is saved, unsaved progress in a saved Word document can, in most cases, be recovered one way or another. Not only that, you can even recover corrupt Word files.
If you’re looking to recover an unsaved document on Word for Mac, the following are some of the most effective methods you can use to try and do so:
Method 1: Look for the unsaved document in the Recovered items folder
The word for Mac often temporarily saves documents that the user has not yet saved themselves in the Recovered items folder that resides in the Trash of a Mac computer. If you would like to use this method to see if you can recover the unsaved Word for Mac document you are trying to recover, go to your computer’s Trash and look for the Recovered items folder. If you do find the Recovered items folder, look inside it and see if there’s a copy of the unsaved Word document in question in there. If you see a copy of the target unsaved document in the Recovered items folder, simply move it to some other location on your computer and load it up in Word for Mac to continue working on it.
Method 2: Look for temporary copies of the unsaved document in the Temporary items folder
A copy of the unsaved document you are trying to recover might also be saved in the Temporary items folder on your computer. To see if that’s the case and then recover the target document if this turns out to be true, you need to:
- Go to the Finder.
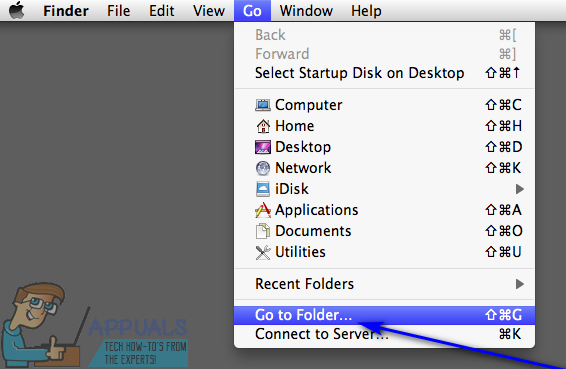
- Click on Go > Go to folder.

- Navigate to the following directory:
/private/var/folders - In this directory, open the Temporary items folder and locate files titled Word Work File inside it.
- Move any files titled Word Work File you find to your Desktop.
- Drag the files named Word Work File from your Desktop onto the Word for Mac icon to have Word open the files.
- If it turns out to be the unsaved Word document you were looking for in the first place, simply click on File > Save As and save it to your desired location with your desired file name.
Method 3: Use Word for Mac’s AutoRecovery feature
The word for Mac has certain features designed specifically to make sure a user’s progress in a document is saved at regular intervals so that the user doesn’t lose everything in the event of a crash or unexpected shutdown. One of these features is AutoRecovery – AutoRecovery simply saves a user’s progress in a saved Word document at regular intervals (10 minutes), and in the event of a crash or unexpected shutdown, a saved document’s AutoRecovery file can be used to recover it. If you would like to use this method to recover an unsaved Word document on Mac, you need to:
- Make sure Word for Mac isn’t already running.
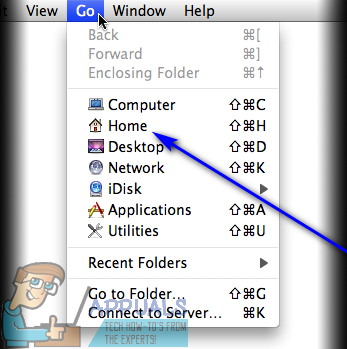
- Click on Home in the Go menu on the Finder.

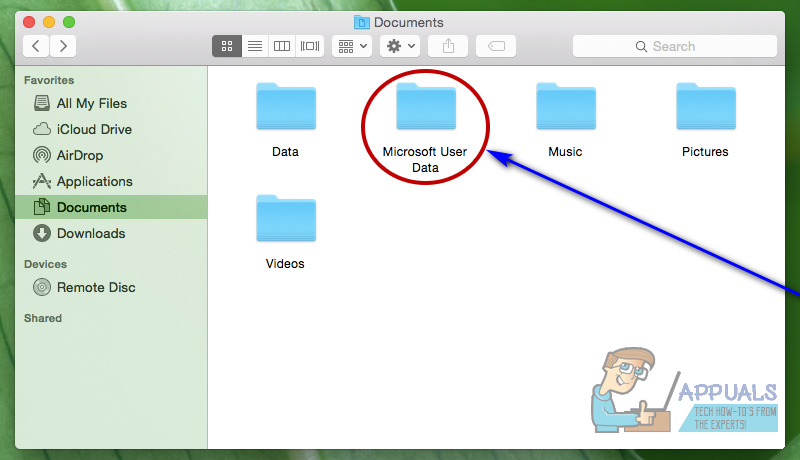
- Navigate to Documents > Microsoft User Data.

- Look for files that have the phrase “AutoRecovery save of” at the beginning of their names. Among these files, look for the AutoRecovery save of the Word document you are trying to recover.
- Once you find the AutoRecovery save of the document you want to recover, rename it and add the .doc extension to the end of its name. Doing so will allow Word for Mac to open the file.
- Double-click on the file to have Word open it.
- Make sure it’s the same document you wanted to recover, then click on File > Save As and save the file to your desired location on your computer with your desired file name.