How to Migrate DHCP from Windows Server 2008 R2 to Windows Server 2016
There are two ways how you can assign IP addresses to hosts in your computer network, including static and dynamic addressing. Static addressing is manually assigning IP addresses to your hosts which consume much more time and decrease the productivity of IT Administrator. We are recommending you to use dynamic addressing using DHCP (Dynamic Host Computer Protocol) protocol. The best practice will include static addressing for servers, storage and network printers, and dynamic addressing to other hosts in the network. You can promote your router, firewall or physical server as DHCP server.
Imagine the next scenario: You are managing 200 hosts in the small company. Currently, you are using Windows Server 2008 R2 as DHCP server and your plan is to migrate your DHCP server to new physical server powered by server Dell PowerEdge R730 and Windows Server 2016.
We will show you how to migrate DHCP from Windows Server 2008 R2 to Windows Server 2016. There are different ways how to do it, but we will show you how to do it by using Powershell. So let’s start.
In the first part, we will install DHCP Server on Windows Server 2016. Your Windows Server 2016 should be a part of domain infrastructure. Before doing this step, please add your server to your current domain. In our example, Windows Server 2016 is added to a domain named appuals.com.
- Log on Windows Server 2016 by using Administrator account
- Open Server Manager

- Under Configure this local server click Add roles and features
- Under Before You Begin click Next

- Under Installation Type, choose Role-based or feature-based installation and then click Next

- Under Server selection, choose your server and then click. In our example, we will install DHCP Server on a server named DHCPSRV1.

- Under Server Roles select DHCP Server and then click Add Features. After that click Next.

- Under Features click Next

- Under DHCP Server click Next

- Under Confirmation click Install

- Wait until Windows is finished installing DHCP Server

In the second part, we will export DHCP Server configuration from Windows Server 2008 R2. In this example, we will save DHCP Server configuration on local disk C:\. You can save on external disk, USB flash disk or network location. Later, you will need this file on the new server.
- Log on Windows Server 2008 R2 by using Administrator account
- Click Start menu and type Powershell
- Right click on Powershell and then choose Run as Administrator
- Type netsh DHCP server export C:\dhcp.txt and then press Enter to export DHCP server to .txt file

In the third part we will import DHCP Server configuration to a new server powered by Windows Server 2016, and then we will authorize the new DHCP. In this part you will need access to exported DHCP Server configuration, so please copy the .txt file to your local storage or network location. In our example, we will copy the .txt file to C:\.
- Log on Windows Server 2016 by using Administrator account
- Click Start menu and type Powershell
- Right click on Powershell and then choose Run as Administrator
- Type netsh DHCP server import C:\dhcp.txt and press Enter to import .txt file

- Open Server Manager
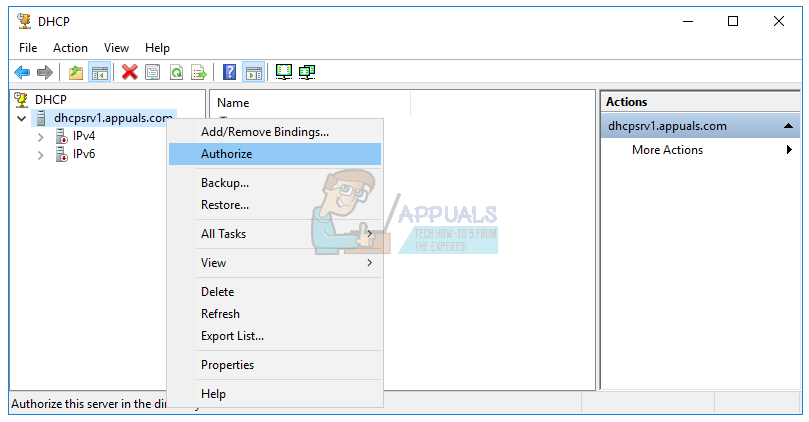
- At the right top corner choose Tools and then click DHCP
- Right click on your server and then click Authorize

- Make sure that your new DHCP has all of the same configuration, including scopes, reservations

In the fourth part, we will remove DHCP Server role from old server powered by Windows Server 2008 R2. Before that, we will check is the old DHCP active or not. It should be deactivated.
- Log on Windows Server 2008 R2 by using Administrator account
- Hold Windows logo and press R
- Type dhcpmgmt.msc and press Enter to open DHCP Management
- Make sure your old DHCP server is not active anymore. After you authorize your new DHCP server, your old DHCP server will deauthorize automatically, as you can see in next screenshot.

- Open Server Manager, again
- Under Roles Summary click Remove Roles
- Under Before Your Begin click Next
- Deselect DHCP Server and then click Next

- Under Confirmation click Remove
- Restart your Windows Server 2008 R2