How To Make Arduino Based Hand Gesture Control Of Your Computer?
Hand Gesture Control is not a new thing. We have seen many robots that are controlled by hand gestures. Technology is moving so fast that anything we think of is already present in the market. A very Interesting project is to control your Personal Computer or the Laptop using a small Microcontroller board called Arduino Uno. By using An Arduino we can perform some simple functions by just waving our hand instead of using a mouse or the keyboard. These functions include Sliding of pictures, Scroll up and down in the pages, switching between the tabs of a web browser, play or pause a video, switch between desktop applications, etc.
How To Perform Different Operations On PC Using Hand Gestures?
Now as we know the abstract of the project, let us move forward and gather different information to start working. We will first make a list of the components, then study them briefly, then assemble all the components to make a working system.
Step 1: Collecting the Components
The best approach to start any project is to make a list of components and going through a brief study of these components because no one will want to stick in the middle of a project just because of a missing component. A list of components that we are going to use in this project is given below:
- No products found.
- No products found.
- No products found.
Step 2: Studying the Components
As we have a complete list of all the components. Let’s move ahead and go through a brief study of the working of all the components.
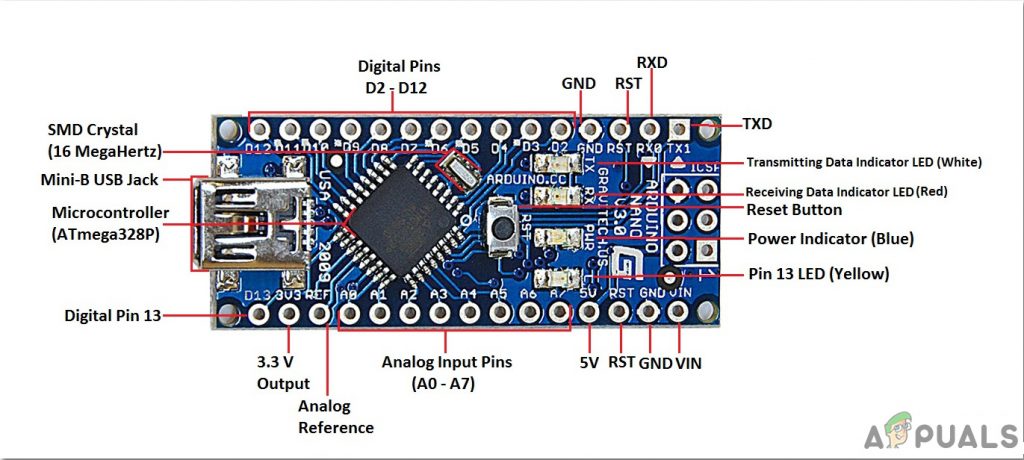
Arduino Nano is a microcontroller board that carries out various operations in different circuits. It requires a C Code that tells the board what tasks to perform and how. It has 13 digital I/O pins which mean that we can operate 13 different devices. Arduino Nano has exactly the same functionality as Arduino Uno but in quite a small size. The microcontroller on the Arduino Nano board is ATmega328p.If you want to control more than 13 devices, use Arduino Mega.
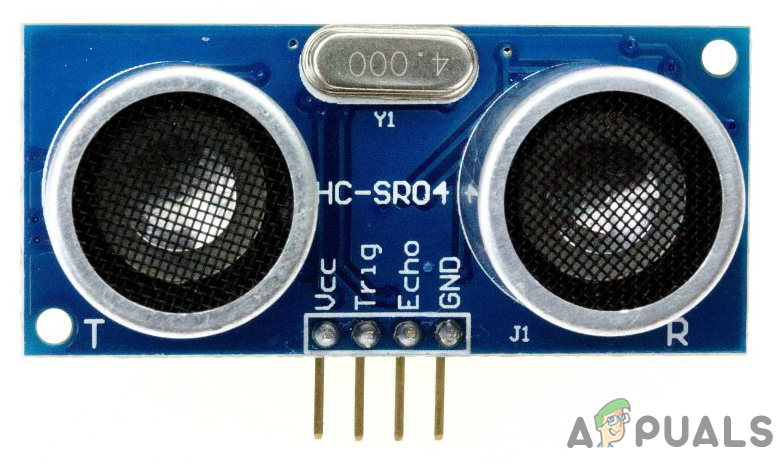
HC-SR04 board is an ultrasonic sensor which is used to determine the distance between two objects. It consists of a transmitter and a receiver. The transmitter converts the electrical signal into an ultrasonic signal and the receiver converts the ultrasonic signal back to the electrical signal. When the transmitter sends an ultrasonic wave, it reflects after colliding with a certain object. The distance is calculated by using the time, that ultrasonic signal takes to go from the transmitter and come back to the receiver.
Step 3: Assembling the Components
Now as we know the main working of the components that we are going to use. Let us start assembling the components to make a final working product.
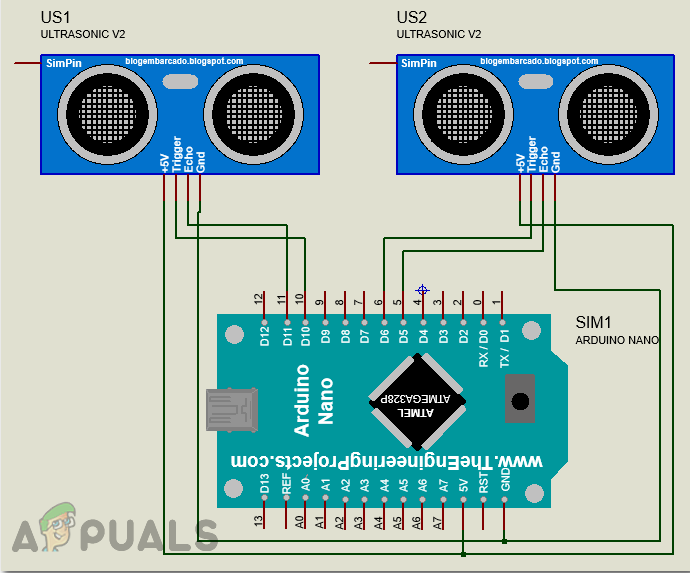
- Connect the Vcc and ground Pins of both the ultrasonic sensors to the 5V and ground of the Arduino Nano board. The trig and echo pin of the first ultrasonic sensor is connected to pin11 and pin10 of Arduino Nano respectively. The trig and echo pin of the second ultrasonic sensor is connected to the pin6 and pin5 of the Arduino nano respectively.
- Attach the Arduino nano board to the back of the laptop screen scotch tape. Both of the ultrasonic sensors will be attached to both top corners of the laptop.
Step 4: Getting Started with Arduino
If you are not already familiar with the Arduino IDE, don’t worry because a step by step procedure to set-up and use Arduino IDE with a microcontroller board is explained below.
- Download the latest version of Arduino IDE from Arduino.
- Connect your Arduino Nano board to your laptop and open the control panel. Then, click on Hardware and Sound. Now, click on Devices and Printers. Here, find the port to which your microcontroller board is connected. In my case it is COM14 but it is different on different computers.

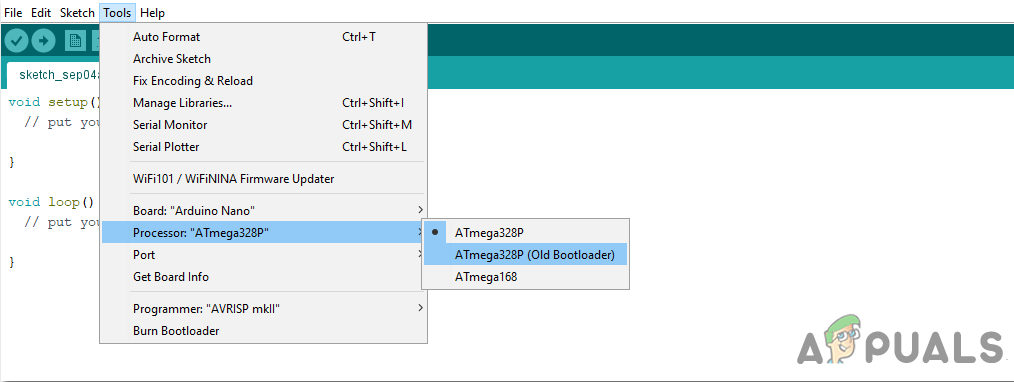
Finding Port - Click on the Tool menu and set the board to Arduino Nano from the drop-down menu.

Setting Board - In the same Tool menu, set the port to the port number that you observed before in the Devices and Printers.

Setting Port - In the same Tool menu, Set the Processor to ATmega328P (Old Bootloader).
Processor - Download the code attached below and paste it into your Arduino IDE. Click on the upload button to burn the code on your microcontroller board.
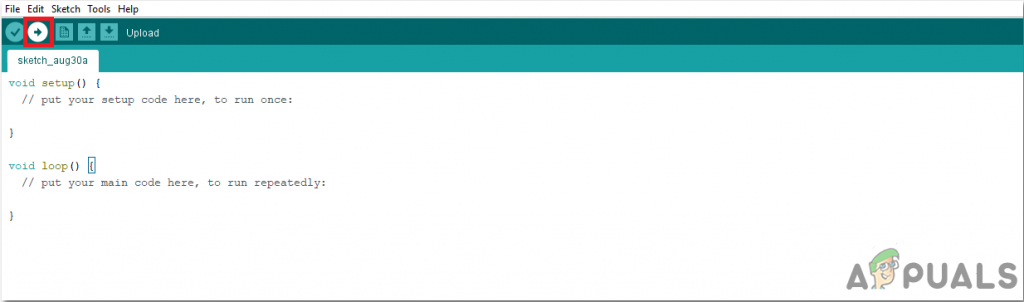
Upload
To download the code, click here.
Step 5: Setting the Gestures
We want to write a code that will detect and convert the distance into an appropriate command to perform a task.
let us first make a list of all the tasks that we want to carry out using gestures. Following is the list of all those tasks.
- Switch to the next tab or the previous tab in the Web Browser.
- Scroll up and down on Web Page.
- Play and Pause videos in VLC Player.
- Increase and decrease the volume.
- Switch between two tasks.
We will now set gestures to perform all these operations.
- Gesture 1: Place Your hand in front of the right ultrasonic sensor between about 15cm-30cm. After a small duration of time, pull your hand away. This will scroll down the web page and decrease the volume.
- Gesture 2: Place Your hand in front of the right ultrasonic sensor between about 15cm-30cm. After a small duration of time, push your hand towards the ultrasonic sensor. This will scroll up the web page and increase the volume.
- Gesture 3: To move to the next tab, swipe your hand in front of the right ultrasonic sensor.
- Gesture 4: To move to the previous tab, swipe your hand in front of the left ultrasonic sensor. This will also play/pause your video on VLC player.
- Gesture 5: To switch between two tasks, swipe your hand across both the sensors.
We have written the code and made all the conditions based on the above gestures. And it should be noted that we are using Google Chrome as our Web Browser and VLC Media Player as our media application.
Step 6: Understanding the Arduino Code
We have written a code that converts 5 gestures into a digital command. this command is sent to the serial port. We will write a python program to interpret these commands and perform some keyboard functions to accomplish various tasks.
1. At the start, all the pins are initialized that we want to connect with the sensors. Different variables are also initialized to store data for the calculation of time and distance.
const int trigPin1 = 11; // trigger output pin ( sensor 1 )
const int echoPin1 = 10; // echo input pin ( sensor 1 )
const int trigPin2 = 6; // trigger output pin ( sensor 2 )
const int echoPin2 = 5; // echo input pin ( sensor 2 )

// variables used for distance calculation

long duration;
int distance1, distance2;
float r;
unsigned long temp=0;
int temp1=0;
int l=0;
2. We have written a function, void find_distance(void) to calculate the distance of both the ultrasonic sensors. It is better not to trigger both of the ultrasonic sensors at the same time because it can cause some interference. This function will return the distance in cm.
void find_distance (void)
{
 digitalWrite(trigPin1, LOW);
 delayMicroseconds(2);
 digitalWrite(trigPin1, HIGH);
 delayMicroseconds(10);
 digitalWrite(trigPin1, LOW);
 duration = pulseIn(echoPin1, HIGH, 5000);
 r = 3.4 * duration / 2; //
 distance1 = r / 100.00;

 digitalWrite(trigPin2, LOW);
 delayMicroseconds(2);
 digitalWrite(trigPin2, HIGH);
 delayMicroseconds(10);
 digitalWrite(trigPin2, LOW);
 duration = pulseIn(echoPin2, HIGH, 5000);
 r = 3.4 * duration / 2;
 distance2 = r / 100.00;
 delay(100);
}
3. void setup() is a function that that initializes all the pins to be used as INPUT or OUTPUT. Baud Rate is also set in this function. Baud Rate is the speed by which the microcontroller board communicates with the sensors attached.
void setup()
{
 Serial.begin(9600);
 pinMode(trigPin1, OUTPUT); // initialize the trigger and echo pins of both the sensor as input and output:
 pinMode(echoPin1, INPUT);
 pinMode(trigPin2, OUTPUT);
 pinMode(echoPin2, INPUT);
 delay (1000);
}
4. void loop() is a function that runs repeatedly ina loop. In this loop, we are calculating the distance in many instances and applying conditions to detect the gesture.
void loop()
{
 find_distance();

 if(distance2<=35 && distance2>=15)
 {
  temp=millis();
  while(millis()<=(temp+300))
  find_distance();
  if(distance2<=35 && distance2>=15)
  {
   temp=distance2;
   while(distance2<=50 || distance2==0)
   {
    find_distance();
    if((temp+6)<distance2)
    {
     Serial.println("down");
    }
    else if((temp-6)>distance2)
    {
     Serial.println("up");
    }
   }
  }
  else
  {
   Serial.println("next");
  }
 }

 else if(distance1<=35 && distance1>=15)
 {
 temp=millis();
 while(millis()<=(temp+300))
 {
  find_distance();
  if(distance2<=35 && distance2>=15)
  {
   Serial.println("change");
   l=1;
   break;
  }
 }
 if(l==0)
 {
  Serial.println("previous");
  while(distance1<=35 && distance1>=15)
  find_distance();
 }
 l=0;
 }
}
Step 7: Python Programming
We will install PyAutoGUI and invoke various keyboard commands by simply reading incoming serial data. With this program, we can mimic many mouse operations and keyboard operations like left or right-click on the mouse or any keyboard key press.
First, we will install PIP on our windows. It is a simple procedure. Click here to open the video guide to install pip on your computer. After installing PIP on our computer, we will move ahead and install pyAutoGUI. To do so, type the following command in the command prompt
python -m pip install pyautogui
This command will install puAutoGUI on your computer. If everything goes well till now, let us go ahead and write a python program to invoke different keyboard commands. As we are receiving 5 different commands in the serial input by the Arduino code, Python code can convert these commands into certain keyboard commands as follows.
- Data: “next” —–> Action: “Ctrl + PgDn”
- Data: “previous” —–> Action: “Ctrl + PgUp”
- Data: “down” —–> Action: “Down Arrow”
- Data: “up” —–> Action: “Up Arrow”
- Data: “change” —–> Action: “Alt + Tab”
Python can be used to program an Arduino, simply by importing pyfirmata, which can interface the Arduino with Python. Following is the Python code which will be required to run the project:
That was the simplest way to control your PC by using hand gestures. Follow all of the steps mentioned above and enjoy controlling your PC by your hand instead of a keyboard and mouse.


