How to Make a Checklist in Microsoft Word
It is entirely possible for users to create entire checklists in Microsoft Word. Using Microsoft Words and the wide, wide range of features the word processor has to offer to users, you can comfortably create a checklist with as many items as you want that you can then check off. Planning a trip and need to make a checklist for everything you need to get done before you can head off? Planning to cook something using a recipe and need to make sure you perform every single step and do so in the right order? These are exactly the kinds of situations that simply scream checklist, and you can quite easily make a checklist using Microsoft Word.
Users can create two different kinds of checklists using Microsoft Word – checklists with check boxes and check marks instead of bullets or numbers (this is the recommended kind of checklist for users looking to create a checklist and then print it out so that they can check off the items on it by hand) and lists that you can check off in Word itself (this is the recommended kind of checklist for users who want to be able to check items off the list in Word itself instead of printing the checklist out, and this kind of checklist requires users to add a content control to the checklist they create).
The ability to create checklists exists of all versions of Microsoft Word – from Microsoft Word 2007 all the way up to Microsoft Word 2016. However, the exact steps you need to go through in order to create a checklist in a Microsoft Word document vary slightly between the different versions of Microsoft Word. Without further ado, here’s how you can create a checklist of basically any version of Microsoft Word that is currently and commonly used:
Create a bulleted checklist with check boxes instead of bullets
If you are simply looking to create a checklist with check boxes that you can create and then print out so that you can check the items off by hand, you can create a bulleted checklist with check boxes instead of bullets and then print it. In order to do so, you need to:
- Launch Microsoft Word and create a new document.
- Type out the list of items (using bullets or numbers) you want to create a checklist out of.
- Once you have typed out the entire list, highlight and select it. The bullets or numbers you used for the list will not be highlighted, but don’t worry.
- Navigate to the Home tab in the toolbar, and click on the arrow next to the Bullets option in the Paragraph section.
- Click on Define New Bullet….

- Click on Symbol….

- Open the dropdown menu located right next to Font: and click on a symbol font installed on your computer (Wingdings, for example) to select it.

- Scroll through the list of available symbols, looking for a symbol that either is a check box or resembles one enough to be passed off as one and function as one. If you don’t find such a symbol in the font you selected, simply switch to a different symbol font. Once you find the check box you want to use, click on it to select it and click on OK.
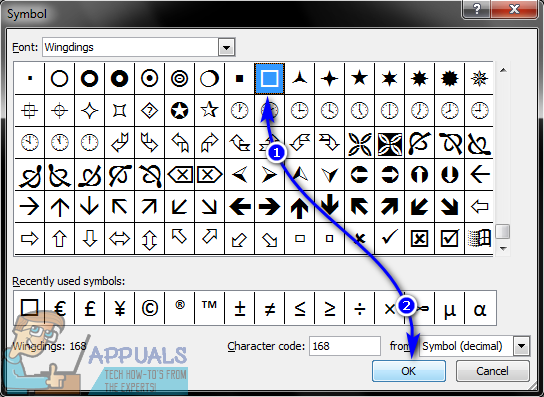
- Click on OK in the Define New Bullet dialog. As soon as you do so, every item in the list you typed out will have a check box next to it, turning the list into a checklist.

Once you have your checklist, you can simply save the Word document and print the checklist out if you want to.
Create a checklist you can check items off of in Word
On Microsoft Word, you can also create a checklist you can interact with using Word itself – you can save the checklist as a Word document and then check items off it on your computer using Word. To create a checklist you can check items off of in Word, you need to:
On Microsoft Word 2007
- Launch Microsoft Word and create a new document.
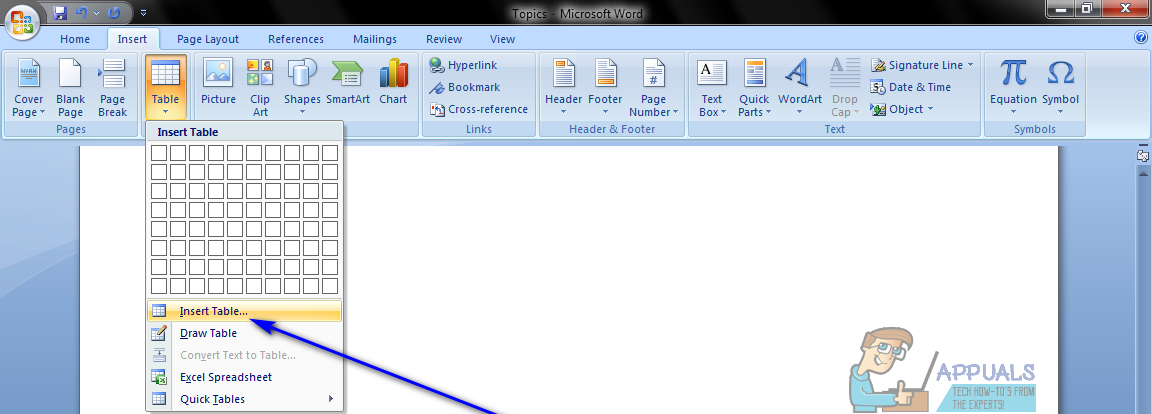
- Navigate to the Insert tab in the toolbar, click on Table in the Tables section and click on Insert Table….
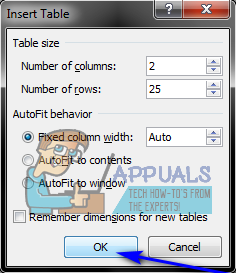
- Type 2 into the Number of columns field, and type however many rows you want to have in the table for however many items your checklist has into the Number of rows field. Once done, click on OK and your table will be created.
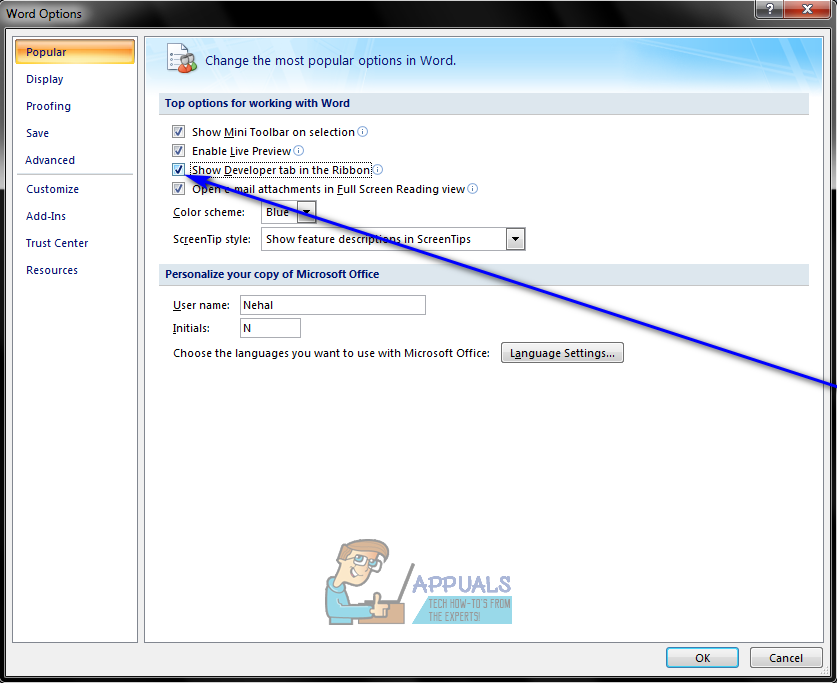
- Click on the Microsoft Office logo button in the top left corner of your screen, click on Word Options in the resulting menu and, in the Popular tab, enable the Show Developer tab in the Ribbon option by checking the check box located directly beside it. Once done, click on OK.
- Click on the top left cell of the table you created in step 3, navigate to the Developer tab in the toolbar and click on Legacy Tools in the Controls section.
- Click on Check Box Form Field under Legacy Forms. Once you do so, a check box should appear in the top left cell of the table. If the check box has a gray background, click on Legacy Tools in the Controls section of the Developer tab, and click on Form Field Shading to disable it and remove the gray background.
- One by one, click on every single cell of the table you want to have a check box in, and press Ctrl + Y in each one to insert a check box.
- Once you have added a check box to every single cell in the left column, start typing the items that make up your checklist in each of the cells in the right column.
- Right-click on the table, hover over AutoFit and click on AutoFit to Contents to select it.
- Right-click on the table, click on Table Properties, navigate to the Table tab, click on Options, type a number representing the amount of space you want there to be between a check box and the checklist item it corresponds to (the recommended number is 0.02) into the Left and Right boxes, and click on OK.
- In the Table tab of Table Properties, click on Borders and Shading, navigate to the Borders tab, click on None under Setting, and click on OK. Any borders you see on the table after doing so will only be to show you where the outlines of the table lie – these will not be visible in any prints.
At this point, you will have successfully created a checklist in Microsoft Word 2007. However, to be able to check items off this checklist by simply clicking on their corresponding check boxes, you need to lock the document. With the document locked, however, you will only be able to check items off the checklist – you will not be able to edit any other parts of the document unless you first unlock the document. To lock a checklist so that you can check items off it in Microsoft Word, you need to:
- Click on Design Mode in the Controls section of the Developer tab to make sure that it is disabled.
- Click on Protect Document in the Protect section of the Developer tab, and click on Restrict Formatting and Editing.
- Under Editing restrictions, enable the Allow only this type of editing in the document option by checking its check box.
- In the list of available editing restrictions, select Filling in forms.
- Under Start enforcement, click on Yes, Start Enforcing Protection.
- Assign a password to the document (so that only users who know the password can unlock the document) by typing a password into the Enter new password (optional) field, and then confirming the password. If you choose to skip this step and not assign a password, anyone will be able to unlock the document and edit it.
Once done, you will be able to check items of your checklist by simply clicking on their corresponding check boxes. If you want to edit any other parts of the document, you can simply unlock it by clicking on Protect Document in the Protect section of the Developer tab, clicking on Restrict Formatting and Editing and clicking on Stop Protection in the Protect Document dialog. If you do unlock the document containing the checklist, be sure to lock it afterwards to be able to continue checking items of the checklist.
On Microsoft Word 2010, 2013 and 2016
- Click on File > Options > Customize Ribbon.
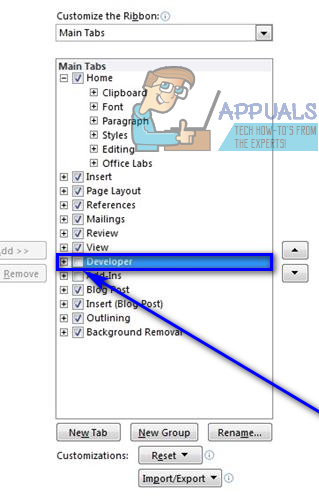
- Open the dropdown menu located directly under Customize the Ribbon: and click on Main Tabs to select it. In the Main Tabs list that appears, enable the Developer option by checking the check box located directly beside it, and click on OK.
- Click on + to expand the Developer tab, and then on + to expand the Controls section of the Developer tab, click on the Check Box Content Control option and then click to the right of the box.
- Select Check Box Content Control and click on OK.
- Click on the Check Box Content Control button in the Controls section of the Developer tab to insert a check box wherever your mouse cursor is and create a new checklist on that position in the document.
- Press the Right Arrow key twice and then type whatever you want to be the first item on your checklist right next to the check box that was inserted.
- Highlight and select the check box and checklist item combination you just created, and press Ctrl + C to create a copy of the check box content control.
- Move to the next line and press Ctrl + V to paste the check box content control you copied over in the last step, and simply type the next item on your list in place of the copied checklist item. Repeat this step and keep on repeating it until you have created your entire checklist.
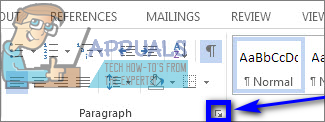
- Select the checklist you just created and click on the Paragraph dialog box launcher in the Paragraph section of the Home tab.
- Type 0.25 in the Left field under Indentation, select the Hanging option under Special, and click on OK once you’re finished.
Next, you need to actually lock the checklist (and the document that contains it) so that you can check items off the list using Microsoft Word itself. To do so:
- Select the checklist you created.
- Click on Group and then on Group in the Controls section of the Developer tab.
You will now be able to directly check items off your checklist in Word by simply clicking on the check boxes located directly next to the items you want to check off. If you would like to change anything else in the checklist, however, you are going to have to unlock it by selecting the checklist and clicking on Group and then on Ungroup in the Controls section of the Developer tab. If you do unlock the checklist, be sure to lock it again once you’re done editing it, otherwise you will not be able to check items off it in Microsoft Word.