How to Install Full Android 5.1 On Shield TV
Having a full android experience on your Shield TV is something many people can wish for, it has many advantages such as downloading any google play store app (without the need to sideload the application), you can use many game controllers such as XBOX 360 one through a dangle, ps3 controllers using the sixaxis application, you can have widgets on your home screen, customize the themes and wallpapers (live wallpapers too!), you can use the ebay app or check your emails with the email app, use twitter, skype and many other applications.
But as everything in life there are a few things that do not work as of yet, firstly the voice recognition on your shield remote (but you can use a webcam and a mic to get that going)and your Nvidia shield controller will only work when wired or you can use the Droidmote application for it to work wirelessly.
Please note that during this process all your data is going to be lost so I advise you to take all necessary backups using your laptop.
Before you start rooting, you will need these:
- Your Shield connected to a TV.
- A laptop with internet connection and a USB port
- A USB cable
Stage 1: Downloading ADB
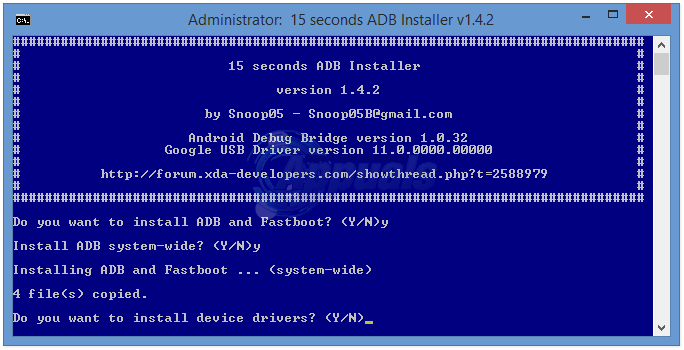
First you will need to download adb setup for your PC system from here, ADB acts like a bridge between your PC and your nvidia shield to make it do some commands, once downloaded run the adb-setup.exe file by using right click then run as administrator, when a command window is opened press Y or yes to install ADB and fastboot, press again Y or yes when asked if you want to install ADB system wide, and again when asked to install drivers and wait for few seconds to finish installation.
Now we are going to need to turn on ADB debugging in your shield, go to Settings -> build number and tap on it about 7 times until a message is shown indicating that you are now a developer, go back to your main screen and access settings again, search for ‘Developers’ and access it, in the menu you will find ADB debugging enable it.
Stage 2: Installing Drivers
Now connect your shield tv to your computer with a usb cable and go into device manager, go to your desktop, right click on my computer, press properties and you should see a device manager option, (or you can go to the start menu and type in ‘devmgmt.msc’).
once it is open look for ADB interface in your list of uninstalled drivers, right click on it and select properties, select update Driver and then Browse my computer for driver software then select ‘Let me pick from a list of device drivers on my computer’ select ADB interface then Fastboot Interface and press yes at Update driver warning, after successful install close this window.
Now you will need to download these files from here and here, place them into a folder on your desktop, then go to your start menu, search for ‘cmd’ and copy the file that appears into the same folder. When done open the cmd file and type in ‘adb reboot bootloader’ , when your Nvidia shield is rebooted into bootloader mode you will need to reinstall the drivers using the same method mentioned above.
Stage 3: Unlocking the Bootloader
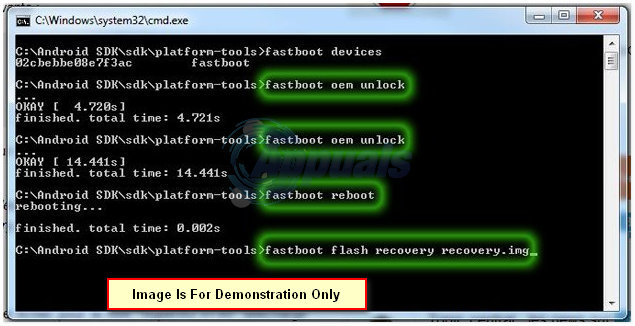
When you are done with installing drivers, in your command prompt window type in ‘fastboot oem unlock’ , You will get a warning screen on your tv, you will need to confirm it using short press to change options and holding it for few seconds to select the confirm options. Wait a little bit until the unlocking is done (Warning: this is a process that will take a few minutes on the 16 GB version but up to two hours on the 500GB version. So be patient.)
Stage 4: Flashing Original Firmware
For this process to work you will need to be on firmware 2.1 so we are going to guide you through the process of flashing it first.
We are going to separate this process into two paragraphs, follow paragraph one if you have the 16GB version and skip paragraph two, vice versa for the 500GB version.
16GB version:
First download the firmware for your version from here onto your desktop and extract it to its own folder, copy a cmd file into that folder (from your search menu) and run the command prompt. Next type in these instructions as they are individually.
fastboot flash recovery recovery.img
fastboot flash boot boot.img
fastboot flash system system.img
fastboot flash userdata userdata.img
fastboot flash staging blob
fastboot flash dtb tegra210-foster-e-p2530-0930-e02-00.dtb
For the 500GB version:
First download the firmware for your version from here onto your desktop and extract it to its own folder, copy a cmd file into that folder (from your search menu) and run the command prompt, type in these instructions as they are individually.
fastboot flash recovery recovery.img
fastboot flash boot boot.img
fastboot flash system system.img
fastboot flash userdata userdata.img
fastboot flash staging blob
fastboot flash tegra210-foster-e-hdd-p2530-0932-e02-00.dtb
After flashing is complete, reboot your system (might take a while for first initialization process). You will need to turn on ADB debugging again, go to Settings -> build number and tap on it about 7 times until a message is shown indicating that you are now a developer, go back to your main screen and access settings again, search for ‘Developers’ and access it, in the menu you will find ‘ADB debugging’ enable it.
Stage 5: Flashing full OS
Go to the folder where you downloaded the two files and put the cmd file, open the command prompt window and type in ‘adb devices’ if your device is read then proceed (if it is not then you might need to re download the drivers using the above method). Type in ‘adb reload bootloader’ and then type in ‘fastboot flash system system.img’(if this did not work then you might need to extract the ‘full OS’ zip file) then when it is finished type in ‘fast boot –w’ then ‘fastboot reboot’. You will now have a FULL android experience on your device. Do not forget to enable Bluetooth to get some of your remote’s functions.
Additional Information
After you get the full android experience you will maybe want to download the Nvidia grid application from the play store, it will work on streaming your games whether they are PC or android. It is very well adapted to the full OS and much better than the one on the android TV OS. You can use different launchers to get back that Android TV look, a quick search on the Google play store and tens of launchers will appear for you to choose from.