How to Install Complete Android OS on a PC
When people think of running Android on PC, they often think of emulators. But today I’m going to show you how to actually install Android as a complete operating system on your PC. This has tremendous benefits over simply running an Android emulator on your desktop.
For one, the Android OS will be able to take complete advantage of your system hardware, whereas an emulator shares CPU / RAM resources with the native OS environment. This means that Android apps and games will run flawlessly and buttery smooth on PC hardware when Android is installed as its own OS.
Imagine, all your favourite Android apps and games running flawlessly on your 32” PC monitor, with mouse and keyboard support. I shouldn’t need to explain how awesome this is for games like Clash of Clans or Mobile Legends. If you’re already drooling at the bit, read on as I’ll walk you step-by-step through installing the Android OS on your PC.
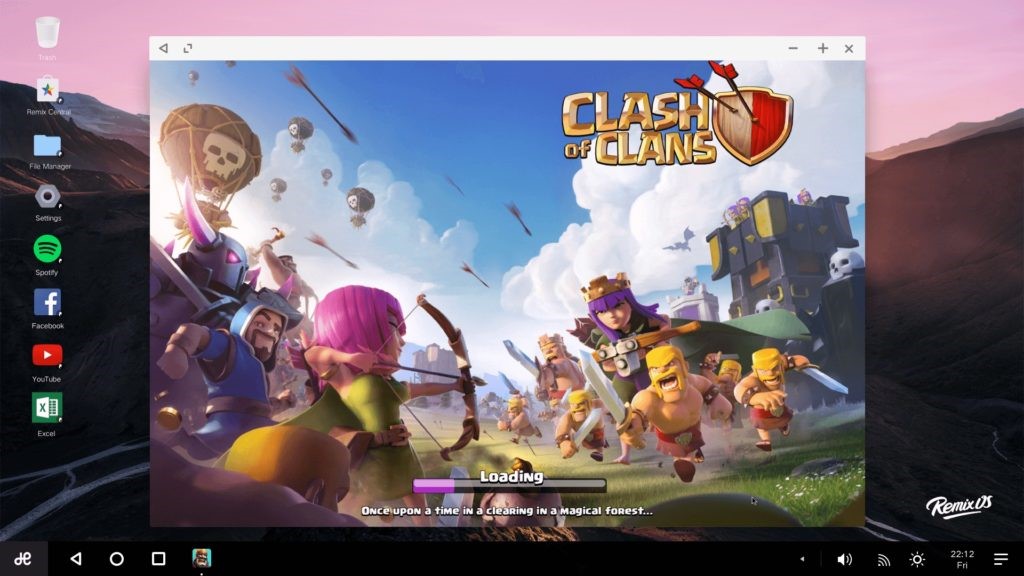
Note: For this guide I am using Remix OS, but have linked to other Android-for-PC options. But Remix OS is the best in my opinion, and the latest versions come pre-rooted, so you can immediately start installing all your favourite root apps.
Requirements:
- Android OS made for PC: You have several options here – the most popular are Remix OS. You can also try x86 Project or OpenThos, but for this guide I’ll be using Remix OS, because its highly optimized for PC hardware compatibility.
- A formatted USB drive with at least 8GB storage (optional, for bootable USB method)
.Exe Package Installation Method
There are two methods of installing Remix OS. If you’re running Windows 7/8/10, you can use the .exe installation tool. Just grab the 64-bit or 32-bit package from the Remix OS download page, launch the installation tool .exe, and follow the on screen instructions.
Now, you can either choose to install Remix OS to your HDD, which will let you dual-boot between Windows or Remix OS without a USB. Or you can install Remix OS directly onto a USB drive, creating a portable OS, and you’d just need to boot from USB in your BIOS / UEFI menu.
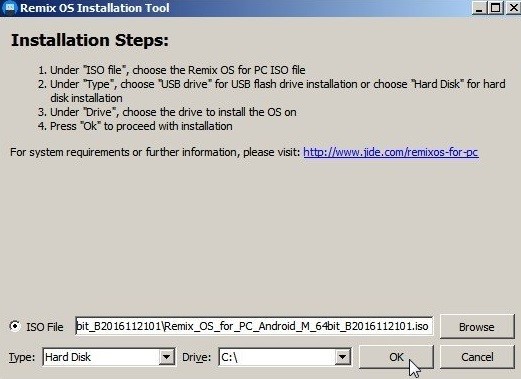
Choose Hard Disk or USB installation, depending on if you prefer a dual-boot system, or a portable OS that will boot from USB.
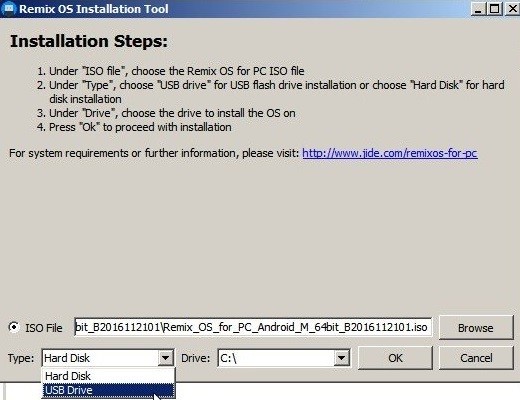
When it’s done, reboot your PC and enter the UEFI boot menu. Simply hit the correct key during boot sequence to enter UEFI menu: F12 for Dell, F9 for HP, F12 for Lenovo, Option Key for MAC.
Disable “Secure Boot” if it’s turned on, and select Remix OS from the boot menu. That’s it!
Single-Boot USB Method
This method is for installing Remix OS as a single-boot OS. This means that Remix OS will be the only operating system on your PC. This may sound pointless, but since Android is designed to run smoothly on devices with low amounts of RAM and CPU power, you could bring life back to an old desktop PC. People report Remix OS running buttery smooth on desktop PCs with as little as 1GB of RAM.
You’ll need software that can burn / write .ISO file to USB and create a bootable USB – I recommend Rufus.
You’ll also need a 3rd-party partitioning software that can partition your HDD from boot, like Hiren’s BootCD. Simply burn the .ISO from Hiren’s BootCD onto a CD or USB. For creating a bootable .ISO on CD, use something like Free ISO Burner or IMGBurn.
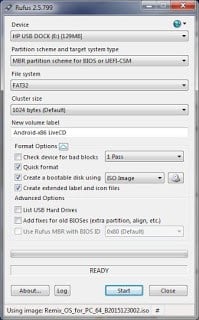
For creating a bootable USB for Remix OS installer, use Rufus that I mentioned before. In Rufus, make sure the following settings are enabled:
- File system: FAT32
- Quick format
- Create a bootable disk using ISO image
- Create extended label and icon files
Do not attempt to create a bootable CD for Remix OS, even if you made a bootable CD for Hiren. Use Rufus to create a USB!!
Now boot your computer into the UEFI / boot menu, choose the drive for the Hiren BootCD you made, and then choose “Parted Magic”. Launch GParted and create a new Partition Table, and a new ext4 partition, using all available HDD space. Save/Apply and reboot your PC into the UEFI / boot menu again.
Now choose the USB drive containing your Remix OS installer. A Grub Boot Menu will appear, so press E on your keyboard when Resident Mode is highlighted.
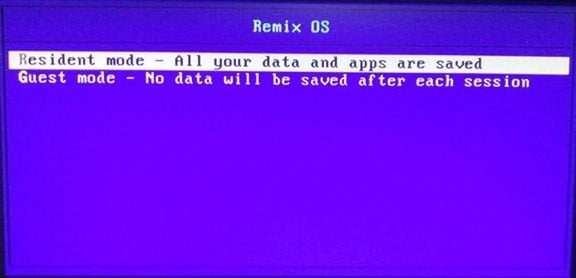
Now set boot flag to INSTALL=1. You need to look for SRC= DATA= CREATE_DATA_IMG=1 and change it to SRC= DATA= INSTALL=1
An installer wizard will appear, so follow along closely now.
Choose the target drive for the OS installation – usually it will be sda1.
Choose “Do not format” and agree to “install Grub Boot Loader”. Also choose to not allow read/write permissions for the /system folder.
Press ENTER key and the installation will begin. Grab a coffee, and when it’s all done, reboot your PC. Now grab another coffee, because the first time booting Remix OS will take around 15 minutes.
When it’s all done, you’ll be taken to the Setup screen, which is almost exactly like turning on a brand new phone. You’ll select your language, user agreement, WiFi setup, activate your Google account, etc.
Enjoy your new Android operating system on PC!