How to Increase Outlook’s Default Attachment Size Limit
Most email service providers limit the maximum email size that can be sent or received by an account. But it’s actually a necessary restriction – otherwise, emails can be easily exploited by being flooded with very large emails.
If you try to send an email that exceeds the maximum limit of the recipient, it will bounce off and you’ll receive an error back in your mailbox. Outlook refuses to send emails with attachments larger than 20MB. That is inconvenient, because most email servers allow users to send 25 MB or larger emails. However, there are ways to send messages larger than 20 MB with Outlook, as long as you make sure that your email provider accepts it.
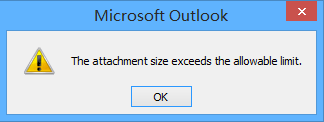
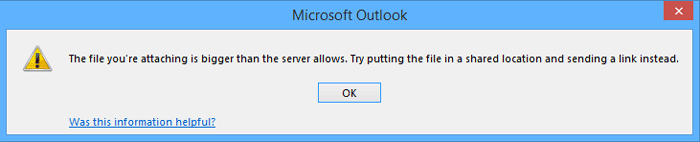
If you try to send a file larger than 20 MB in Outlook, you’ll get a message similar to “The attachment size exceeds the allowable limit.” Another variation of this error is “The file you’re attaching is bigger than the server allows.”
If you’re in this situation, there are several ways to tackle this issue. One way to mitigate the problem is to upload large attachments on cloud drives and only send the link to the recipient through an email. Cloud servers will allow you to upload files as large as 15 GB free of cost.
Another, more elegant solution would be to increase the default attachment limit in Outlook to match the email server’s default size. For Gmail and a few other email providers it won’t be a huge improvement, but if you use a self-hosted email server or Exchange, you can go way higher.
Below you have a collection of methods that will allow you to send larger files through Outlook. Take a look!
Method 1: Changing the Attachment Size Limit in Registry Editor
The guide below will show you how to edit the registry so that your Outlook will allow larger attachments limits. We are going to modify the parameter of MaximumAttachmentSize using the Registry Editor. Here’s what you need to do:
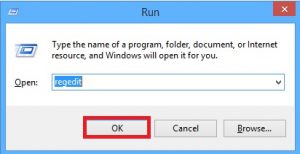
- Press the Win key + R to open the Run dialog box. Type “regedit” in the box next to Open: and hit OK.
- Depending on your Windows version, you will be taken to a User Account Control box. Click on Yes to advance.
- Once the Registry Editor is opened, navigate to the preferences folder by following the paths below. Make sure you follow the appropriate path according to your Outlook version.
- Outlook 2016: HKEY_CURRENT_USER \ Software \ Microsoft \ Office \ 16.0 \ Outlook \ Preferences
- Outlook 2013: HKEY_CURRENT_USER \ Software \ Microsoft \ Office \ 15.0 \ Outlook \ Preferences
- Outlook 2010: HKEY_CURRENT_USER \ Software \ Microsoft \ Office \14.0 \ Outlook \ Preferences
- Outlook 2007: HKEY_CURRENT_USER \ Software \ Microsoft \ Office \ 12.0 \ Outlook \ Preferences
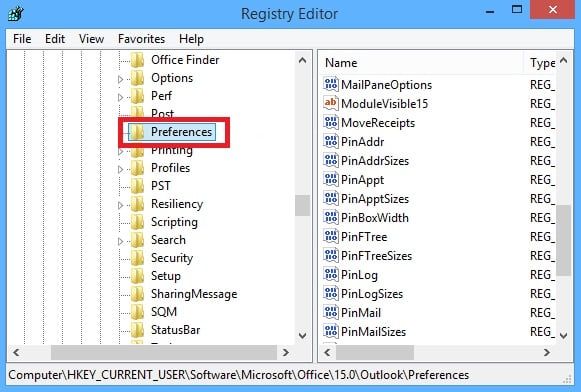
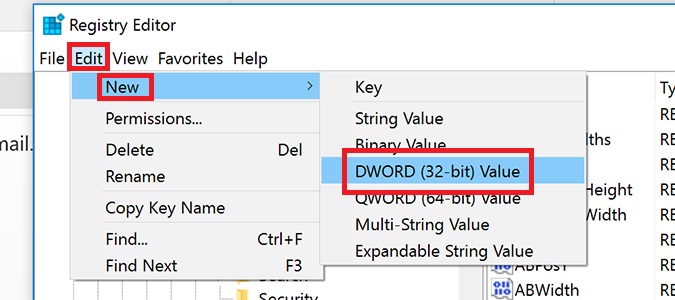
- Click once on the Preferences folder to select it. With the folder selected, go to New > DWord (32-bit) Value.
- Now check the Decimal option and enter the attachment size limitation in the Value data box. The size limit needs to be added in kilobytes. For example, if you want to set the size limit to 25 MB, you need to enter 25600. It’s good practice to reduce the Outlook limit to allow some wiggle room of at least 500 KB.
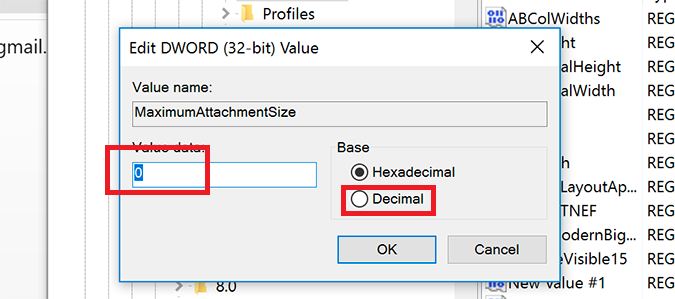 Note: If you’re using Exchange, be advised not to set the MaximumAttachmentSize higher than the account is allowed. If you fail to do so, the message will not send. Even more, do not leave the file size limit to 0 as it will render all your emails undeliverable.
 - Press Ok and close the registry editor.
- Try sending an email through Outlook with an attachment larger than the size previously allowed.
Method 2: Modifying the default size limit with Kutools
If you found the steps above too complicated, there’s an easier way to alter the size limit. We have found that using Kutools for Outlook will automate a lot of the steps and make changing the attachment limited size a lot easier. Kutools for Outlook is an Outlook add-in designed to simplify the chores you do daily in Outlook.
Lucky for us, it has a suite of additional settings, one of them being an intuitive way of changing the Maximum Attachment Size. Kutools is compatible with Outlook 2016, Outlook 2013, Outlook 2010 and Office 365.
Keep in mind that Kutools will not allow you to send email attachments larger than the limit imposed by your email provider. It does the exact same thing as the first method, but it’s a lot easier.
Here’s a quick guide on how to alter the default Maximum Attachment Size using Kutools.
Changing the Maximum Attachment Size with Kutools add-in
- Close Outlook completely.
- Download and install Kutools for Outlook from this link. This is a trusted link, so you should use it and avoid downloading add-ins from shady places.
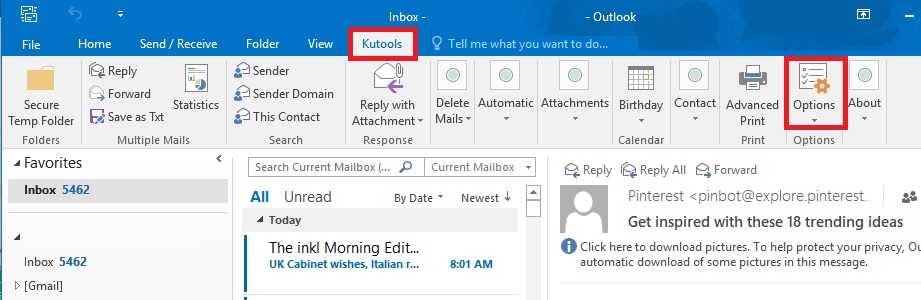
- Open Outlook and click on the new Kutools tab. This will bring out an entirely new menu. Look for Options and double click on it.
- Now select the Others tab and enter the appropriate limit size that you want in the text box next to Maximum Attachment Size.
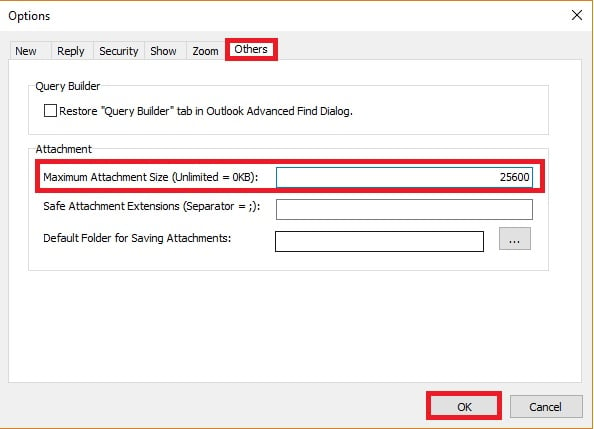 Note: Make sure you insert the value in KB. Also, keep the value below the limit imposed by your email service provider. Do not set the value to 0 because it will render your Outlook client unable to send attachments.
 - Hit Ok to confirm and restart your Outlook software so that the changes can take effect.
Method 3: Using Email Compression Tools
If you’re looking for a more elegant solution, the best way to send large attachments in Outlook is to use email compression tools. A tool like this will automatically compress large files as soon as you add it in your draft. After going over multiple tools, we decided to feature WinZip Express because it has seamless integration with most Outlook versions and is extremely reliable.
WinZip Express will compress your attachment into a Zip file and automatically upload it to the cloud. Then, it will replace the attachment with an efficient download link. This will help you bypass any email attachment size limits that you might deal with. Not to mention it provides extra security by using encryption.
WinZip Express is compatible with Outlook 2013, Outlook 2010 and Outlook 2007. You can install it from here for free. As soon as you install the add-in, it will automatically start every time you open Outlook. You can confirm that it’s working by checking if you see the WinZip Express group in the menu bar.

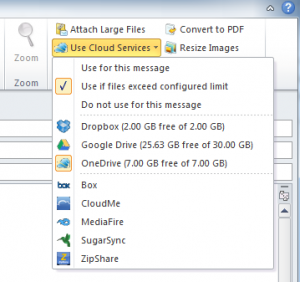
You can access the Use Cloud Services menu to determine which cloud services should be used when dealing with large attachments. As soon as you hit Send, WinZip Express will check to see if the attachment exceeds the default size limit. If the size is below that, it will apply compression to it and upload the file to the previously selected cloud storage. Finally, it will replace the attachment with an elegant download link.
Really helps me… Good Job thanks for this tool