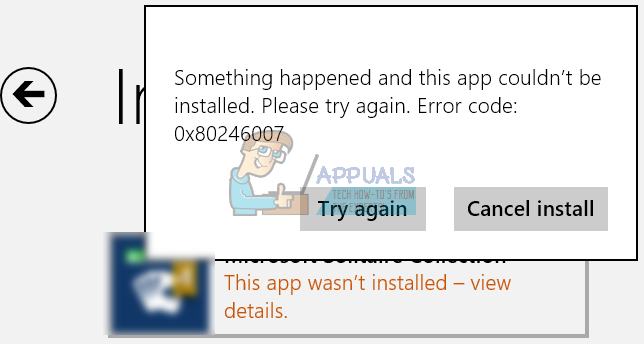
How to Fix Windows Update Error Code 80246007
Error Code 80246007 simply means that the update has not been downloaded. This issue occurs when Windows has an update that needs to be installed – but it could not download it from Windows repositories.
This can be really frustrating for users trying to figure out why the update failed to download as it could be due to numerous reasons such as the server from where the update is pushed is down, or your antivirus raised a false flag on the download or it could also be the internet connection failing to establish a link with Windows.
Error Code 0x80246007 – How to Solve
This particular error code can occur either while trying to download Windows updates or while updating or downloading apps from Windows Store. The explanation provided by Microsoft on their post regarding all error messages is simply that “The update has not been downloaded”.

This can be quite annoying, especially if an app you want to update is quite important. Information regarding this error message in particular is quite rare and obscure but there are a lot of great fixes which are guaranteed to fix any error code you might receive.
1. Disable Your Antivirus and Firewall
Antivirus software is something every user should have installed on their PCs because threats you can infect your computer with are numerous and you can easily catch a virus online or by an infected DVD or USB flash drive.
However, these tools sometimes prevent services such as Windows Update from accessing the Internet normally and that is often why you receive these annoying error messages.
- Disable your antivirus.
- The process for each antivirus is different. However, if you are a Windows 10 user, you also need to disable Windows Defender.
- Right-click on the shield icon on your taskbar and click on Open.
- When Windows Defender Security Center opens, click on the shield icon below the home button, open Virus & threat protection settings, and turn off Real-time protection and Cloud-based protection.
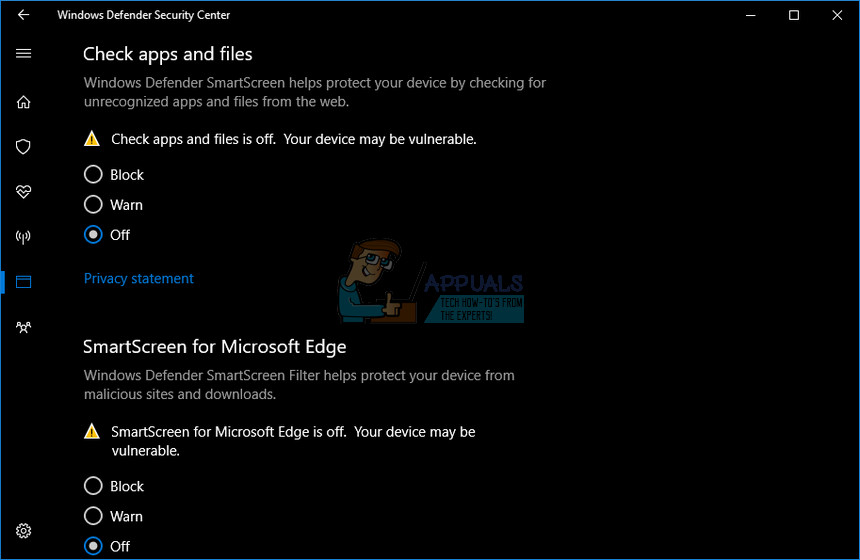
- Navigate to the browser icon (second from the end) and turn off the Check apps and files option.
- Also, turn off the SmartScreen for Windows Store apps option below.

Windows Firewall may also cause some connectivity issues because it automatically blocks unrecognized connections towards you computer and it’s quite possible it’s currently blocking some of the connections related to Windows or application updates.
- Open Control Panel by searching for it after pressing the Start button located at the bottom left part of your desktop.
- Change the View by option to Small icons and locate the Windows Firewall option.
- Click on it and select the Turn Windows Firewall on or off option located at the menu on the left side of the window.
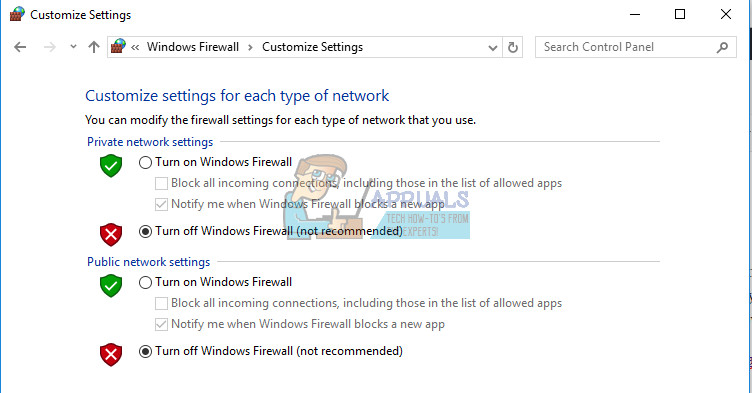
- Click the radio button next to the “Turn off Windows Firewall (not recommended)” option next to both the Private and Public network settings.
- Click on the OK button and try updating your computer now.

Note: Even though you struggled with updating one of your apps or your operating system because of your antivirus or firewall, you shouldn’t leave your computer unprotected so please make sure you turn on your antivirus, Windows Defender, and your Windows Firewall as soon as you successfully update Windows or the app you wanted to update.
2. Troubleshoot Windows Update and Your Internet Connection
Windows 10 comes preinstalled with several troubleshooters which can automatically recognize the problem you are having and fix it for you in no time. These troubleshooters have helped a lot of people who are not so experienced in dealing with these issues themselves and the process takes almost no time at all.
- Press and hold the Windows key then press the I key to open the Settings app.
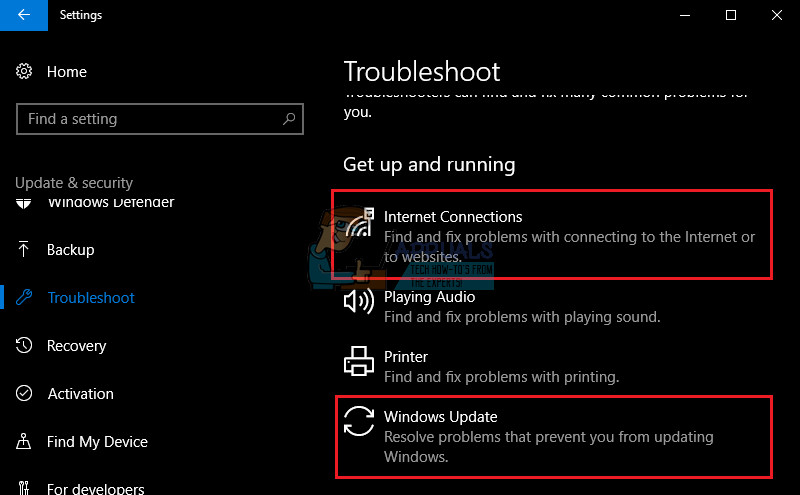
- Head over to the Update & Security section and navigate to the Troubleshoot menu.
- First of all, click on the Windows Update option and follow the instructions on the screen to see whether there is something wrong with Windows Update services and processes.
- After the troubleshooter finishes, navigate to the Troubleshoot section again and open the Internet Connections troubleshooter.
- Check to see if the problem is solved.

3. Check Your Image and Your System Files
Windows updates failing usually have to do something with your Windows image or your system files. Luckily, Windows comes with several tools built-in which can fix these issues easily and automatically.
DISM (Deployment Image Servicing and Management) is a command which can be used to check your Windows image for errors and fix these errors.
SFC (System File Checker) is another command which can be used to locate faulty and missing Windows system files and the tool also fixes or replaced them.
- You can use these tools with Command Prompt. Type Command Prompt in the search bar, right-click on it, and select Run as administrator.
- Type in the following command in order for DISM to scan your Windows image and perform a repair automatically. Please be patient for this tool to finish as the process can take up to 20 minutes.
DISM /Online /Cleanup-Image /RestoreHealth
- After the previous process finishes, use the following command to have SFC scan your system files for malfunctions:
sfc /scannow
- Try updating or downloading your app now if that was the problem or try running Windows update to see if the problem is fixed.
4. Resetting Windows Update Components Manually
This is probably the most complex solution but it efficiently eliminates all types of Windows update problems and error codes because of the fact that you have to reset everything on your computer regarding Windows update.
- Type Command Prompt in the search bar and run it with administrator privileges.
- Kill the following services: MSI Installer, Windows Update Services, BITS, and Cryptographic by copying and pasting the commands below. Make sure you click Enter after each one.
net stop msiserver
net stop wuauserv
net stop bits
net stop cryptSvc
- Rename the Catroot2 and Software Distribution folders. You can do this more easily by copying the following commands in the Command Prompt:
ren C:\Windows\SoftwareDistribution SoftwareDistribution.old
ren C:\Windows\System32\catroot2 Catroot2.old
- Start the MSI Installer, Windows Update Services, BITS, and Cryptographic services again by copying and pasting the commands below one after another.
net start wuauserv
net start cryptSvc
net start bits
net start msiserver
- Restart your computer after this and check to see if your problem is solved.
Note: You won’t be able to rename the folders listed in Step 3 unless you end the services we listed before. Follow these steps exactly as they are listed, make sure you are logged in with an administrator account, and run Command Prompt as administrator.