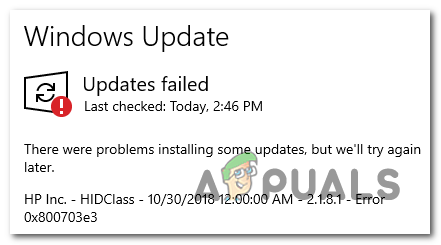
How to Fix Windows Update Error 0x800703e3?
Some Windows users have been reaching us with questions after seeing the error 0x800703e3 when trying to perform a certain action. Some users are seeing this when they try to update their operating system, while others see it while interacting with a different service (such as the webcam app or a printer connected to the network). The issue is much more common on Windows 10, but there are some occurrences on Windows 7 and Windows 8.1.
What’s causing the 0x800703e3 Error code on Windows?
We investigated this particular issue by looking at various user reports and by testing out the different repair strategies that are recommended by similar users that managed to get to the bottom of this issue. As it turns out, there are several different scenarios with the potential of triggering the 0x800703e3 error code. Here’s a shortlist of potential culprits:
- Camera driver issue – If you’re encountering this issue while trying to update your camera driver or while trying to use the Camera app, likely, the deceased driver was not designed to work with your Windows version. If this scenario is applicable, you can resolve the issue by replacing the camera driver manually (using Device Manager)
- Windows Update is unavailable – It’s also possible that you’re encountering this problem due to a temporary issue with the Windows Update servers. In this case, you can circumvent the problem entirely by relying on the Microsoft Update Catalog to install the update manually.
- Windows Update glitch – As it’s been confirmed by several different users, this issue can also occur due to Windows Update glitch that interferes with your PC ability to install new updates. In this case, the most efficient way of fixing the problem is to reset every WU component manually via an elevated Command Prompt.
- System File Corruption – Corruption among the files and dependencies used by the Windows Update component is another potential scenario in which you might encounter this error code. If this scenario is applicable, you can resolve the issue by resetting every OS component with a procedure like a repair install or a clean install.
Method 1: Replacing the camera driver manually (if applicable)
If you’re encountering this issue while trying to access your Camera app or when trying to update its driver, you’re likely dealing with driver issues. In this case, you should be able to resolve the issue by updating the webcam driver software with the generic equivalent that’s compatible.
Several Windows users that were also struggling with this issue have confirmed that this procedure finally allowed them to update the Camera driver or launch the application without encountering the 0x800703e3 error code. As it turns out, the generic driver is known to be a lot more stable and will not cause the same problems.
Here’s a quick guide on how to update the camera driver manually by replacing it with the generic equivalent via Device Manager:
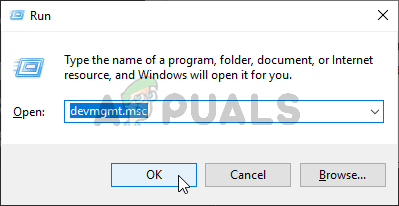
- Press Windows key + R to open up a Run dialog box. Next, type ‘devmgmt.msc’ inside the text box and press Enter to open up Device Manager.
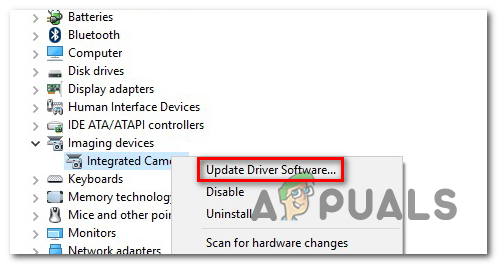
Opening the Device Manager - Inside Device Manager, scroll down through the list of installed devices and expand the drop-down menu associated with Imaging devices. Then, right-click on your webcam and choose Update Driver Software from the newly appeared context menu.
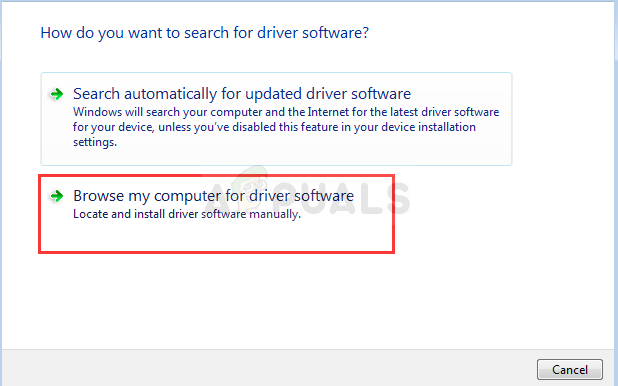
Updating the driver software for your default Imaging Device - Once you arrive at the first screen, click on Browse my computer for driver software.
Browse my computer for driver software - Next, when you’re prompted to select a location of the driver that you want to install, click on Let me pick from a list of device drivers on my computer.
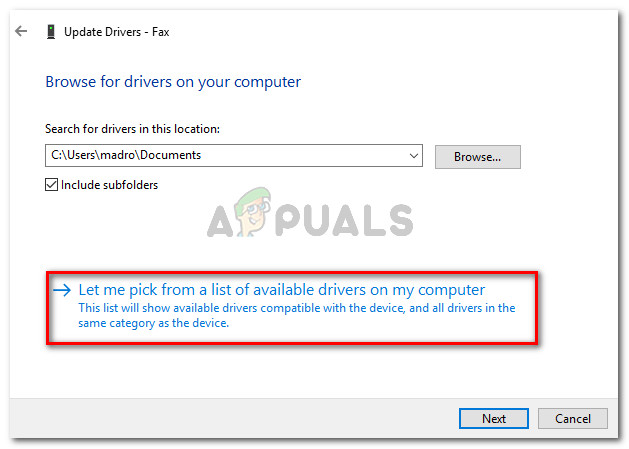
Click on Let me pick from a list of available drivers on my computer - At the next screen, start by checking the box associated with Show compatible hardware, then select the USB Video Device from the list of available drivers. With the correct driver selected, click Next.

Installing the correct generic driver - Once the installation process is complete, restart your computer and see if the issue is resolved at the next computer startup.
If this method wasn’t applicable or you followed the instructions above with no success, move down to the next method below.
Method 2: Installing the Windows update manually
Another possibility is that the problem is occurring because the WU (Windows Update) component is temporarily unable to access the servers or because some local dependencies have become corrupted.
If this scenario is applicable, chances are you will be able to circumvent the issue altogether by installing the update that is failing manually. This procedure has been confirmed as being successful by several affected users that we’re struggling to resolve the 0x800703e3 error.
Here’s a quick guide on installing the failing update manually using the Microsoft Update Catalog:
- Start by clicking this link (here) to visit the web address of the Microsoft Update Catalog.
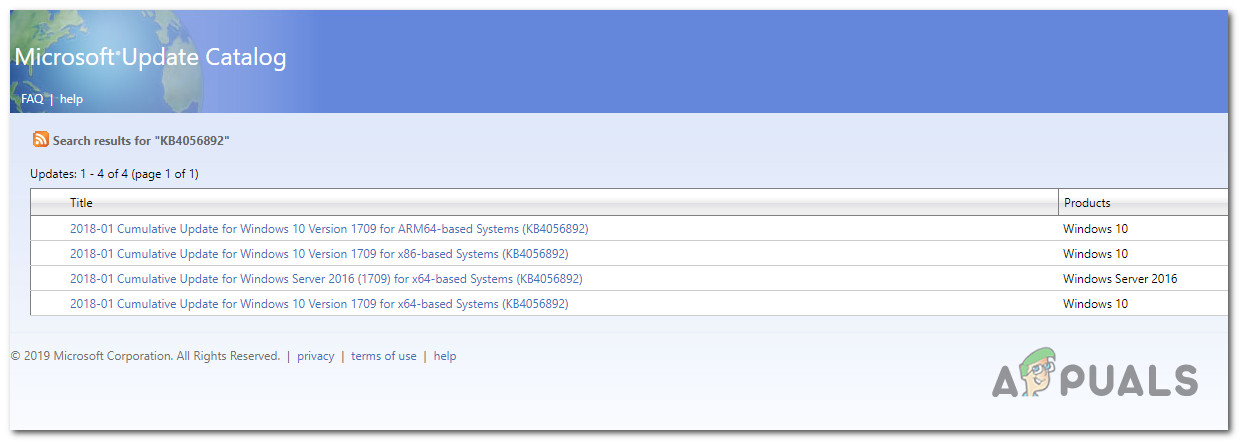
- Once you get there, use the search function in the top-right corner to search for the update that is failing when you try to install it using the Windows Update component.

Searching for the update that you want to install manually - When you see the results, look for the appropriate download according to your CPU architecture and Windows version.
Choosing the right Windows Update - Once you’ve decided on the correct version, click the Download button to start the process.
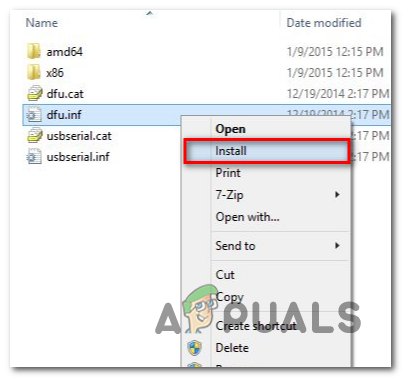
- After the download is complete, extract the contents of the update into a folder that you’ll only use for this purpose. Next, right-click on the .inf file and choose Install from the newly appeared context menu.
Installing the Inf driver - Follow the on-screen prompts to complete the installation, then restart your computer and see if the issue is resolved at the next system startup.
Method 3: Resetting every WU component
Another potential cause that will trigger the 0x800703e3 error is a WU glitch that will ultimately stop your PC’s ability to install new updates. In this case, the most convenable way of resolving the issue is to reset all components and dependencies that are involved in the updating process.
Several affected users have confirmed that they were able to resolve the issue and install the updates without any error message after they followed a procedure capable of resetting every WU component and dependency manually (via an elevated CMD prompt).
Here’s q step by step guide with what you have to do to reset every WU component from an elevated Command prompt:
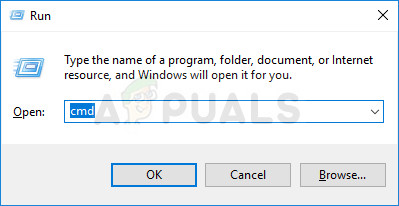
- Open up a Run dialog box by pressing Windows key + R. Next, type ‘cmd’ inside the text box and press Ctrl + Shift + Enter to open up an elevated Command Prompt. If you are prompted by the UAC (User Account Control), click Yes to grant admin access.
Running Command Prompt as an administrator - Once you find yourself inside the elevated CMD prompt, type the following commands in order and press Enter after each one:
net stop wuauserv
net stop cryptSvc
net stop bits
net stop msiserver
Note: These commands will temporarily stop the Windows Update service, MSI Installer, Cryptographic service, and BITS service.
- Once all involved services are disabled, run the following commands in the same CMD window and press Enter after each command to rename the SoftwareDistribution and Catroot2 folders:
ren C:\Windows\SoftwareDistribution SoftwareDistribution.old
ren C:\Windows\System32\catroot2 Catroot2.old
Note: Keep in mind that these two folders are responsible for storing update files that are being used by the Windows updating component. By renaming them, you will force your OS to create new folders that will take their place.
- Once the two folders have been resolved, type these final sets of commands in order and press Enter after each one to start the very same services that you previously disabled:
net start wuauserv
net start cryptSvc
net start bits
net start msiserver
- Attempt to reinstall the update that was previously failing once again and see if the issue is now resolved.
If the same problem is still occurring, move down to the next method below.
Method 4: Repair install or clean install
If none of the instructions above have allowed you to resolve the issue, there’s a very strong chance that you’re dealing with some kind of corrupted operating system data that cannot be resolved conventionally. In this case, the best way of resolving the issue is to reset every Windows component including every booting related process.
You can do this either by performing a clean install or via a repair install (in-place repair) procedure.
A clean install is the fastest and the most convenable solution, but the major downside is that you will not be able to keep your data unless you back them up in advance. Unless you use a back-up utility, your media, apps, games and all user preferences will be lost.
If you’re looking for a more focused approach, a repair install (in-place repair) is your best bet, This procedure will only affect your OS components and booting data. All apps, games, personal media and user preferences will be left untouched.


