How to Fix ‘Volume Bitmap is Incorrect’ CHKDSK Error?
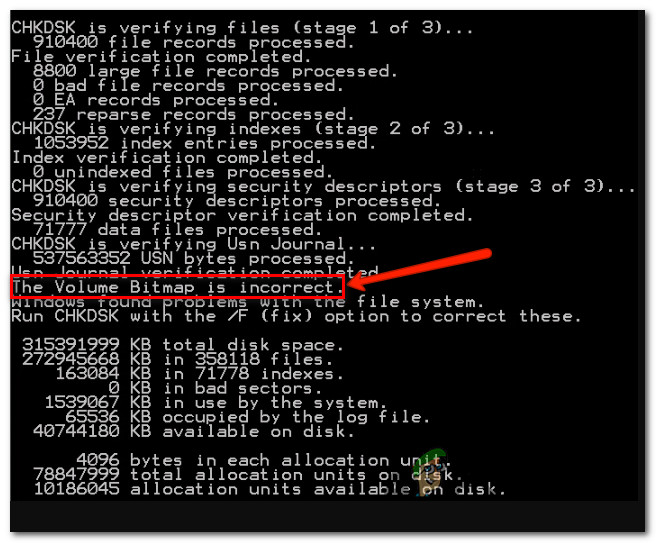
Some users are alarmed by the fact that they keep seeing the “The Volume Bitmap is incorrect” error when they try to complete a CHKDSK scan. During the final part of the scan, this error comes up and essentially stops the process from completely. The issue is mostly reported to occur on Windows Vista and Windows 7, but there are also some reported cases on Windows 10 and Windows 8.1. Other affected users are reporting that even though the operation completes for them, they still get the same error the next time they initiate a CHKDSK scan.
What is the Volume Bitmap?
The BitMap volume is a special file from within the NTFS file system. This file is responsible for keeping track of all the used and unused clusters on an NTFS volume. Under certain circumstances, the BitMap metafiles might become corrupted and trigger certain error messages including this one. But typically, the issue is automatically resolved by you or during the startup sequence.
What’s causing the “The Volume Bitmap is incorrect” error
We investigated this particular issue by looking at various user reports and the repair strategies that re commonly being used to fix this particular issue. But as it turns out, there are several different scenarios in which this problem will appear. Here’s a list of potential culprits:
- The command doesn’t fix the Volume Bitmap – Although ‘chkdsk.exe /scan’ is the most popular way of running the CHKDSK utility, it’s also the most likely cause that will trigger this particular error. Keep in mind that going for this scan will skip several checks, including the Volume Bitmap. So the utility will report the problem, but it won’t fix it unless you run an offline operation without the ‘/scan’ flag.
- 3rd party interference – As it turns out, this issue can also be caused by some type of 3rd party interference. HDD partitioning utilities like Acronis and Partition manager are known to cause this behavior, party because they leave behind a background service that interferes with CHKDSK. If this scenario is applicable, you can either fix the issue by running the CHKDSK command while in Safe Mode or by uninstalling the HDD partitioning app before running the scan.
- System file corruption – Judging from the number of user reports, this problem can also be caused by some type of corruption among the system file folders. In this case, you should be able to fix the issue (if the corruption is not severe) by running a series of built-in utilities equipped to deal with corrupted os files and logical errors (DISM and SFC).
- Corrupted MTF and BitMap files – There’s also a possibility in which you’re a machine is suffering from an underlying system file corruption issue that cannot be resolved conventionally. In this case, one fix that won’t touch your files is to perform a repair install (in-place repair).
- Drive was previously cloned – There’s also a special scenario that will spawn this error even if there’s no corruption among your OS files. If you previously cloned your drive, chances are the MTF and BitMap data have become corrupted in the process. In this case, a repair install won’t work because the bad data will be migrated. The only fix, in this case, is to do a clean install.
If you’re currently looking for ways to resolve this issue, this article will provide you with several different troubleshooting guides. Down below, you’ll find a collection of methods that have been recommended by other users finding themselves in the same scenario.
For the best results, we recommend that you follow the methods below in the same order that we presented them in since we ordered them by efficiency and severity. Eventually, you will stumble upon a fix that will provide an appropriate repair strategy (regardless of the culprit that’s creating the problem).
Let’s begin!
Method 1: Running a CHKDSK without ‘/scan’
This is by far the biggest scenario in which the “The Volume Bitmap is incorrect” error will occur. Certainly, ‘chkdsk.exe /scan’ is the most popular way of using this utility and although it’s awesome and extremely convenable, it will skip several checks, including the Volume Bitmap.
Several affected users that also encountered this issue have managed to resolve the issue by running the CHKDSK scan in offline mode only – without the “/scan” flag.
After doing this, they reported that the issue was resolved entirely, and a normal scan that included the ‘scan’ flag no longer triggered the “The Volume Bitmap is incorrect” error.
Here’s a quick guide on running an offline mode CHKDSK scan and avoid the use of the ‘scan’ flag:
- Press Windows key + R to open up a Run dialog box, then type “cmd” and press Ctrl + Shift + Enter to open up an elevated Command Prompt window. When you’re prompted by the UAC (User Account Control), click Yes to grant administrative privileges.
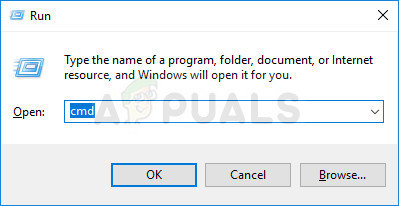
Running Command Prompt - Once you’re inside the elevated Command Prompt, type the following command and press Enter to initiate an offline scan:
chkdsk *X:* /f
Note: This command will attempt to fix any found errors. Keep in mind that *X* is only a placeholder – replace it with the drive that you wish to perform the scan on.
- Wait until the process is complete. Do not interrupt CHKDSK by closing the CMD window or restarting your computer before the operation is complete. Doing this will expose your system to further file corruption.
- Once the operation is complete, restart your computer and wait for the next startup sequence to complete.
- After your computer boots back up, run another CHKDSK operation with the ‘scan’ flag and see if the issue is still occurring:
chkdsk /scan
If the “The Volume Bitmap is incorrect” error is still appearing during some point, move down to the next method below.
Method 2: Running the scan in safe mode
As it turns out, this issue can also occur due to some kind of 3rd party interference that is confusing CHKDSK into thinking that it doesn’t have the necessary permissions. Several users that were also encountering this issue have reported that an HDD partitioning software was responsible for the “The Volume Bitmap is incorrect” error.
As soon as they ensured that there the app was unable to interfere, the error stopped occurring during the CHKDSK scan. And the most effective way to ensure that you’re not dealing with a software interference is to run the scan while in Safe Mode.
Here’s a quick guide on how to boot in Safe Mode and run a CHKDSK scan without any 3rd party interference:
Note: If you have installed a partitioning software and you are willing to uninstall it to resolve the issue, you can skip this process and move directly to Method 3. The process is quicker and there’s no terminal work whatsoever.
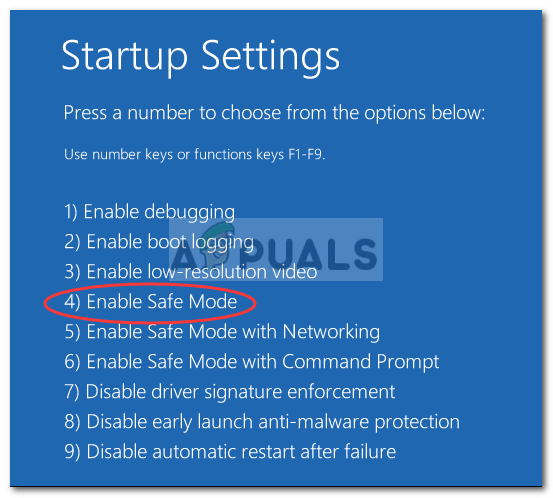
- With your computer turned off, press the power button once and start pressing the F8 key repeatedly as soon as you see the initial screen. This will open the Advanced Boot Options menu.
- Once you’re inside the Advanced Boot Options menu, use the arrow keys or press the corresponding key (F4) to select Safe Mode.
Press F4 for Safe Mode - Wait until the booting sequence is complete. Once Windows is fully loaded up, press Windows key + R to open up a Run dialog box. Next, type “cmd” and press Ctrl + Shift + Enter to open up an elevated Command Prompt window.

Running Command Prompt - Inside the new CMD window, initiate the same scan that was previously triggering the “The Volume Bitmap is incorrect” error.
- If the scan completes without issues, restart your computer once again to boot back into normal mode.
If the same issue is still occurring while in Safe mode, move down directly to Method 4.
Method 3: Uninstalling the HDD partitioning app (if applicable)
Having an HDD partitioning app installed while performing a CHKDSK scan is known to facilitate the apparition of the “The Volume Bitmap is incorrect” error. If you’re willing to get rid of it, then uninstalling the application altogether is the quickest way of resolving the problem for you.
Several affected users have reported that the issue was no longer occurring after they uninstall the HDD partitioning tool from their computer, restarted, and performed the CHKDSK scan once again. Here’s a quick guide through the whole thing:
- Press Windows key + R to open up a Run dialog box. Then, type “appwiz.cpl” and press Enter to open up the Programs and Files window.

Typing in “appwiz.cpl” in the Run prompt - Once you’re inside the Programs and Files screen, scroll down through the list of installed applications and locate the partitioning software that you wish to uninstall.
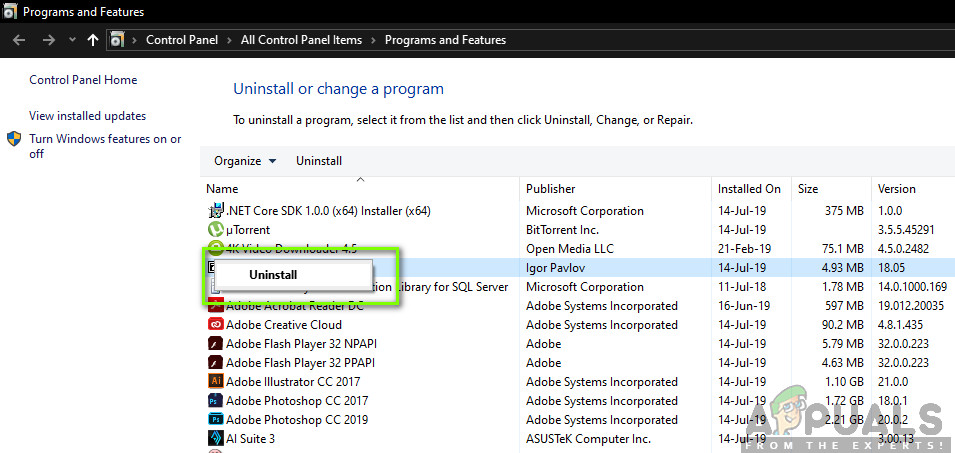
Uninstalling the Conflicting Application - When you see it, right-click on it and choose Uninstall from the newly appeared context menu.
- Follow the on-screen prompts to complete the uninstallation, then restart your computer.
- Once the next startup sequence is complete, repeat the scan that was previously triggering the “The Volume Bitmap is incorrect” error and see if the issue is now resolved.
If you’re still encountering the same error message, move down to the next method below.
Method 4: Running DISM and SFC scans
Another potential culprit is system file corruption among the dependencies that the CHKDSK utility uses during the scan. If some of the associated files are tainted by corruption, the whole scan might fail with the “The Volume Bitmap is incorrect” error. If this scenario is applicable, you should be able to resolve the problem by running a series of utilities capable of fixing corrupted files.
Several affected users have reported that they managed to fix the issue by deploying both DISM (Deployment Image Servicing and Management) and SFC (System File Checker) to replace corrupted files and fix logical errors.
SFC uses a locally stored archive to fix logical errors and replace bad files with healthy copies. It’ especially useful in instances where the corruption is located inside the Windows Resource Protection folder.
On the other hand, DISM (Deployment Image Servicing and Management) is a more modern utility that is geared towards resolving issues associated with WU (Windows update). Instead of relying on a locally cached archive, DISM uses downloads healthy copies for the files that need replacing directly through the official Microsoft channels.
Since both utilities are equally important, the best approach would be to run both to ensure that any type of system file corruption is resolved. Here’s a quick guide on running both an SFC and a DISM scan from an elevated CMD window to resolve the “The Volume Bitmap is incorrect” error:
- Press Windows key + R to open up a Run dialog box. Next, type “cmd” inside the text box and press Ctrl + Shift + Enter to open up an elevated Command prompt. When you see the UAC (User account Prompt), click Yes to grant administrative privileges.

Running Command Prompt - Once you’re inside the elevated Command Prompt, type the following command and press Enter to initiate a DISM scan capable of identifying and resolving system file errors:
Dism.exe /online /cleanup-image /scanhealth
Dism.exe /online /cleanup-image /restorehealth
Note: Before you initiate the scan, make sure that you have a stable internet connection since DISM needs it to download healthy copies. The first command will make the utility look for any system file inconsistencies, while the other will start the repairing process. If no errors are found after you type the first command, do not run the second one – instead, move directly to the method below.
- Regardless of the outcome of the DISM scan, restart your computer. At the next startup, follow step 1 again to open another elevated CMD prompt. This time, type the following command and press Enter to initiate an SFC scan:
sfc /scannow
Note: Do not close the elevated CMD prompt or restart your computer until the SFC scan is complete. Interrupting the scan facilitates the apparition of further logical errors.
- When the process is complete, restart your computer once again and see if the issue is now resolved.
If you’re still encountering the “The Volume Bitmap is incorrect” error, move down to the next method below.
Method 5: Perform a repair install
If the method above didn’t fix the issue automatically, it’s clear that the issue is caused by an underlying system corruption issue that cannot be resolved conventionally.
Some affected users that were also struggling to resolve this error message have reported that the issue was fixed after they performed an in-place repair (repair install). This procedure will refresh all Windows components that might be responsible for this error message.
The best part about this procedure is that it does this while allowing you to keep all your files (applications, games, personal media, etc.) If you decide to perform a repair install (in-place repair) follow this article (here) for step by step instructions on how to do this.
If you’ve already performed this operation without success or you’re looking for a more radical approach, move down to the final method below.
Method 6: Doing a clean install
If you’ve previously cloned the drive that you’re encountering the issue on, chances are the issue is occurring because the MTF and BitMap data have become corrupted in that process. There are a lot of reports of users encountering this type of behavior after previously cloning the drive.
Performing a repair install, in this case, won’t work, because the process will migrate the corrupted MTF and BitMap and you’ll encounter the issue again after the process is complete.
The only viable fix now is to back-up all important data and go for a clean installation of your Windows. If you’re unsure on how to do this, follow this step-by-step article (here).


