How to Fix “Could not find this item” Error
“Could not find this item” error usually prevents you from deleting, moving, or renaming a file, even though you can see it in File Explorer. This error means that Windows can’t find the file in the system’s directory, even if it appears to be there. The most common reason for this is a file path or name that is too long, exceeding Windows’ character limits, which makes the file inaccessible.
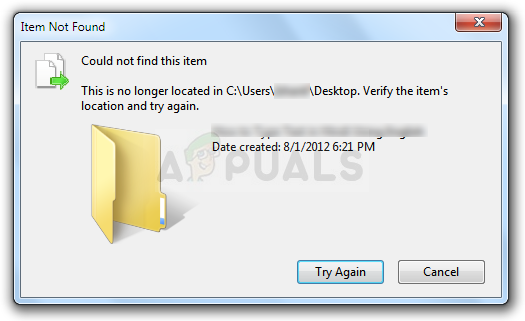
Other causes could include corrupted file details, hidden files, or temporary system issues. In this article, we will discuss methods to solve this problem.
1. Use the Command Prompt to Delete the Problematic File
Bypassing Windows’ usual limitations, this method allows the system to delete files or folders that standard methods can’t handle. It helps the system directly remove problematic files, even those with long paths or corrupted details that File Explorer can’t process. This technique provides a direct system approach to ensure stubborn files that resist normal deletion are properly removed from the system. Note: Use these commands with caution, as they permanently delete files.
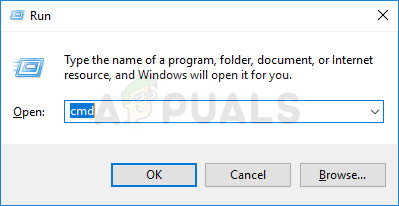
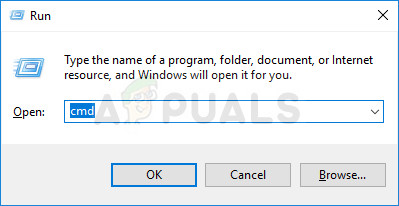
- Press Windows + R, type cmd, and hit CTRL + SHIFT + ENTER to open Command Prompt with administrative privileges.
- Copy and paste the command below and press Enter. Ensure you use the correct path to the file, including its name. Replace “X” with the drive letter where the file is located.
rd /s \\?\X:\bad\folder\path
- You should see the “Operation completed successfully” message. If not, ensure the file’s location is entered correctly. If the problem persists, try other solutions below.
2. A Command Prompt Tweak to Rename the Folder and Operate with it Normally
Renaming a problematic folder via Command Prompt can fix issues with file paths or names that prevent normal actions. If a file or folder name is too long or has invalid characters, Windows might have trouble accessing or deleting it through File Explorer. By using Command Prompt, you can simplify the file name so Windows can handle it more easily.
- Press Windows + R, type cmd, and hit CTRL + SHIFT + ENTER to open Command Prompt with administrative privileges.
- Type cd followed by the path to the folder containing the problematic file, using the format C:\Folder1\Folder2\Folder3. Do not include the problematic file itself:
cd C:\Folder1\Folder2\Folder3
- Press Enter, then type the commands shown below. Each command is on a new line; press Enter after each one:
DIR /A /X /P
RENAME current-file-name new-name
EXIT
- Ensure you only write the current name and the new name separated by a space, without brackets. If successful, you should now be able to operate the file normally via Windows Explorer.
3. File without Any Extension
If a file has no extension, Windows might struggle to recognize or manage it. Identifying and removing these files avoids problems from missing file type data. Such files are often left by incomplete tasks or software errors.
- Press Windows + R, type cmd, and hit CTRL + SHIFT + ENTER to open Command Prompt with administrative privileges.
Running Command Prompt as an Administrator - In Command Prompt, navigate to the folder containing the problematic file using cd and the path format C:\Folder1\Folder2\Folder3. Carefully input the folder paths.
- Press Enter, then use the command below to delete the problematic file:
del *.*
- Use File Explorer to confirm the file is no longer present.
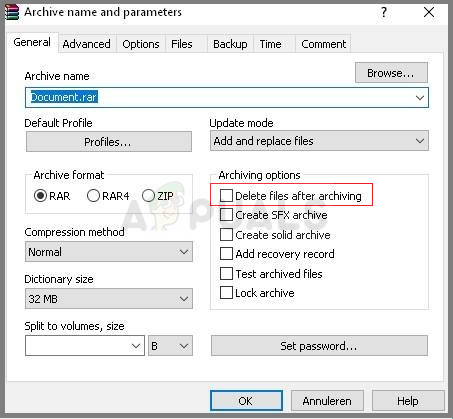
4. Workaround with Archiving
By compressing the file into a ZIP archive with tools like WinRAR or 7-Zip, you make Windows handle it differently. Once the file is in the archive, you can delete the original file using the archive manager. This method bypasses issues with long file paths or corrupted data, letting the system remove the file without errors.
- Download WinRAR from here.
- Locate the problematic file or folder on your computer using File Explorer. Right-click on it and choose Add to archive from the context menu.
- In the archiving options window, select Delete files after archiving. Click OK to begin the archiving process. When it finishes, your problematic file should be gone.
- Delete the archive you created by right-clicking on it and choosing “Delete” from the context menu.


thanks using method del archive work for me