Fix: EventID 10016 (The Application-Specific Permission Settings Do Not Grant Local Activation Permission)
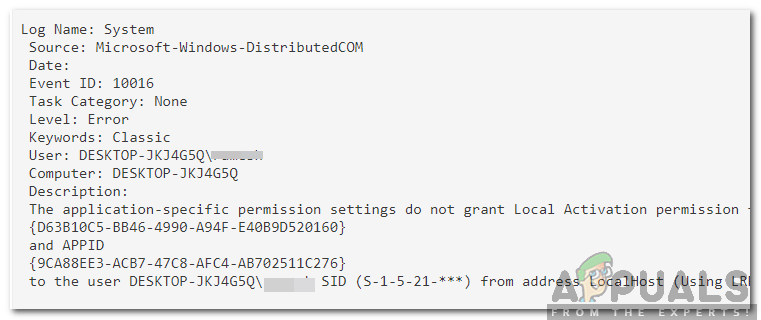
The “Application-specific permission settings do not grant Local Activation permission” error usually appears in Event Viewer with Event ID 10016. It means a process tried to launch a DCOM (Distributed Component Object Model) component without the required permissions.
In many cases, this warning does not cause visible problems. However, if the blocked component is required by an app or service, that app may fail to open or work correctly.
This usually happens because the affected DCOM component does not allow the required account to activate it. To fix it, you need to identify the correct component, take control of its registry keys, and then grant the missing activation permission in Component Services.
What Causes the Application-Specific Permission Error?
- Missing Local Activation Permission: The account shown in the error log does not have permission to start the DCOM component.
- Protected Registry Ownership: Some related registry keys are owned by TrustedInstaller, so Windows will not let you change permissions until ownership is updated first.
Note: If everything on your PC is working normally and you only see this entry in Event Viewer, you can ignore it. Follow the steps below only if the error is linked to an app or service that is actually failing.
This fix is done in three parts.
- First, identify the component from the registry.
- Then take ownership of the required registry keys so permissions can be edited.
- Finally, grant the missing Local Activation permission in Component Services.
Step 1: Identify the Affected DCOM Component
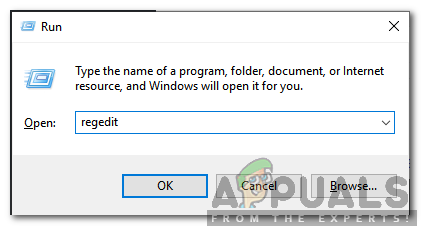
- Press Windows + R, type regedit, and press Enter.
- Navigate to the following key:
HKEY_CLASSES_ROOT\CLSID\{D63B10C5-BB46-4990-A94F-E40B9D520160} - In the right pane, double-click Default and note the Value Data. This tells you the component name linked to the error.
- Now navigate to:
HKEY_CLASSES_ROOT\AppID\{9CA88EE3-ACB7-47C8-AFC4-AB702511C276} At this stage, you are confirming the exact component and AppID mentioned in the Event Viewer entry. This is important because changing the wrong DCOM entry will not fix the problem.
Step 2: Take Ownership of the Required Registry Keys
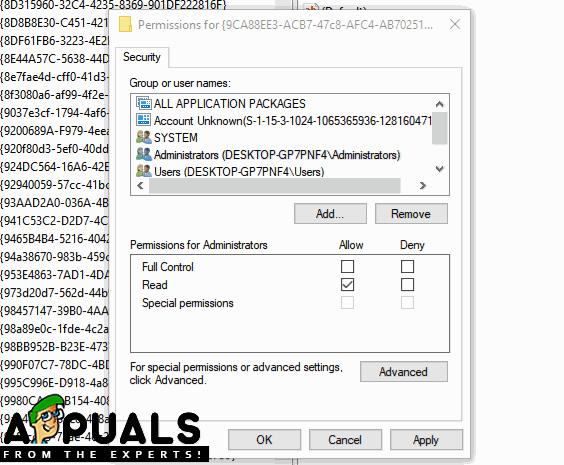
- Right-click {9CA88EE3-ACB7-47C8-AFC4-AB702511C276} in the left pane and select Permissions.
- Click Advanced, then click Change next to the Owner field.
- Select your Windows account as the owner, then click OK and Apply.

- Repeat the same ownership steps for this key as well:
HKEY_CLASSES_ROOT\CLSID\{D63B10C5-BB46-4990-A94F-E40B9D520160} - After ownership is changed, go back to the Permissions window.
- Select Administrators and enable Full Control.
- Select Users and enable Full Control as well.
- Click Apply, then click OK.
This step only makes the DCOM entry editable. Without changing ownership first, Windows may block permission changes even if you are using an administrator account.
Step 3: Grant Local Activation Permission in Component Services
- Press Windows + R, type dcomcnfg.exe, and press Enter.
- In the left pane, go to:
Component Services > Computers > My Computer > DCOM Config
- Find Runtime Broker in the list and open its Properties.
- If there are multiple Runtime Broker entries, check each one until you find the one whose AppID matches:
9CA88EE3-ACB7-47C8-AFC4-AB702511C276}
- Open the Security tab.
- Under Launch and Activation Permissions, select Customize, then click Edit.
- If Windows Security prompts you, click Remove.
- Click Add and enter NT AUTHORITY\LOCAL SERVICE.
- If that does not work, try entering Local Service instead.
- Click OK, then allow Local Activation for that account.
- Click Apply and OK.
Step 4: Check if the Error is Resolved
- Restart your computer.
- Open the affected app again or check Event Viewer to see whether the same Event ID 10016 entry returns.
If the error was caused by missing activation rights for this component, it should no longer appear after the correct permission is added.


If you don’t get that, when you click on “Edit” are you able to proceed with the rest of the steps?