How to Fix ‘System 53 Error has Occured’ Error on Windows?
Windows is one of the most popular operating systems out there with more than a billion users. It provides users with the ability to link their computers through a network. However, quite recently, a lot of users have been facing the “System 53 Error has Occurred” Error on their network-connected computers. This issue has mainly been common with the older operating systems.

In this article, we will discuss some of the reasons due to which this error is triggered and also provide viable solutions to fix it completely. Make sure to follow the steps accurately and in the same order in which they are presented to avoid conflict.
What Causes the “System 53 Error has Occurred” Error?
After receiving numerous reports from multiple users, we decided to investigate the issue and devised a set of solutions to fix it completely. Also, we looked into the reasons due to which it is triggered and listed them as follows.
- Connection Issue: There is a possibility that the two computers might not have been connected properly or the network through which they are connected is facing issues. If this is the case, the problem can be with the ethernet cable, the router or the configuration between the computers. These issues need to be checked and resolved through troubleshooting different options.
- Security Software: In some cases, the security software installed on either of the two computers might be preventing the connection between the two computers. Security software can detect the connection as harmful and block it entirely due to which this error can be triggered.
- Background Applications: Some background applications/tasks can also prevent the connection from being established properly. These background processes can interfere with important system functions and one of those functions might be the networking function.
- Disabled Sharing: In some cases, the sharing of files and folders might be disabled on the computer or the network card. This setting can be configured in the control panel and it needs to be enabled in order for the connection to be established properly.
- Incorrect Share Folder Command: With the majority of users, the issues were occurring due to an incorrect command being executed during sharing. It is recommended that you use the correct command with the appropriate format to share the folder.
Now that you have a basic understanding of the nature of the problem, we will move on towards the solutions. Make sure to implement these in the specific order in which they are presented to avoid conflict.
Solution 1: Using the Correct Share Command
In most cases, the issue occurs due to an incorrect share command which triggered this error. The command should display the address of the server and the folder to be shared in commas and most users forget this, due to which the issue is triggered. The correct method of sharing is:
- Press “Windows” + “R” to open the Run prompt.
- Type in “cmd” and press “Enter” to open Command Prompt.
Running Command Prompt - Type in your share command in the following format.
net use F: "\\server\share name"
- Check to see if the issue persists after you use this format.
Solution 2: Running Ping Test
The correct way to identify if the network server is working properly is to ping the server and check if there is a response. In this test, we will also check if there is packet loss which can also trigger this error. To run a ping test:
- Press “Windows” + “R” to open the Run prompt.
- Type in “Cmd” and press “Enter”.
Running Command Prompt - Type in the following command to ping the server/computer in question.
ping (IP address of the server)
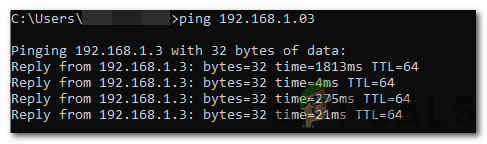
Result of the ping command - If the Ping command returns all the packets and there isn’t any packet loss it means that your network is set up correctly. But, if the response isn’t received or there is an error while pinging the server, it means that the connection hasn’t been set up correctly.
- Troubleshoot according to the results of the ping test.
Solution 3: Disabling Security Software
If the ping test returned a good response and the computer was being detected, it is time to disable the security software and check if it was causing the issue. Sometimes, the Antivirus installed on the computer can prevent the user from accessing the folder on a network. Therefore, disable your Antivirus and check if the connection between the computers is made and the files can be accessed on the network.
Solution 4: Enabling Sharing
In some cases, the sharing of files and hardware between computers might be disabled from the control panel. Therefore, in this step, we will be changing that setting and enabling the sharing between computers. For that:
- Press “Windows” + “R” to open the Run prompt.
- Type in “Control Panel” and press “Enter” to open it.
Opening Control Panel - Click on the “Network and Internet Settings” option and select the “Network and Sharing Center” button.
- Click on the “Change Advanced Sharing Settings” option.
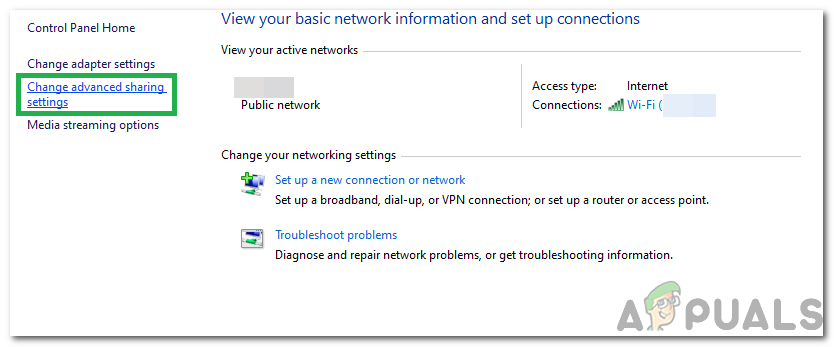
Clicking on “Change Advanced Sharing Options” button - Click on All Dropdowns in the setting menu and check the “Turn On Network Discovery” and “Turn On Printer and File Sharing” options.

Configuring the File Sharing and the Network Discovery Options Note: You must enable this for both “Guest and Private” Networks.
- Click on “Apply” to save your changes and close the window.
- Check to see if the issue persists.
Solution 5: Checking in Safe Mode
In this step, we will be putting the computer in safe mode to determine whether an application is causing this problem. For that:
- Restart the computer and immediately start pressing the “F8” key rapidly.
- Wait for the boot options screen to appear and select the “Advanced Boot Options” option.
- Select “Safe Mode With Networking” and wait for the computer to startup.
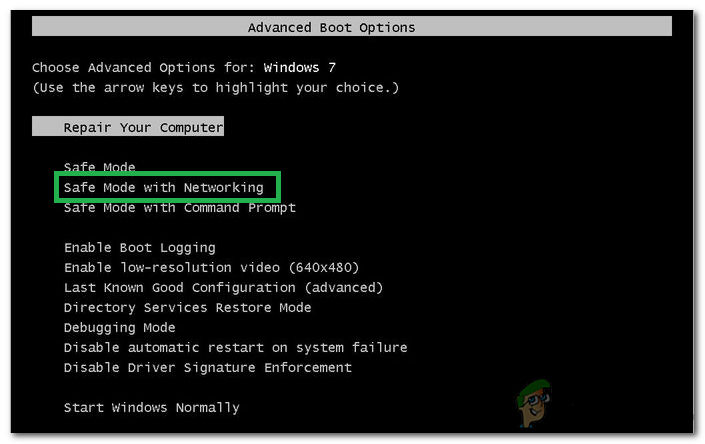
Selecting the “Safe Mode With Networking” option - Check to see if the issue exists in this mode.
- If it doesn’t, it means that a background application was causing the issue all along. Start disabling applications one by one and notice the one which makes the issue go away. Either reinstall that application or keep it disabled.


