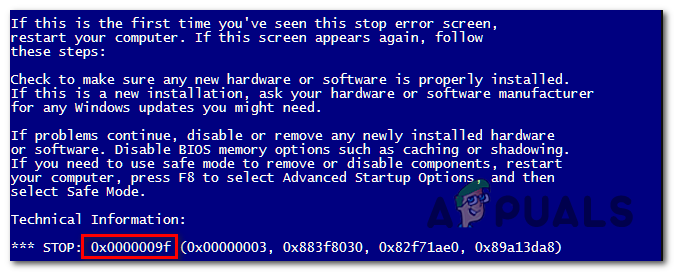
How to Fix Stop Error 0x0000009f on Windows?
Several Windows users have been reaching us with questions after encountering constant Stop Error 0x0000009f that ultimately leads to a BSOD (Blue Screen of Death) that effectively crashes the system. Some users are reporting that they only see this error while performing a certain action, while others are saying that for them the crashes are completely random. Although the issue is more common on Windows 7, we also managed to find some occurrences of it occurring on Windows 8.1 and Windows 10.
What’s causing the Stop Error 0x0000009f?
We’ve investigated this particular issue by looking at various user reports and by trying out the various repair strategies that affected users have successfully used to get to the bottom of this issue. As it turns out, several different scenarios might end up producing this particular issue. Here’s a shortlist of potential culprits that might be involved:
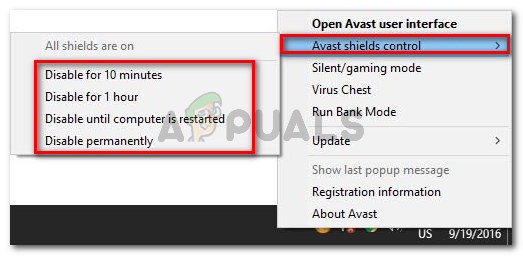
- 3rd party AV interference – As it turns out, a fairly common culprit that might end up causing this problem is an overprotective security suite. Avast and Comodo are often responsible for causing this problem after they end up interfering with a critical OS component. If this scenario is applicable, you can resolve the issue either by disabling the real-time protection or by uninstalling the 3rd party suite altogether.
- Low-Level BIOS glitch – Several users have confirmed that in their case, the problem occurred due to an issue with their BIOS version or with the low-level chipset drivers. In this case, the issue can be rectified by replacing the BIOS version with the latest.
- System file corruption – Under certain circumstances, this behavior might be facilitated by a file corruption issue that ended up affecting a series of critical services or processes to the system’s stability. If this scenario is applicable, you should be able to resolve the issue by a couple of built-in repair utilities (DISM and SFC) or by refreshing every OS component with a clean install or repair install procedure.
- Corrupted Intel driver – If you’re using network drivers supplied by Intel Corp., this may be what’s causing the system instability. There are two quite common drivers (Intel(R) Gigabit Network Connection Driver or WiFi Link Driver) that might end up triggering this behavior. If this scenario is applicable, you can solve the random BSODs by replacing the drivers with their latest versions or by replacing them with generic ones.
- Emulation driver interference – As it’s been confirmed by several affected users, this issue can also occur due to one or two emulation drivers belonging to Daemon Tools (Sptd.sys and amm9h5at.sys). If this scenario seems like it could be applicable, you might be able to resolve the issue by uninstalling the entire Daemon Tools suite or by replacing it with the latest version.
Method 1: Uninstall 3rd party security suite (if applicable)
It turns out that this random stop error can be caused by an overprotective AV suite that is somehow crashing the system by interfering with a critical component. In most cases, the interference occurs on a kernel level.
If you’re using a 3rd party security suite and you’re suspecting that this scenario might be applicable, you can confirm or infirm your suspicions either by disabling the real-time protection of your AV suite or by uninstalling it altogether.
Ideally, you should start by disabling real-time protection. But keep in mind that this procedure will be different depending on the type of 3rd party AV suite that you’re using. However, in most cases, you’ll be able to do this directly from the taskbar icon of your antivirus or firewall suite.
Once you do this, repeat the action that was causing the Stop Error 0x0000009f and see if the issue is now resolved.
If the issue persists, you should ensure that you eliminate this possibility by doing a complete uninstallation and ensuring that you’re not leaving behind any leftover files that might still cause this problem. To do this, follow this article (here) for step-by-step instructions on uninstalling the 3rd party suite any potential remnant files.
NOTE: If you do this and you discover that the issue is resolved, you don’t necessarily have to migrate to a different 3rd party suite. Windows Defender will automatically kick in and take the place of the uninstalled 3rd party suite.
However, if the same issue is still occurring even after you disable the 3rd party security suite or this method didn’t apply to your scenario, move down to the next method below.
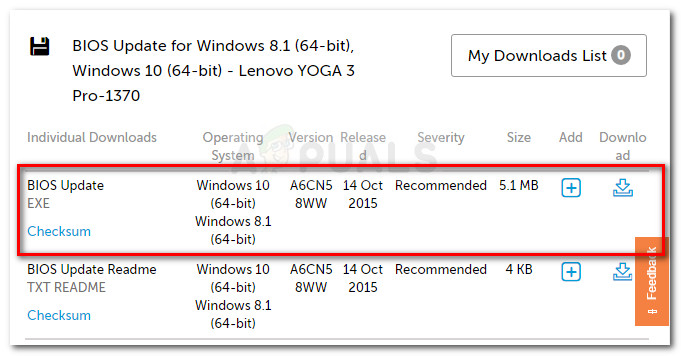
Method 2: Updating BIOS version
A problem with your BIOS version or with the low-level chipset drivers can also facilitate general system instability that might ultimately lead to the apparition of the Stop Error 0x0000009f. Several affected users have reported that they finally managed to resolve the issue after updating their BIOS version on their PCs.
But before you pursue this repair strategy, be advised that an improper BIOS installation procedure might end up producing other issues including startup issues. If you want to try this fix, do it at your own risk! And if you decide to do it, follow the instructions to the letter.
Keep in mind that BIOS interfacing and the exact process behind this operation will be different depending on the configuration that you’re using. But regardless of your motherboard manufacturer, follow the instructions carefully.
Here’s the official documentation for BIOS updating when it comes to the most popular motherboard manufacturers:
If you followed the instructions above to no avail or this method didn’t apply to your current situation, move down to the next method below.
Method 3: Running DISM and SFC scans
As it’s been confirmed by a lot of affected users, the most common cause that will spawn this Stop Error 0x0000009f is a critical process that is affected by some type of system file corruption.
If this scenario is applicable, the most efficient way of resolving this problem is to run a series of built-in utilities capable of fixing local errors and system file corruption. Both DISM (Deployment Image Servicing and Management) and SFC (System File Checker) are capable of doing this.
Note: Feel free to use 3rd party alternatives if you have any in mind. But if you don’t want to install additional software, this is your best option.
Keep in mind that although both utilities will ultimately focus on the same thing, they have different approaches to dealing with system file corruption. For example, DISM relies on the WU (Windows Update) component to replace corrupted instances with healthy copies. SFC, on the other hand, is entirely local and uses a locally stored archive to deal with system file corruption.
Because of this, our advice is to run both utilities to maximize your chances of fixing corrupted instances that might be causing the Stop Error 0x0000009f. Here’s what you need to do:
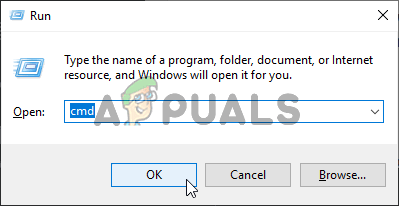
- Press Windows key + R to open up a Run dialog box. Next, type ‘cmd’ inside the text box and press Ctrl + Shift + Enter to open up a Command Prompt with admin access. When you’re prompted by the UAC (User Account Control), click Yes to grant administrative privileges.
Opening the Command Prompt - Once you’re inside the elevated CMD window, type the following command in order and press Enter after each command to initiate a DISM scan:
Dism.exe /online /cleanup-image /scanhealth
Dism.exe /online /cleanup-image /restorehealth
Note: Keep in mind that since DISM uses Windows Update to download healthy copies of the files that are corrupted, you need to ensure that your Internet connection is stable before initiating this procedure. The first command (scanhealth) will analyze your system files while the second (restorehealth) will trigger the reparation process.
- Once the DISM scan is completed, restart your computer promptly and wait patiently until the next startup sequence is complete. Next, follow step 1 again to open up another elevated Command prompt. Once you return to the elevated CMD, type the following command and press Enter once again to initiate another SFC scan:
sfc /scannow
Note: Under no circumstances should you interrupt this procedure after you start the SFC scanning operation. Closing the CMD window or facilitating an unexpected machine interruption might leave your system exposed to additional logical errors.
- Restart your computer once again once the operation is complete, then restart your computer and see if the issue is resolved at the next computer startup by repeating the action that was causing the critical system crash.
If you’re still encountering Stop Error 0x0000009f errors, move down to the next method below.
Method 4: Installing the latest Intel Internet driver (if applicable)
After seeing this scenario repeat a couple of times, it’s clear that the issue can also occur due to a system component belonging to the Intel Internet Driver. In most common cases, the reported culprits are either Intel(R) Gigabit Network Connection Driver or WiFi Link Driver. If you use one of these two wireless drivers, there’s a chance that this is what’s causing the system instability.
Several affected users that found themselves in a similar situation have reported that they finally managed to resolve the issue. Most of them did it by uninstalling the driver altogether (letting the generic driver take over), while others did it by reinstalling the latest Intel driver version from the manufacturer website.
If this particular scenario applies to your current situation, follow the instructions below to either remove or reinstall the Intel Wireless driver and stop the BSOD crashes from ever occurring again. Here’s what you need to do:
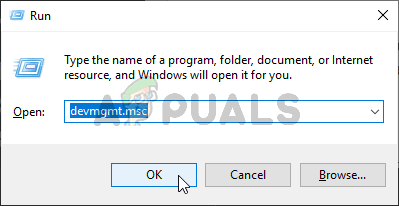
- Open up a Run dialog box by pressing Windows key + R. Next, type ‘devmgmt.msc’ and press Enter to open up Device Manager. When you’re prompted by the UAC (User Account Control), click Yes to grant administrative privileges.
Running Device Manager - Once you’re inside Device Manager, scroll through the list of installed applications and expand the drop-down menu associated with Network Adapters.
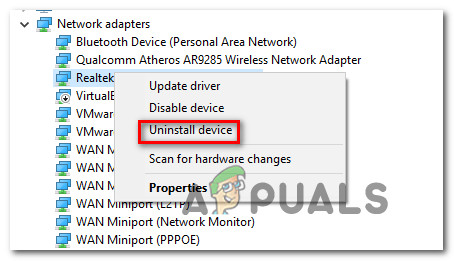
- After you arrive at the correct Network Adapters sub-menu, right-click on Intel Wireless WiFi Link Driver or Intel(R) Gigabit Network Connection Driver and then choose Uninstall device from the newly appeared context menu. When you are asked to confirm, click on Uninstall once again to do so and start the procedure.
Uninstalling the Realtek network driver - Once the procedure is complete, restart your computer to allow the operation to finish. After the next startup sequence is complete, you have two options – If you don’t do anything else, your operating system will use a generic driver to replace the one that you previously uninstalled at step 3.
Note: If you insist on using the dedicated Intel driver, navigate to the manufacturer website and download the latest version of the driver that you uninstalled. Then, double-click on the executable and follow the on-screen prompts to install the driver on your computer. - After the new driver is installed, use your computer normally and monitor the situation to see if the symptoms of the BSOD are now resolved.
If you’re still encountering Stop Error 0x0000009f during fixed or random intervals, move down to the next method below.
Method 5: Uninstalling Daemon Tools (if applicable)
Another rare but likely culprit that might end up causing the Stop Error 0x0000009f is a pending I/O in sptd.sys. As it turns out, Sptd.sys is a faulty CD ROM emulation driver that belongs to Daemon tools. But based on some other reports, there’s also a different Daemon Tools driver (amm9h5at.sys) that might end up causing the very same behavior.
Several affected users that were also struggling with this problem have reported that they managed to stop the BSOD triggered by the Stop Error 0x0000009f from occurring by uninstalling or updating their Daemon Tools installation.
If this scenario is applicable, follow the instructions below for step-by-step instructions on resolving the issue by dealing with the Daemon Tools installation. Here’s a quick guide with what you need to do:
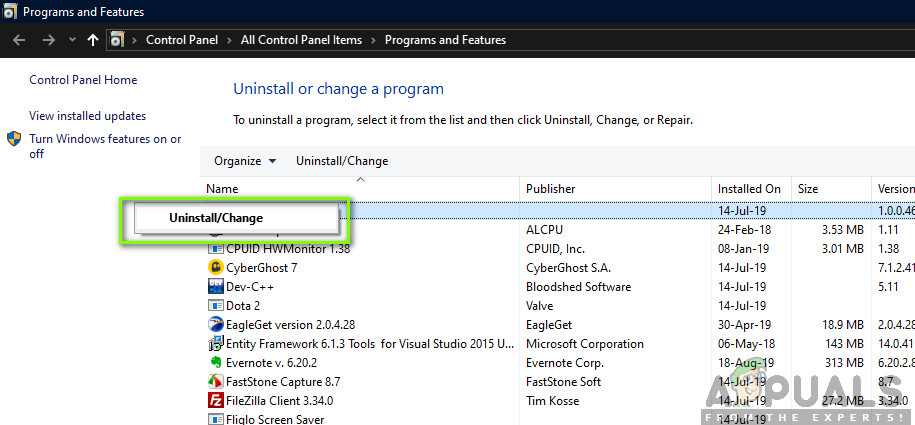
- Press Windows key + R to open up a Run dialog box. Next, type “appwiz.cpl” inside the text box and press Enter to open up the Programs and Features window.

Type appwiz.cpl and Press Enter to Open Installed Programs List - Once you’re inside the Programs and Files window, scroll down through the list of installed applications and locate your Daemon Tools installation. Once you see it, right-click on it and choose Uninstall from the context menu.
Uninstalling the Daemon Tools application - Follow the on-screen prompts to complete the uninstallation, then restart your computer to complete the process.
- At the next startup, monitor your computer and see if the issue is still occurring. If you’re no longer experiencing Stop Error 0x0000009f, you can safely conclude that your Daemon Tools installation was causing the problem.
Note: If you rely on the tool a lot, you can attempt to install the latest version form this link (here) and see if the system’s stability is preserved.
In case this scenario was not applicable or you followed the instructions above and you’re still encountering the Stop Error 0x0000009f, move down to the next method below.
Method 6: Performing a repair install / clean install
If you’ve followed all the potential fixes above to no avail, you are likely dealing with some kind of corruption issue that cannot be resolved conventionally. If you’ve come this far with no alleviation to your problems, the only viable fix with the potential of resolving the BSODs caused by the Stop Error 0x0000009f is to reset every Windows component.
Several users that have been facing this problem have reported that they managed to get the problem fixed by refreshing every Windows component by performing a repair install or a clean install.
Keep in mind that both utilities will ultimately help you to achieve the same goal, but they have different approaches:
- Clean install – This procedure is extremely straightforward and easy to perform. Although you don’t need any prerequisites like an installation media, the major downside of going this route is that you will lose all your data including apps, games, personal media and all user preferences if you don’t back them up in advance.
- Repair install (in-place repair) – This approach is more tedious as it involves more steps and requires you to own (or create) a compatible Windows installation media. But the major advantage of this method is that it will allow you to keep all your files (including applications, games, documents, music, videos and even some user preferences).
Regardless of the option, you end up choosing, follow the instructions to the letter and see if they end up resolving the Stop Error 0x0000009f. If the same issue is persisting, you can conclude that the issue is being caused by a hardware component (in this case, you should take your PC to a qualified technician for investigations).


