How to fix ‘Sivinit Has Stopped Working’ Error on Windows
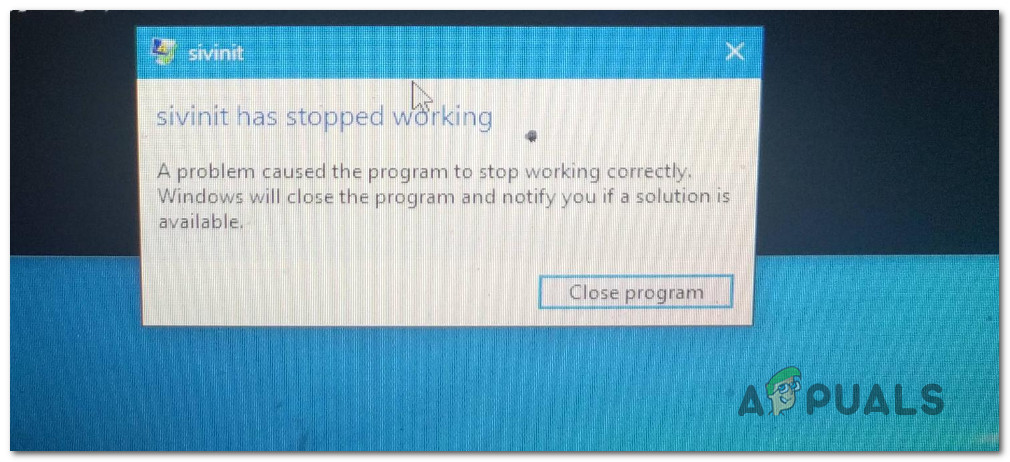
Several Windows users have been reaching us with questions after being unable to get rid of the error message “Sivinit has stopped working“. Most affected Windows users are reporting that they see this error message at every system startup as they’re unable to identify the application that’s causing it. As it turns out, the issue isn’t restricted to a certain Windows version since it’s confirmed to occur on Windows 7, Windows 8.1 and Windows 10.
What’s causing the ‘Sivinit has stopped working’ error on Windows 10?
We investigated this particular issue by looking at various user reports and by testing out the various repair strategies that are commonly recommended by affected users that managed to fix the issue on their computer. As it turns out, several different common scenarios might be triggering this error code. Here’s a shortlist of potential culprits:
- Gigabyte Software glitch – As it turns out, the most common culprit that’s confirmed to cause this startup error is a Gigabyte process that gets installed by System Information Viewer, Gigabyte App Center or a similar tool (typically published by Gigabyte). If this scenario is applicable, you can resolve the issue by uninstalling the suite that’s causing the issue.
- Different 3rd party interference – As it turns out, there are several other 3rd party services that aren’t signed by Gigabyte and can still trigger this startup error. In cases like this, the most focused and efficient approach is to boot in a clean boot state to identify the culprit that’s causing the startup error.
- System file corruption – In rare circumstances, a machine interruption or a remnant file might produce an inconsistency that will make the system call some processes from the wrong location. In this case, you should be able to resolve the issue either by performing a clean install or a repair install.
If you’re encountering this same issue and you’re looking for a fix that is capable of resolving the issue, this article will provide you with several different troubleshooting steps. Down below, you’ll discover a collection of potential fixes that other users in a similar situation have successfully used to stop the “Sivinit has stopped working” startup error from appearing.
If you want to be as efficient as possible, we advise you to follow the potential fixes below in the same order we arranged them in (by efficiency and severity). Eventually, you will stumble upon a fix that will resolve the issue regardless of the culprit that’s causing the startup error code.
Method 1: Uninstalling System Information Viewer (if applicable)
As it turns out, the most common culprit that will produce the startup error “Sivinit has stopped working” is a corrupted Gigabyte component. If you’re using Gibabyte drivers or you recently swapped a component that used them, chances are you have a remnant application that’s causing this behavior.
Most affected users that were struggling with this error have reported that they finally managed to resolve this issue by uninstalling the System Information Viewer (SIV) app. This utility will be bundled with a lot of Gigabyte drivers and is known to cause startup errors if the component is removed or not working properly.
If this scenario is applicable, follow the instructions below to resolve the issue by uninstalling the System Information Viewer:
- Press Windows key + R to open up a Run dialog box. Next, type “appwiz.cpl” and press Enter to open up the Programs and Features menu.

Typing in “appwiz.cpl” in the Run prompt - Once you’re inside the Programs and Features screen, scroll down through the list of installed applications and identify the System Information Viewer (SIV) app or Gigabyte App Center. When you see it, right-click on it and choose Uninstall from the context menu.
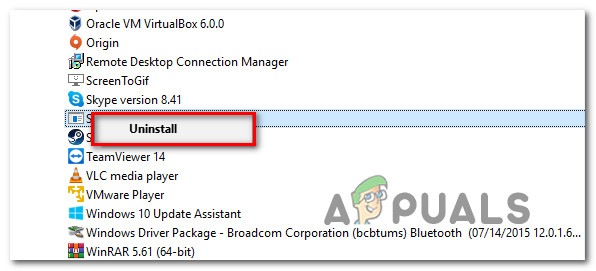
Uninstalling the System Information Viewer (SIV) - When you’re inside the uninstallation window, follow the on-screen prompts to complete the process. Once the process is complete, restart your computer and see if the issue is resolved at the next system startup.
In case this method wasn’t applicable or you followed it and you’re still encountering the same “Sivinit has stopped working” startup error, move down to the next method below.
Method 2: Performing a clean boot
If the issue above wasn’t applicable or it didn’t produce any results, a different startup process signed by Gigabyte is likely triggering the startup error. Since the Sivinit process is bundled with a lot of applications, we can’t compile a list of applications that might be causing this error.
Fortunately, there is a way that will allow you to investigate and determine with startup item is causing this startup error. You can do this by booting your computer in a clean boot state, where no startup item is prevented from running.
If the issue doesn’t occur while your system starts in a clean boot state, it’s clear that one of your 3rd party services is causing the issue. In this case, it becomes a matter of identifying the culprit responsible for the “Sivinit has stopped working” startup error.
If this scenario applies to your current situation, follow the instructions below to achieve a clean boot state and then identify the 3rd party startup service that’s causing the error:
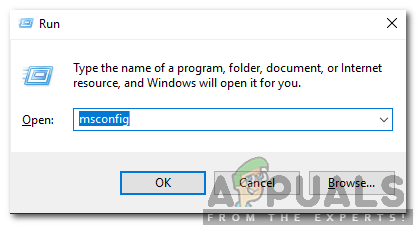
- Press Windows key + R to open up a Run dialog box. Next, type “msconfig” and press Enter to open up the System Configuration menu. If you see the UAC (User Account Prompt), click Yes to grant administrative privileges.
Typing in msconfig and pressing enter - Once you’re inside the System Configuration window, click on the Services tab from the top of the window, then check the box associated with the “Hide all Microsoft Services” option. After you’ve done this, all Windows services will be removed from the list, which will prevent you from mistakenly disabling a Windows service.
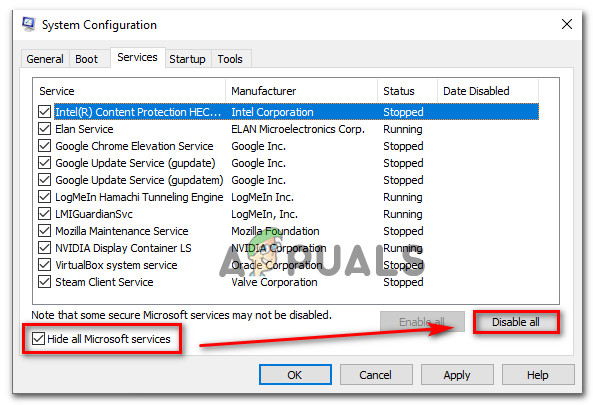
Disabling all non-Microsoft startup items - After all Windows services are excluded from that list, click on the Disable all button to effectively prevent every 3rd-party service from being called during the next startup sequence.
- Once you manage to get inside the Startup tab of Task manager, systematically select each startup service, then click the Disable button at the bottom of the screen. Do this with every startup item until each and everyone is disabled.
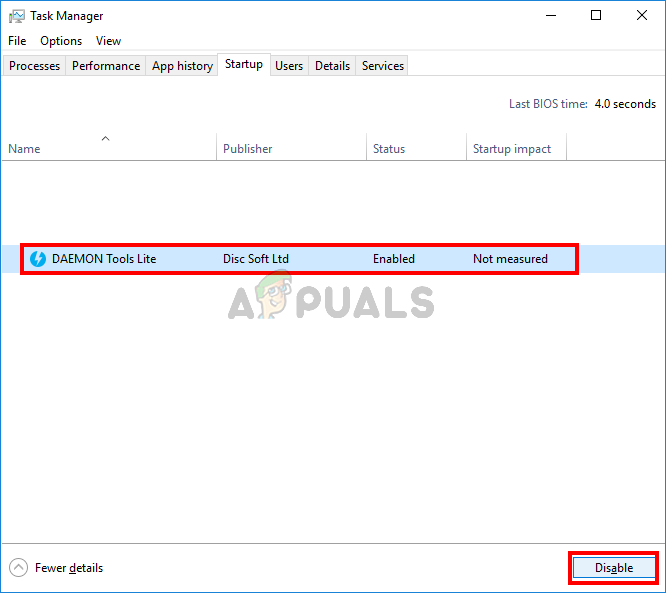
Disabling Apps from Startup - Once you’re done with the step above, you have effectively achieved a clean boot state. To take advantage of this state, simply restart your computer.
- At the next startup sequence, your computer will be in a clean boot state. This allows you to test and see the startup error returns. If the “Sivinit has stopped working” startup error is no longer occurring, you can confirm that a 3rd party service is causing the problem.
- In case you’ve confirmed that a startup item is responsible for the error, reverse engineer the steps above and systematically re-enable the previously disabled services coupled with consistent restarts until you figure out which startup item is responsible for the error. Once you discover it, ensure that you leave it disabled.
If you followed the instructions below and you’re still encountering the “Sivinit has stopped working” startup error, move down to the next method below.
Method 3: Perform a repair install / clean install
If none of the methods below have allowed you to resolve the issue, you’re likely encountering the issue due to some underlying system file corruption. Since there are a lot of causes that might lead to this behavior, the easiest and most efficient fix, in this case, is to reset every Windows component.
When it comes to resetting every component of your Windows operating system, you have two major options: a clean install or a repair install (in-place repair).
A clean install is an easier and hassle-free procedure, but keep in mind that going this route will make you lose most of your data including installed applications, games, personal media and user preference (unless you back them up in advance).
Going for a repair install (in-place repair) is a more tedious approach, but it has a major advantage. With a repair install, only the OS components will be affected. This means that all your applications, games, user preferences, and personal media will remain intact.


