How to Fix Rage 2 Crashing?
Rage 2 is fairly a new entry in the gaming arena with only being released this January by Bethesda Softworks. It is a first-person shooter video game and is a prequel to Rage released in 2011. The game has mixed reviews from users where some claim that the story doesn’t have many storylines while some complement the intensive graphics.
Despite being one of the most popular games on Steam, we came across numerous instances where Rage 2 was crashing again and again for users. This crashing varied quite different ranging from crashes in graphics-intensive scenarios to random crashing when the game started. In this article, we will go through all the reasons as to why this occurs and what the possible workarounds are to fix the problem.
What causes Rage 2 to Crash?
After we received numerous reports from users, we decided to start our investigation and started noting our findings. We concluded that the crashing didn’t only occur because of a specific problem, but due to several different cases ranging to each scenario. Here are some of them:
- Outdated game: There is also an option to play Rage 2 offline. In the past, there have been numerous cases where because of the game is outdated, it crashed. Noticing this, the developers released updates to patch the problem.
- Compatibility mode: Compatibility mode allows users to launch any application which has its parameters set to run on some older Windows configurations. The surprising thing is that the compatibility mode of some other version of Windows seems to work on newer versions.
- Running in Native Resolution: Another instance where you will have issues like crashing is where the resolution set on your monitor is set as the native resolution. The Native resolution is the default resolution on which them monitor is programmed to run.
- Game DVR: Game DVR is one of the most enjoyed features of Windows where it allows an overlay whenever you play a game to record the gameplay and also stream it directly. However, despite the feature being popular, it is known to cause problems with Rage 2.
- System requirements: If the system requirements of your computer do not match the requirements of the game, the game will crash because of the lack of hardware to support it.
- Vsync: Vertical Sync is a nifty feature which only a few games have. It allows the user to sync the refresh rate of the game with that of the monitor. Despite being extremely useful, it is known to cause problems with some games.
- Graphics drivers: Last but not least, the graphics drivers running on your computer may cause the crashes if they are not updated to the latest build.
Now that you know all the possible causes, we will move on and try troubleshooting one by one and see where the issue lies. Make sure that you are logged in as an administrator and have access to a stable internet connection.
Pre-requisite: System Requirements
Before we start jumping in any solution, it is wise to check whether our computer meets all the system requirements of the game. Even though the game will run in the minimum requirements, we recommend that you have at least the recommended requirements.
Minimum System Requirements

Operating System: Windows 7/8.1/10

Architecture: 64 bit

System Memory: 8GB

Processor: Intel Core i5-3570 or AMD Ryzen 3 1300X

Graphics Card: Nvidia GTX 780 3GB or AMD R9 280 3GB

Hard Drive Space: 50GB
Recommended System Requirements

Operating System: Windows 7/8.1/10

Architecture: 64 bit

System Memory: 8GB

Processor: Intel Core i7-4770 or AMD Ryzen 5 1600X

Graphics Card: Nvidia GTX 1070 8GB or AMD Vega 56 8GB

Hard Drive Space: 50GB
Once you have determined that you have the minimum requirements, you can proceed.
Solution 1: Verifying Game and Cache Files
The first thing which we will check when troubleshooting the problem is seeing whether the game files are proper, updated, and complete. If the game files are somewhat missing or lacking important modules, you will experience numerous issues including the crashing.
When we verify the integrity of game files using Steam, the game checks for any discrepancies by comparing the local version with one that is saved remotely. If any is found, it is automatically downloaded and replaced. This method will also ensure that your game is updated to the latest updates.
- Launch Steam and click on the Library button present on the top tab.
- Now, locate Rage 2 on the left navigation pane. Right-click on it and select Properties.
- Once in the game’s properties, click on the Local Files tab and select Verify integrity of game files.
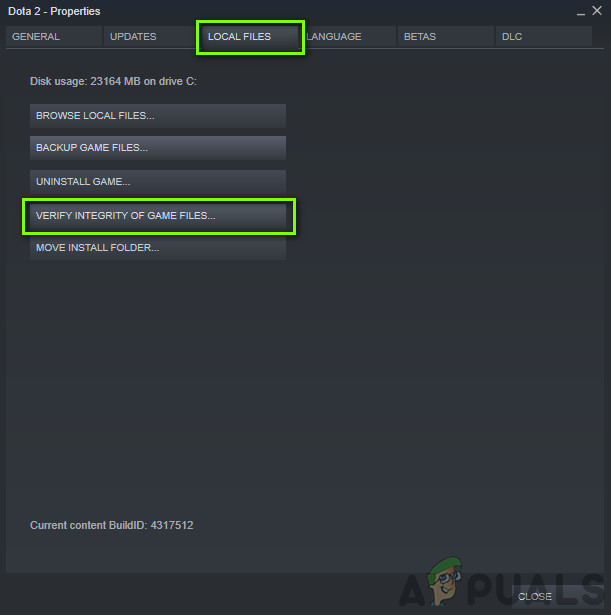
Verifying Game and Cache Files - Let the process complete. After it is done, restart your computer completely and check if the issue is resolved for good.
Solution 2: Running in Compatibility mode
Every game is developed with the hosting operating system in mind with the latest one their first preference. However, in numerous instances, we saw cases where setting the compatibility mode of an older operating system fixed the problem instantly. This might be because some Windows 10 modules might not be supporting the game is running. Hence when you change the compatibility mode, the older configurations get loaded and it runs smoothly without any errors. Here is the method on how to run the game in Compatibility mode.
Every version of Sims 4 is released with the guest operating system in mind. So if the Sims installed on your computer is meant to be for a newer version of Windows and you are using an older one, you will experience the Video card error. Here, we can try launching Sims 4 in compatibility mode and see where that takes us. If the compatibility is the issue, this solution will solve it.
- Navigate to the following directory:
<Drive>\Steam\steamapps\common\Rage 2 \game\bin\win32 (or 64)
- Locate Right-click on Sims 4 application and select “Properties”.
- Once in properties, select the Compatibility Check the option Run this program in compatibility mode for: and select another operating system. Preferably go with Windows 8 or 7.
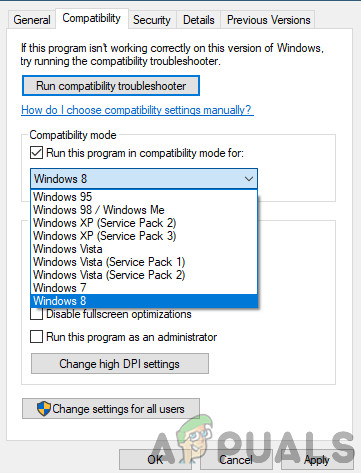
Running Rage in compatibility mode - Press Apply to save changes and exit. Now restart your computer completely and check if the problem got solved.
Solution 3: Changing Resolution
Another thing which we noticed was where changing the resolution of the game to something other than the native resolution fixed the problem instantly without any issues whatsoever. This seems like a bizarre case as the native resolution is the resolution which is supported by the monitor and the hardware. But in the case in Rage 2, this is the opposite. First, we will change the resolution using your system settings and then we will change it inside the game settings.
- Type “resolution” after pressing Windows + S in the dialogue box and open the application which comes forth.
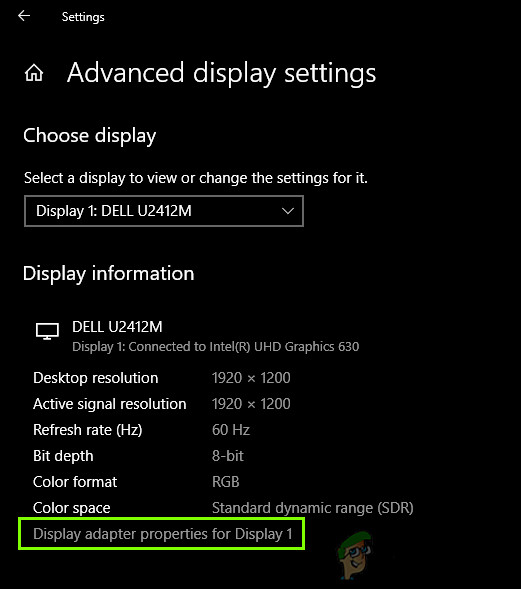
- Once in Settings, browse down to the end of the page and select “Advanced display settings”.
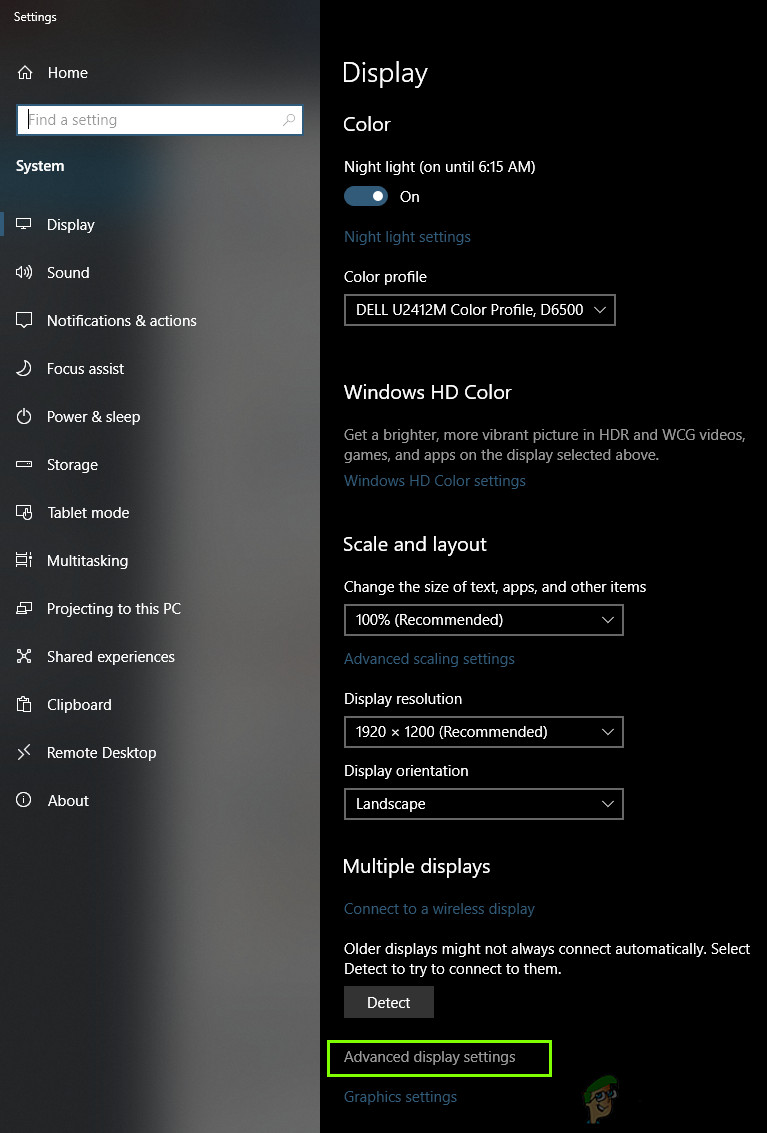
Running Rage in compatibility mode - Another window will come up consisting of all the details of your display. Select the option Display adapter properties for Display 1.
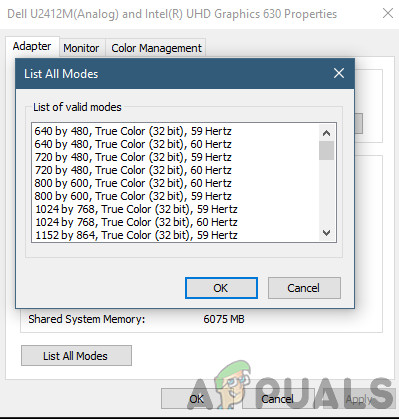
Display Adapter Properties - Once you are in your hardware properties, select List all modes in the tab of Adapter
- You will see a list of different resolutions present on the screen. Change the resolution according to your computer specifications. You may try different resolutions each time.
Changing Display Modes - Now, launch Rage 2. Navigate to its in-game settings and then change the resolution to the one you set earlier. Restart your computer after performing the actions so everything is refreshed.
Solution 4: Disabling Game DVR
Game DVR is an option present inside the Xbox settings which allow users to record their gameplay along with the audio as well without installing any other third-party application. It is quite a nifty feature but is known to conflict with several different games. Here is the method on how to disable the Game DVR from the Xbox Application.
- Press Windows + S, type “Xbox” in the dialogue box and open the application.
- Click on the Settings icon present at the bottom left side of the screen. Once in the settings, select Game DVR and then uncheck the following option:
Record game clips and screenshots using Game DVR
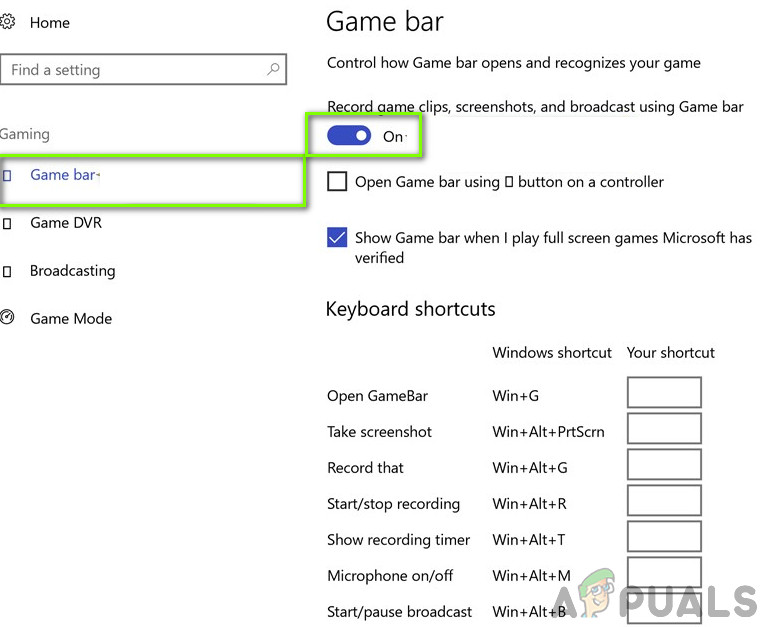
Disabling Game Bar - Restart your computer for the changes to take place and check if the problem at hand got solved.
If you are using a newer version of Windows, the Xbox application will not have this feature. Follow the listed steps instead.
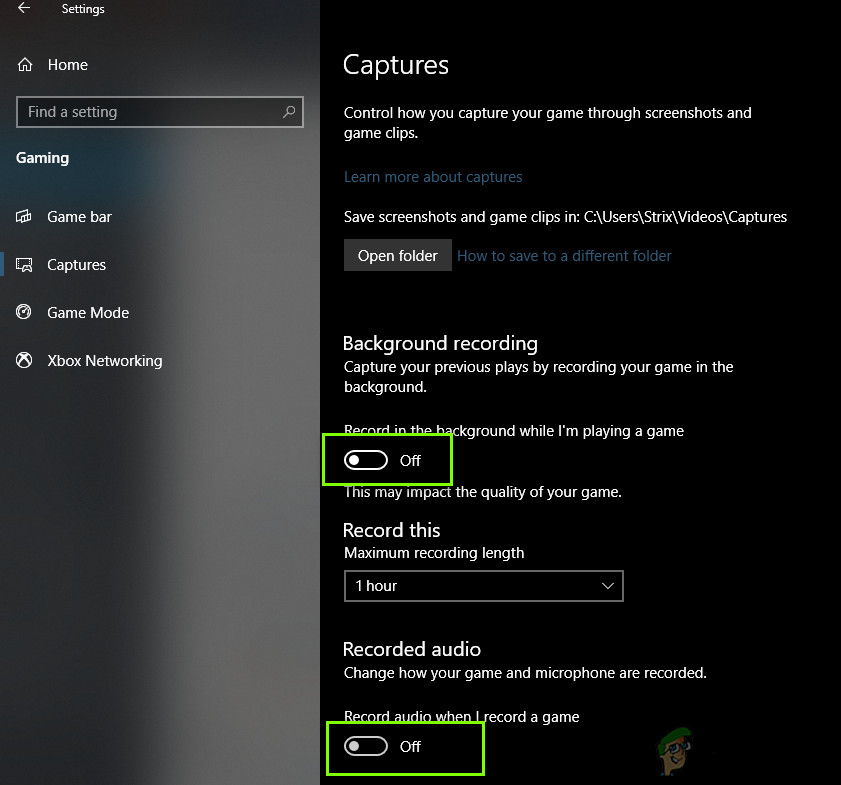
- Press Windows + I to launch Settings. Now click Gaming from the menu and click on Captures from the left navigation bar.
- Uncheck the following options:
Record in the background while I’m playing a game

Record audio when I record a game.
- Restart your computer properly and launch Rage 2 again.
Solution 5: Disabling VSync
Vertical Sync (Vsync) allows users to sync their frame rate on which the game is running with the monitor’s refresh rate. This results in improved stability and graphics in the game. This feature is already integrated into the game settings of Rage 2. Even though this might sound cool and helpful, it is known to cause several issues. We will be disabling the Vsync and see if this makes any difference.
In this solution, we will navigate to the settings of the game and disable the option.
- Launch Rage 2 and click on Options from the main menu.
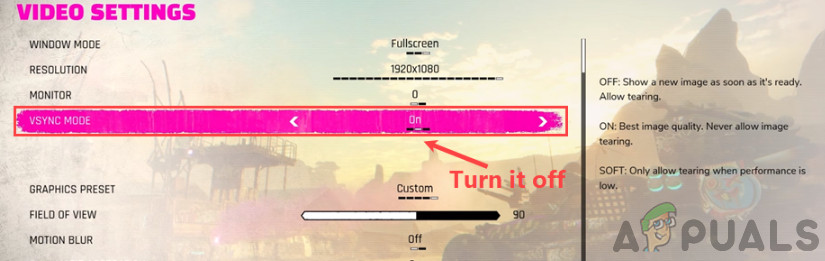
- Now, click on Video and toggle the Vsync
- Save changes and exit. Restart Rage 2 and see if the issue is resolved.
Solution 6: Updating Graphics Drivers
If none of the above methods work out, we will move on to updating the graphics drivers on your computer. The drivers are the main actors which play a huge part in communicating information between the game and the display hardware. If the graphics drivers are themselves outdated or corrupt, there is a very high chance that Rage 2 will crash whenever a graphics-intensive comes on.
In this solution, we will download a tool named DDU and then uninstall the current graphics drivers in Safe Mode. First, download and install DDU on your computer before proceeding.
- After installing Display Driver Uninstaller (DDU), launch your computer in safe mode. You can check our article on how to boot your computer into safe mode.
- After launching the DDU, select the first option “Clean and restart”. Once you do this, all the current drivers will be removed from the computer.
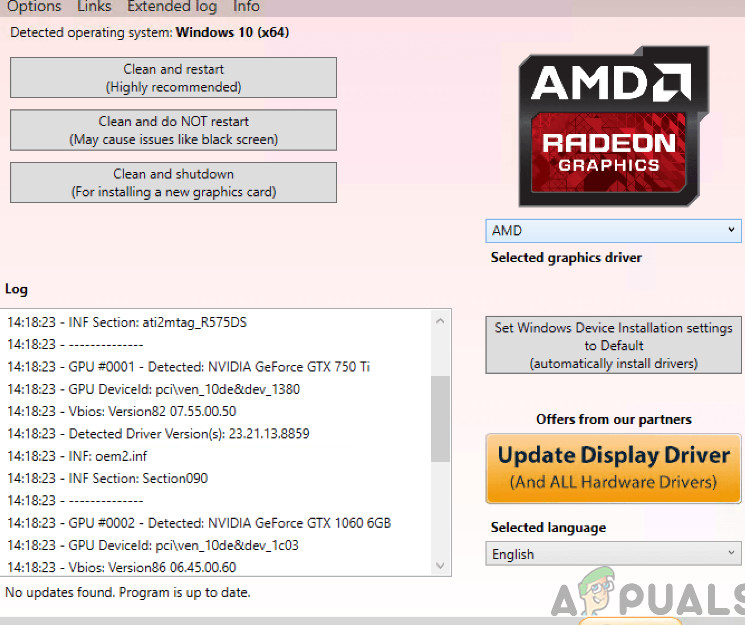
Clean and restart – DDU - Now after the uninstallation, boot your computer normally without safe mode. Type devmgmt.msc in the dialogue box after pressing Enter. Once you are in the device manager, right-click on any space and click Search for hardware changes.
- In the majority of the cases, the default drivers will not work for you so you can either install the latest drivers through Windows update or navigate to your manufacturer’s website and download the latest ones.
Locate the graphics drivers, right-click on them and click on Update Driver. - After you have installed the drivers, restart your computer and check if the problem is solved.


For a hot fix, you need to make sure the system meets the minimum requirements.
The critical parameter is not even the frequency of the processor or a video card with DirectX 12 support – you need about 8GB of RAM.
If it doesn’t help, please increase the paging file to a value from 2GB to 4GB.