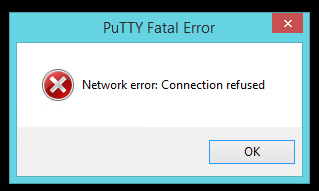
How to Fix ‘Network Error Connection Refused’ on PuTTY
PuTTY is a free to use open source software that is used for terminal emulation, serial console and network file sharing purposes. It can be used freely, modified and copied without any limitations. However, quite recently a lot of reports have been coming in of a “Network Error Connection Refused” error while trying to establish a connection. In this article, we will tell you about the reasons due to which this error is triggered and also guide you with viable solutions to fix this issue.
What Causes the “Network Error Connection Refused” Error on PuTTY?
After receiving numerous reports from multiple users, we decided to investigate the issue and identify the root causes of the problem. some of the most common ones are listed below:
- Invalid IP Address: It is possible that you are not using the Raspberry Pi IP Address while trying to establish the connection. The Raspberry Pi IP Address is needed in order to establish a connection with the servers.
- Misconfigured Login: In some cases, if you are trying to login to your Raspberry Pi using “ssh”, it triggers the error. It needs to be reconfigured using a specific command in order to work properly.
Now that you have a basic understanding of the nature of the problem, we will move on towards the solutions. Make sure to implement these in the specific order in which they are provided to avoid any conflicts.
Solution 1: Implementing Correct IP Address
It is possible that the IP Address you are using isn’t the Raspberry Pi one. Therefore, in this step, we will be identifying the correct IP Address and using that to connect. In order to do that:
- Click this link to download the “Advanced IP Scanner” tool.
Note: This tool is free to use and can be easily used to identify the IP Address. - Click on the “.exe” and follow the on-screen instructions to install it.
- Once installed, run the tool and click on the “Scan” button.

Clicking on the “Scan” button - Wait for the scanning process to be completed.
- Check to see if there is a “RaspberryPi” named connection in the list.
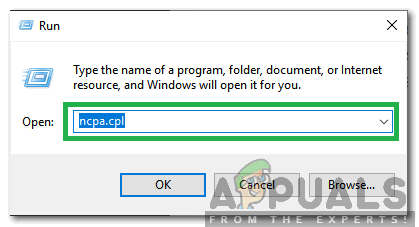
- If there isn’t, press “Windows” + “R” and type in “ncpa.cpl“.
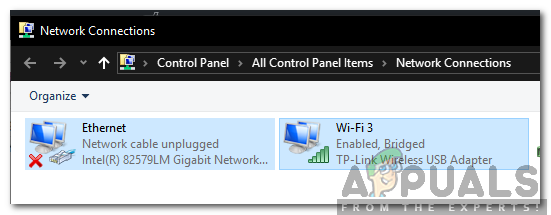
Typing in “ncpa.cpl” and pressing “Enter” - Press “Shift” and click on a “LAN” connection and the current “Wifi” connection.
Pressing shift and clicking on two connections - Click on the “Bridge Connections” option in order to establish a bridge.
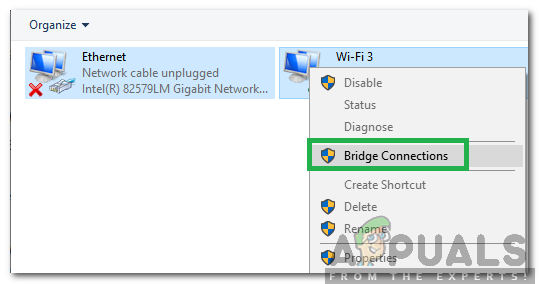
Bridging connections Note: If it shows an error, right-click on Wifi and select Properties. Click on “Sharing” and uncheck both options.
- Once the bridge is established, open the IP Scanning Application again and click on “Scan”.
- A “RaspberryPi” named Connection will show up, copy the IP Address listed in it and paste it in the “Host Name” for PuTTY Configuration.
- Click on “Open” and check to see if the issue persists.
Solution 2: Executing a CLI Command
It is possible that a misconfiguration has occurred during the login process to Raspberry Pi due to which you cannot log in with an “ssh” command. Therefore, it is recommended to try and log in with the command listed below
$ sudo rm /etc/ssh/ssh_host_* && sudo dpkg-reconfigure openssh-server


