How to Fix Netflix Error M7703-1003
In our ongoing series of covering Netflix errors, we will cover all the popular error messages experienced by the user and how to fix them. In this post, we will talk about the error message “M7703-1003”. This error code is also officially recognized by Netflix and is also documented at their website.

According to Netflix:
This error message typically points to a component on your browser that needs to be updated or that is being blocked by a security setting or program.
This doesn’t help users experiencing the error message especially Linux Ubuntu users (Linux users face this error 60% of the time).
What causes the Netflix error ‘M7703-1003’?
Users experience this error message in both Linux and Windows operating system and it mostly has to do with browser configurations on your computer. The error message ‘M7703-1003’ occurs when:
- There are corrupt or bad modules in Google Chrome. This isn’t something new and happens all the time in other cases as well.
- The Google Chrome profile is corrupt.
- The extension Widevine on Google Chrome for Netflix is also known to cause issues. This module allows Chrome to play DRM-protected HTML 5 audio and video.
Before we start with the solutions, make sure that you are logged in as an Administrator and have a good internet connection to start with.
Solution 1: Checking Widevine Content Decryption Module
Widevine is a digital rights management component in Google Chrome which is used for encryption and secure license distribution. It also plays a role in protecting playback of a video on any consumer device. Netflix relies on Widevine for playback on the browser and if the module is missing or outdated, you might be prompted with this error.
- Open Chrome and in the address bar, type:
chrome://components/
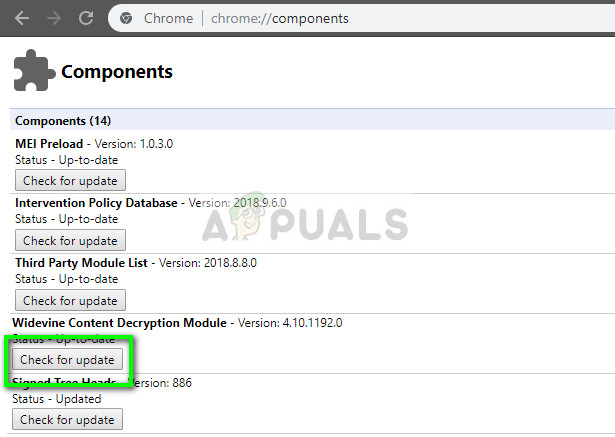
- Navigate to the near end of the page and locate the entry “Widevine Content Decryption Module”. Click on Check for Update and install updates (if any).

- Restart your computer after making changes and try launching Netflix again. See if the error message went away.
If you suspect that this module is responsible for the error message, you can carry out the fixes in more detail by referring to our article Fix: Widevine Content Decryption Module.
Solution 2: Removing Chrome configurations
If Widevine is working as expected, you can try resetting Chrome’s configurations. Do note that this will erase all your history, cache, and other saved items. By doing this, we ensure that there are no bad files in the configurations which are conflicting with the browser and not letting it play Netflix videos.
- Make sure that you have made a copy of your existing configurations to an accessible folder so you can always restore if things don’t go the way we want.
- Navigate to our article How to Fix Netflix Error M7111-1331-2206 and follow Solution 1 to clear all your browser history and cache completely.

- Restart your computer after performing the actions and try playing any video on Netflix again.
If you are using Ubuntu and this method doesn’t work, you can follow the listed steps:
- Open a terminal window on your window.
- Type the following command. This will prompt you for an administrator password so make sure you have that at hand.
sudo rm -r ~/.config/google-chrome
- Restart your machine and check if the error message went away.
Solution 3: Using another profile
If both the above methods don’t work, you can try using a new profile and see if works. Keep this solution as a last resort as you will lose all your bookmarks and favorites in this process. Make sure that you have your profile settings saved against your Gmail ID so you can always log your profile back and load all your items without losing anything.
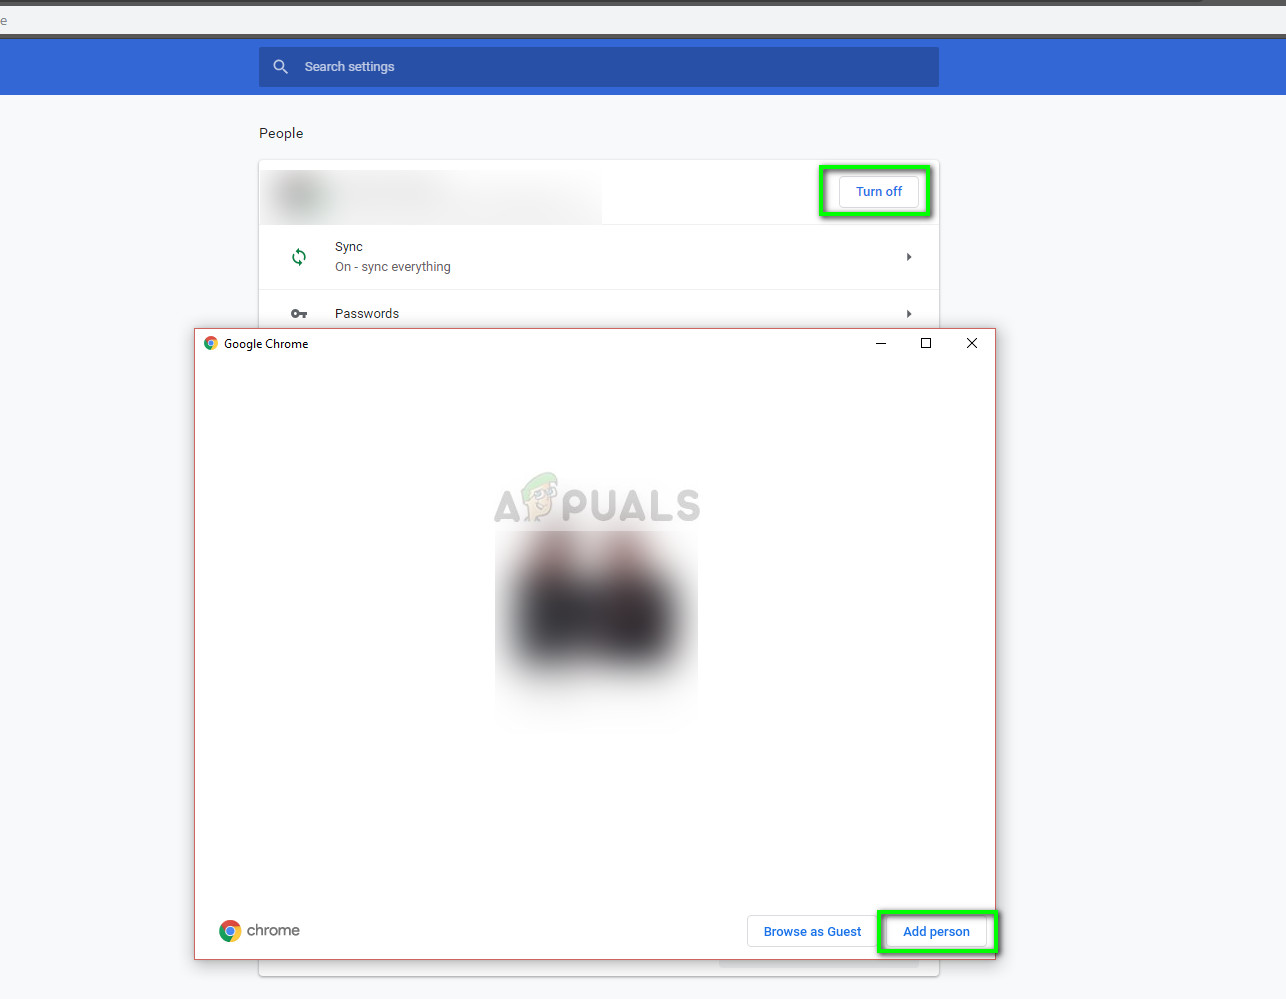
- Click on profile icon on Chrome’s taskbar to open your profile settings. Click Turn off in front of Sync. Also, click Manager other people and when the new window pops up, select Add person.

- After creating a new user, log as the user and restart Chrome. It is also advised that you log out of your current profile so all the existing settings get erased.
If you are using Ubuntu, you can execute the following command in the terminal to backup your existing configurations setting. When Chrome notices there isn’t any, it will automatically create a new one.
cd ~/.config/google-chrome/

mv Default Default-bkp
You can then attempt at restarting Chrome and after adding Netflix as a shortcut, try launching it.


