4 Easy Methods to Fix Minecraft ‘Error: org.lwjgl.LWJGLException’
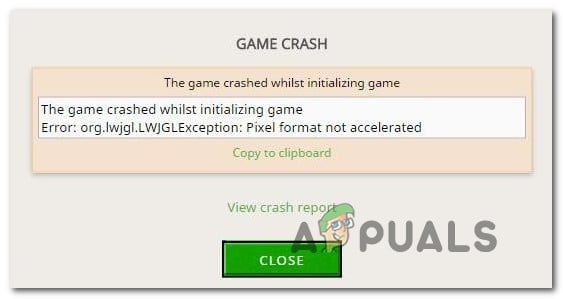
Several users are seeing the org.lwjgl.LWJGLException: Pixel format not accelerated error when trying to launch Minecraft through the official launcher. Although the issue is mostly reported to occur on Windows 10, there are other occurrences of this issue occurring with Windows 7 and Windows 8.1.
What is causing the Minecraft Error org.lwjgl.LWJGLException?
We investigated this particular issue by looking at various user reports and the repair strategies that are commonly being used to resolve the Minecraft Error org.lwjgl.LWJGLException error. Based on our investigations, there are several different potential culprits that might be responsible for the apparition of this error:
- Outdated GPU driver – In the vast majority of cases, this particular error will occur because the computer is using an outdated GPU driver. Several affected users have reported that they managed to resolve the issue by updating the driver to the latest version. This can either be done manually, via Device Manager or by using proprietary software.
- WU updated GPU with an incompatible version – Windows update is known to break some functionality (especially having to do with GPUs) when it tries to update the GPU version to the latest. It’s possible that the updating components end up installing a newer version that is not actually compatible with your GPU model. In this case, you can resolve the issue by rolling back to the previous GPU driver version.
- Catalyst Control Center is missing from PC – If you’re using an older AMD GPU model, chances are you’re encountering this issue because Catalyst Control Center is not installed on your computer. If this scenario is applicable, you will be able to resolve the issue by installing the missing utility.
- The computer doesn’t meet the minimum requirements – The latest Java edition of Minecraft is a lot more resource demanding that it’s precursors. If you have a low-end PC, it’s possible that you’re encountering this error message because your computer specifications are under the minimum requirements o Minecraft. In this case, the only way of resolving the issue is to update the hardware of your PC/laptop.
If you’re also encountering the Minecraft Error org.lwjgl.LWJGLException error when you try to launch Minecraft, this article should provide you with several troubleshooting steps around the issue. Down below, you’ll find a collection of potential fixes that other users in a similar situation have successfully used to resolve this issue. Every method featured below is confirmed to work by at least one affected user.
If you want to remain as efficient as possible, we encourage you to follow the methods below in the order that they are presented, since they are ordered by efficiency and difficulty. One of the fixes is bound to resolve the issue regardless of the culprit that ends up creating the problem.
Method 1: Updating the GPU driver
As it turns out, the Minecraft Error org.lwjgl.LWJGLException is often reported to occur in instances where the GPU is running with an outdated driver version. Several affected users have reported that the issue was resolved as soon as they updated to the latest version available (according to their graphics card model).
To update your GPU, you can either use Device Manager or install the latest version manually. But keep in mind that going the proprietary route is known to be much more efficient. But regardless of your preference, we got you covered. Feel free to choose whichever guide seems more convenable to your current situation.
Updating the GPU driver via Device Manager
- Press Windows key + R to open up a Run dialog box. Then, type “devmgmt.msc” and press Enter to open up Device Manager. If prompted by the UAC (User Account Control), click Yes to grant administrative privileges.
- Inside Device Manager, expand the drop-down menu associated with Display Adapters. Then, right-click on the GPU that you’re actively using when playing Minecraft and choose Properties from the context menu.
- Once you’re inside the Properties menu of your GPU, select the Driver tab and click on Update driver.
- Then, from the next screen, click on the box associated with Search automatically for updated driver software.
- Wait to see if the scan reveals a new available driver version. If a new driver version is available, follow the on-screen prompts to install it.
- Once the new version is installed, restart your computer and see if the issue has been resolved one the next startup sequence is complete.

Updating the GPU using proprietary software
If you’re using a dedicated GPU for your gaming activities, an even better way of ensuring that you have the latest update specifically released for your graphics card is to use the correct proprietary software according to the manufacturer of your GPU.
Every major GPU manufacturer has proprietary software that will automatically identify and install the correct driver. Consult the list below and install the correct utility according to your GPU manufacturer:
- GeForce Experience – Nvidia
- Adrenalin – AMD
- Intel Driver – Intel
If you’re still encountering the Minecraft Error org.lwjgl.LWJGLException even after ensuring that you have the latest GPU driver installed, move down to the next method below.
Method 2: Rolling back the graphics drivers
If you only starting to get the Minecraft Error org.lwjgl.LWJGLException recently (the game used to work before), chances are a GPU update forced by WU (Windows Update) ended up creating this problem. A lot of users are reporting that this issue has the potential of occurring if the WU component ends up installing a graphics driver that is not actually compatible with the GPU model.
Several users have reported that they managed to resolve this issue after using Device Manager to roll back to the previous driver version. Here’s a quick guide on how to do this:
Note: The following procedure will be applicable regardless of your Windows version.
- Press Windows key + R to open up a Run dialog box. Then, type “devmgmt.msc” and press Enter to open up Device Manager.
- Once you’re inside Device manager, expand the drop-down menu associated with Display Adapters. Next, right-click on the display adapter device that is used when playing games and click on Properties.
Note: If you have two different display adapters (an integrated and a dedicated GPU), right-click on the dedicated GPU, since that’s what comm - Inside the Properties screen of your GPU, select the Driver tab and click on Roll Back Driver
Note: If you get asked to provide a reason why you’re rolling back the driver, select “My apps don’t work with this driver” and click Yes to initiate the process. - Once the procedure is complete, restart your computer and see if the issue has been resolved at the next startup sequence.

If the issue is still not resolved, move down to the next method below.
Method 3: Installing the Catalyst Control Center ( if applicable)
If you’re using an AMD GPU, chances are the issue is occurring because the Catalyst Control Center is not installed on the PC that is displaying the issue. Several affected users have reported that the “My apps don’t work with this driver” issue was no longer occurring after they ensured that AMD’s Catalyst Control Center is installed on their Machine.
Note: If you don’t have an AMD GPU, move down directly to the next method below.
Here’s a q quick guide on installing AMD Catalyst:
- Start by closing all opened application (including 3rd party firewalls, 3rd party AV, remote access programs and any sort of webcam software).
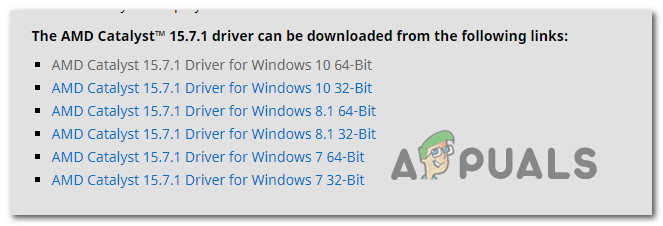
- Visit this link (here) and download the appropriate AMD Catalyst driver according to your OS version and bit architecture.
Downloading the appropriate AMD Catalyst version - Once the installation executable is downloaded, double-click on it and follow the on-screen prompts to install the software on your system.
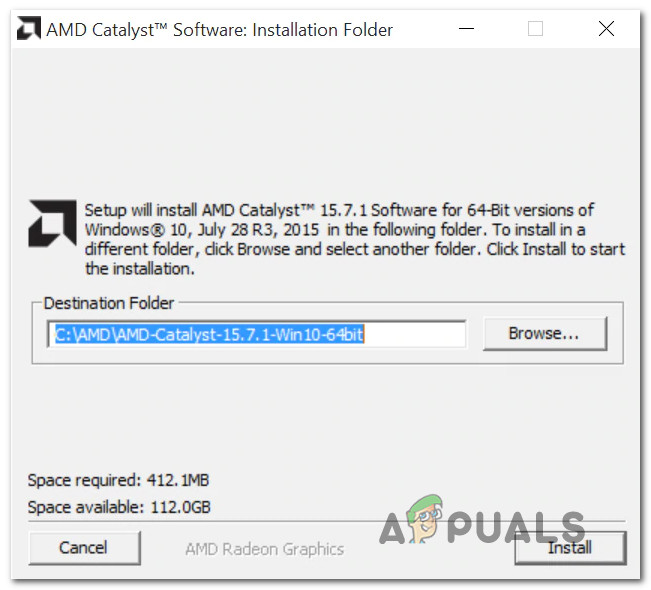
Downloading Adobe Catalyst on your system Note: You can select Custom when asked to confirm the installation method an uncheck everything that comes bundled with Catalyst.
- After you agree with the ToS, wait until the installation is complete.
- Restart your computer and see if the Minecraft Error org.lwjgl.LWJGLException has been resolved once the next startup sequence is complete.
If you’re still seeing the same error message, move down to the next method below.
Method 4: Verify if the computer meets minimum System Requirements
If you’ve come this far without a result (and Minecraft has never worked on this particular machine), it’s very likely that your computer doesn’t meet Minecraft’s minimum system requirements. There’s only one way to determine this – By comparing your system specifications with Minecraft’s minimum specs.
Here are the minimum specifications of Minecraft (Java Edition):
- CPU: Intel Core i3-3210 3.2 GHz / AMD A8-7600 APU 3.1 GHz or equivalent
- RAM: 4GB
- GPU (Integrated): Intel HD Graphics 4000 (Ivy Bridge) or AMD Radeon R5 series (Kaveri line) with OpenGL 4.4*
- GPU (Discrete): Nvidia GeForce 400 Series or AMD Radeon HD 7000 series with OpenGL 4.4
- HDD: At least 1GB for game core, maps, and other files
- OS:
– Windows: Windows 7 and up
– macOS: Any 64-bit OS X using 10.9 Maverick or newer
– Linux: Any modern 64-bit distributions from 2014 onwards
Here’s a quick guide on viewing your own PC specifications:
- Press Windows key + R to open up a Run dialog box. Then, type “msinfo32” and press Enter to open up the System Information window.

Accessing the System Information window - Start by selecting System Summary from the vertical menu on the left. Then, move over to the right pane to discover your OS, Processor (CPU) and Installed RAM.
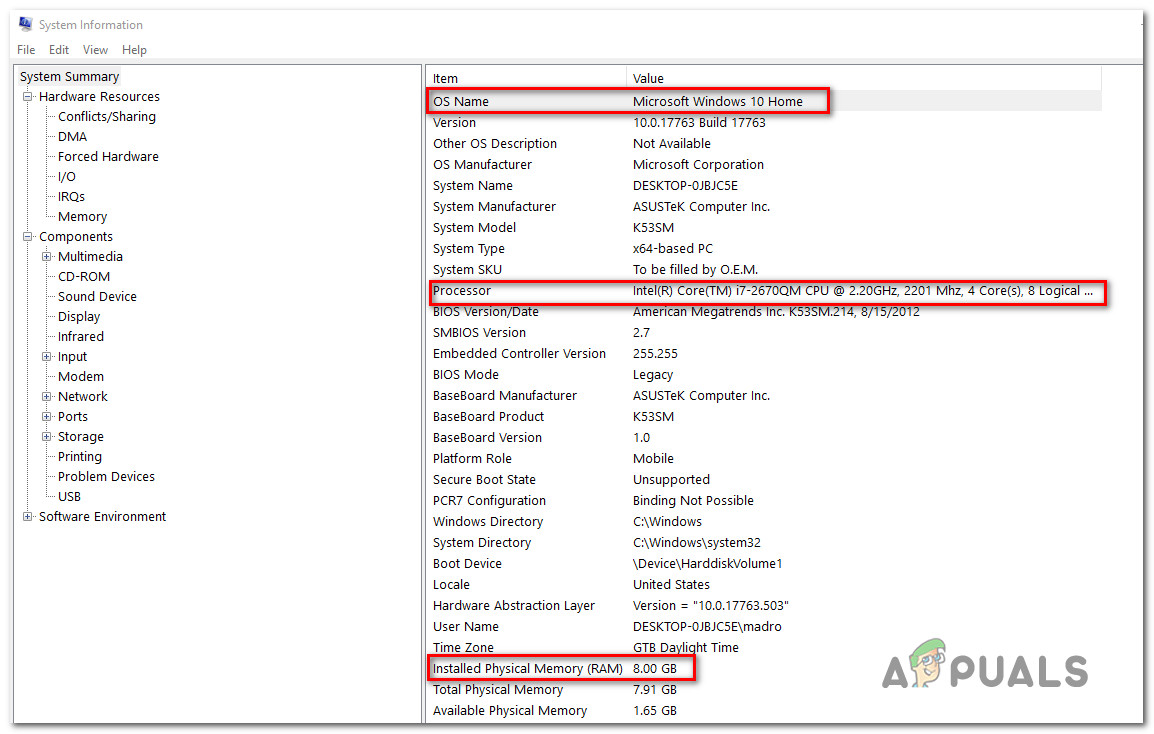
Discovering the OS, CPU, and RAM - To view your GPU, select Components from the vertical menu on the left, then click on Display. Then, move over to the right pane to see the GPU card that is installed on the PC.

Verifying if the PC meets the minimum GPU requirement Note: If you have both an integrated and a dedicated (discrete) GPU, the integrated solution will be listed first. But keep in mind that when playing games or doing other GPU demanding activities, the dedicated GPU will be used.
If your PC specifications are under the minimum requirements listed above, you will not be able to bypass the Minecraft Error org.lwjgl.LWJGLException until you update your hardware.


Unfortunately but the above article did not solve my problem.
The graphics card driver I have installed is the latest version. The specification is correct because before I switched to windows 10 I had windows 7 and minecraft worked.