How to Fix Inbound Traffic Blocked on Hamachi
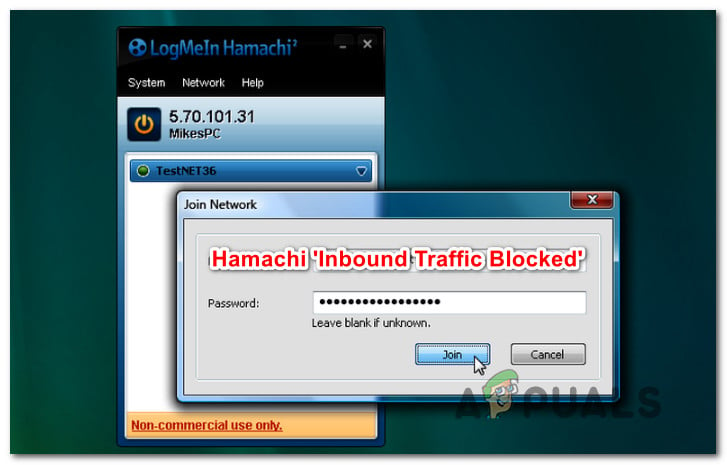
Several Windows users have been struggling to set up and use Hamachi after encountering the “Inbound Traffic blocked, check firewall settings” error. Typically, this error is reported to occur when users try to configure it in order to play a game or after the computer has been reformated or upgraded to a newer Windows build. As it turns out, the issue is not exclusive to a certain Windows version since it’s also reported to occur on Windows 10, Windows 8.1 and Windows 7.
What is causing the “Inbound Traffic blocked, check firewall settings” error?
We investigated this particular issue by looking at various user reports and the repair strategies that are commonly being used to resolve this particular issue. As it turns out, there are several different potential culprits that might be responsible for this particular issue:
- Hamachi is among the list of Protected Networks – One of the most common culprits that produce this error is when Hamachi is among the list of Protected Network Connection. Several users that have encountered this exact problem have reported that they managed to resolve the issue by customizing the default Protection network connection.
- Hamachi is being blocked by Windows Firewall – Another common scenario in which this error occurs is when LogMeIn Hamachi is ending up being blocked by your Windows Firewall. If this scenario is applicable, one quick fix around this issue is to add Hamachi to the list of excluded Firewall items.
- Windows Firewall doesn’t have an inbound rule for Hamachi – If your firewall security settings are strict, I can guarantee that Hamachi will not be able to maintain inbound connections. An elegant way that will allow you to keep your current firewall security level and use Hamachi is to establish an inbound rule for the VPN network.
- Hamachi driver is missing or incomplete – As it turns out, this particular error can also occur if Hamachi is missing the tunneling driver or the driver was not installed correctly. In this case, you will be able to resolve the issue by installing the missing Hamachi driver manually by using Device Manager.
If you’re currently struggling to resolve the very same error message, this article will provide you with some troubleshooting guides. Down below, you’ll find a collection of methods that other users in a similar situation have successfully used to fix the “Inbound Traffic blocked, check firewall settings” error.
Each of the potential fixes presented below is confirmed to work by at least one affected users. Since the methods are ordered by efficiency and difficulty, we advise you to follow them in the order that they are presented. One of them is bound to resolve the issue regardless of the culprit that is actually causing it.
Method 1: Removing Hamachi from the list of Protected Network Connections (if applicable)
If you’re encountering this issue with Hamachi and you’re using the default Windows security protection (Windows Defender + Windows Firewall), chances are the issue is occurring because your firewall is blocking inbound connections in an attempt to protect the virtual network.
Note: If you’re not using Windows Firewall as the default network protection software, move down directly to Method 4 as this one will not make a difference.
Several affected users have reported that they managed to resolve the issue by accessing the Windows Defender Firewall settings and customizing the default Protection network connection behavior so that Hamachi is excluded from the list of protected items.
Here’s a quick guide on removing Hamachi from the list of Protected Network Connections:
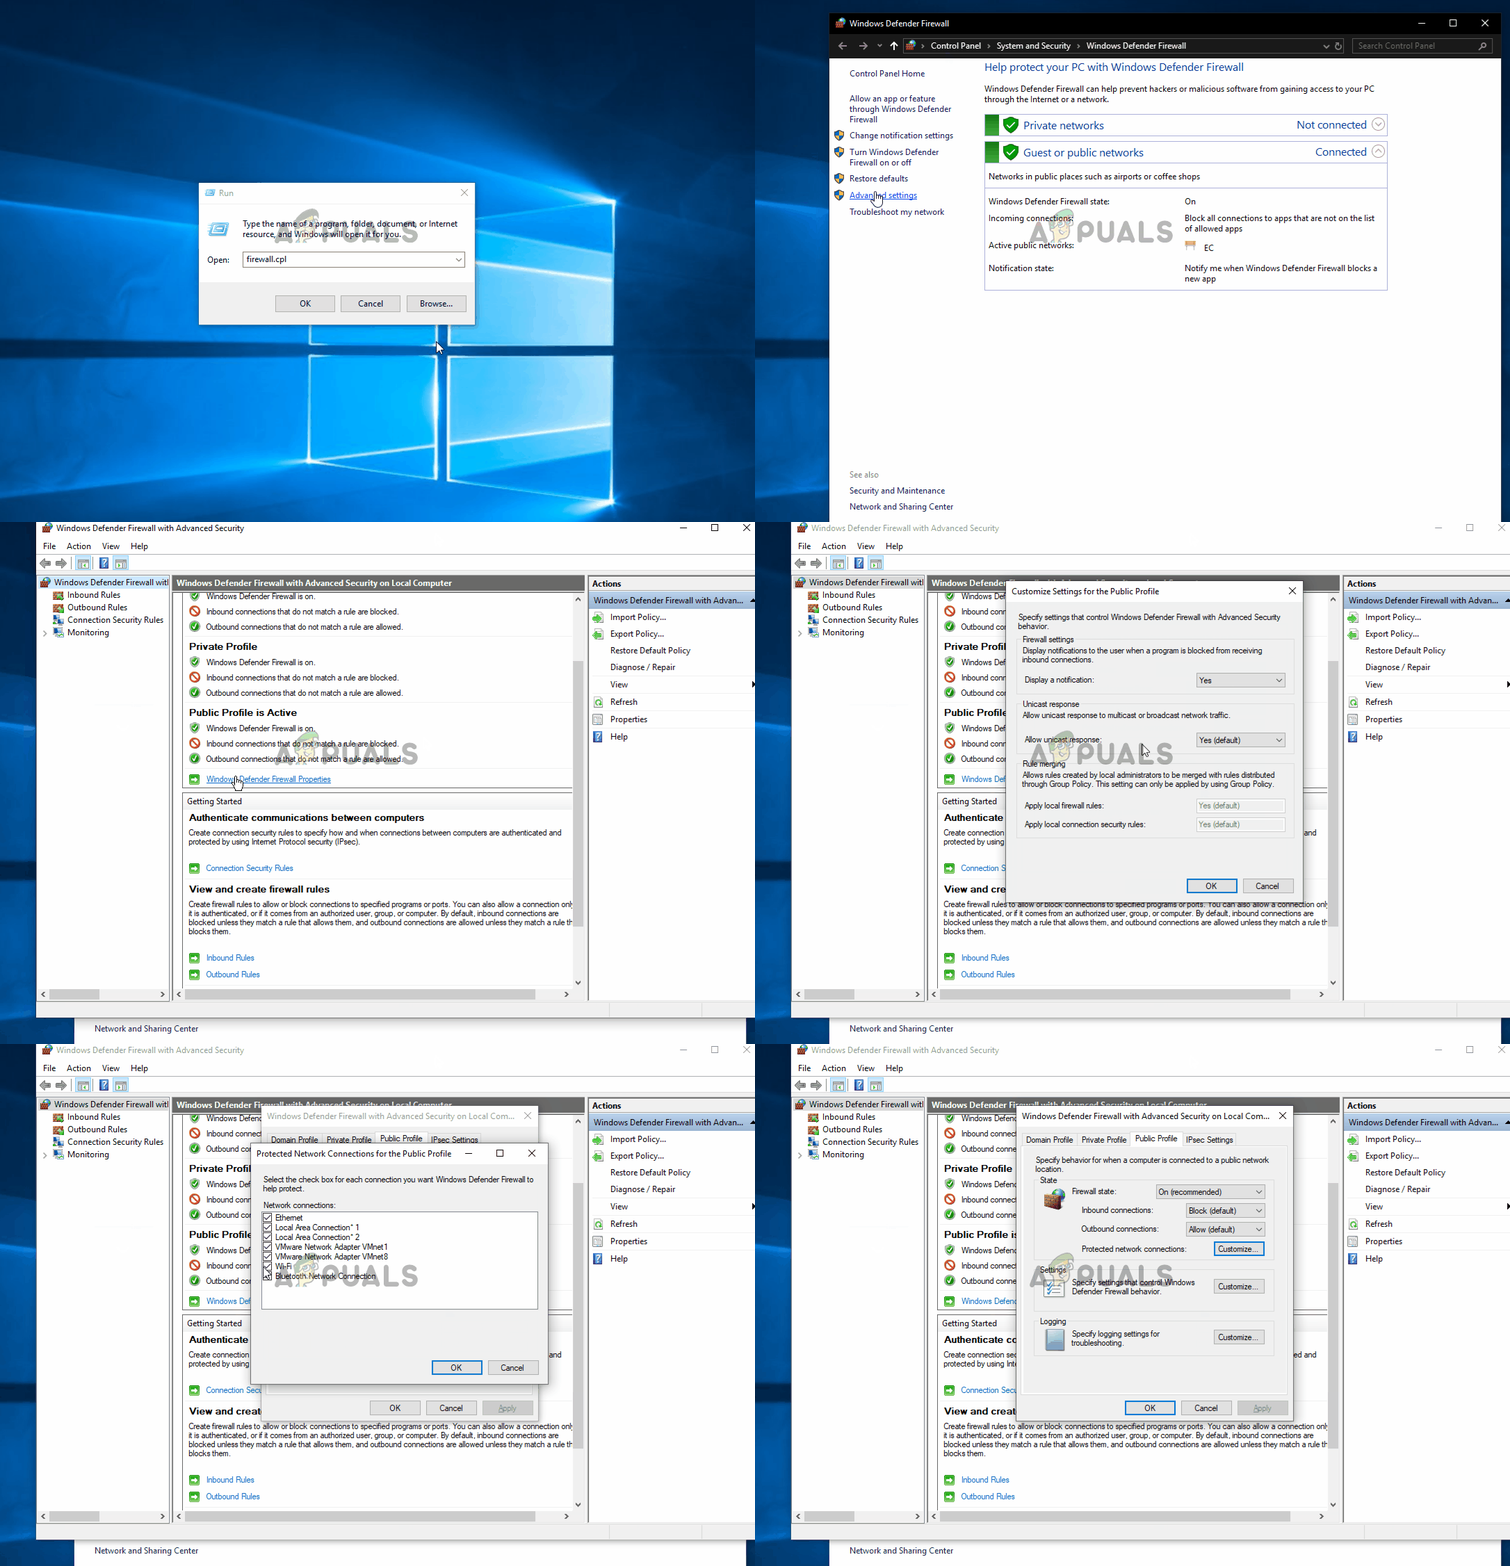
- Press Windows key + R to open up a Run dialog box. Then, type “firewall.cpl” and press Enter to open up the Windows Defender Firewall menu.
- Once you get to the Windows Defender Firewall menu, click on Advanced settings from the vertical menu on the left section of the screen.
- When you get to the Windows Defender Firewall with Advanced Security window, move over to the right pane. Once you’re there, scroll down to the bottom of the Overview section and click on Windows Defender Firewall Properties.
- Inside the Windows Defender Firewall with Advanced Security window, select the Public Profile tab, then click on the Customize button associated with Protected network connections.
- Next, inside the Protected Network Connections for the Public Profile window, you should see a list of Network connection. If Hamachi is present there, uncheck the box associated with it and click Ok.
- Click Apply to save the new configuration.
- Restart your computer and see if the “Inbound Traffic blocked, check firewall settings” error is resolved once the next startup sequence is complete.
Note: Keep in mind that if you have multiple computers connected to the same Hamachi network, you need to repeat this step with every connected machine.
If you’re still encountering the same error message while trying to use Hamachi or this method wasn’t applicable, move down to the next method below.
Method 2: Adding Hamachi to the list of excluded Firewall items
Some affected users have been able to resolve the issue entirely by adding the main Hamachi executable to the list of excluded Firewall items. This might seem like a risky procedure, but it isn’t as long as you trust the Hamachi network that you’re using. We’ve seen this fixed being confirmed a couple of times and it seems to that the likelihood of success is higher on Windows 10.
Note: If you’re using a 3rd party firewall, move directly to Method 4.
Here’s a quick guide on adding Hamachi to the list of excluded Firewall items:
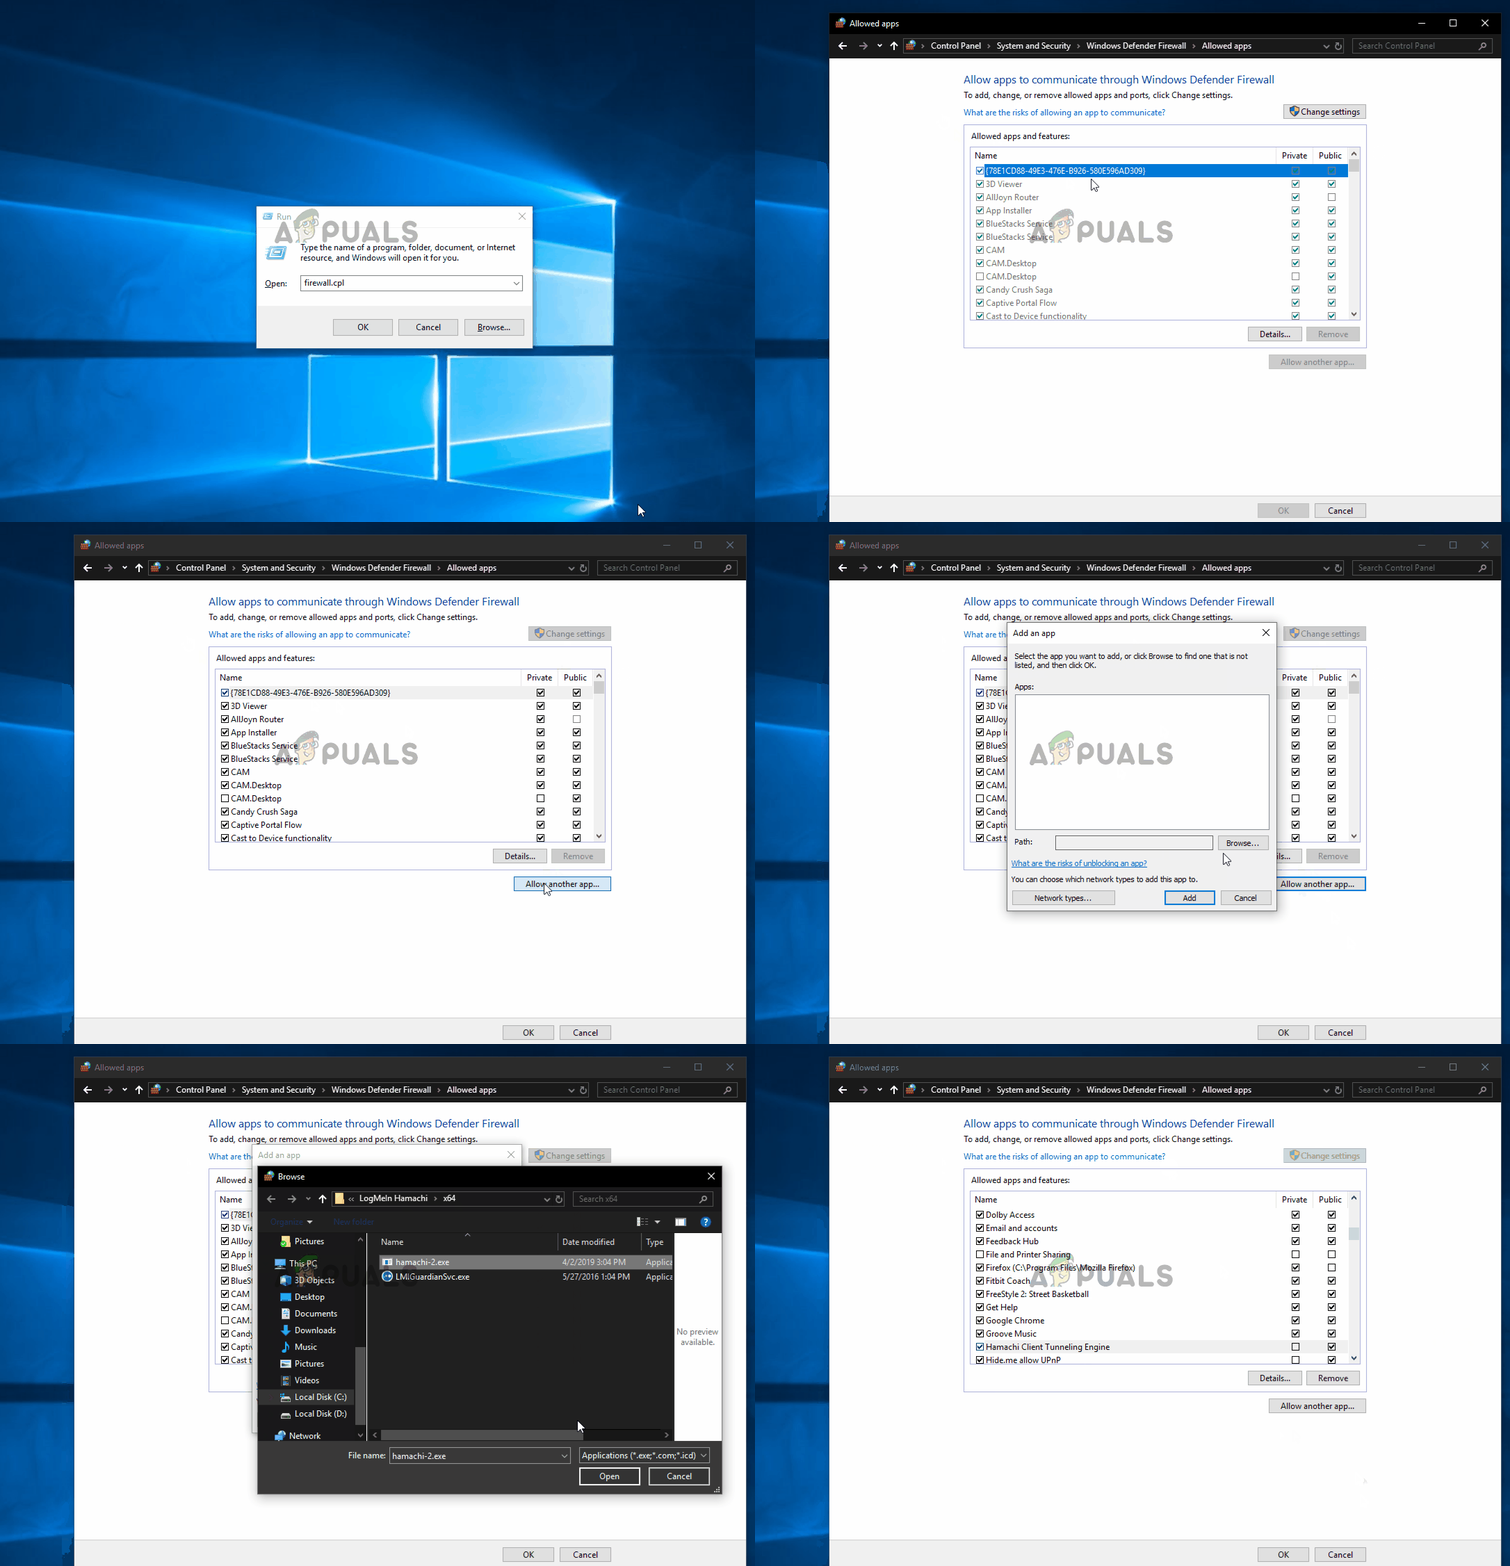
- Press Windows key + R to open up a Run dialog box. Then, type “firewall.cpl” and press Enter to open up the Windows Defender Firewall menu.
- Once you’re inside the Windows Defender Firewall window, click on Allow an app or feature through Windows Defender Firewall from the vertical menu on the left section of the screen.
- Inside the Allowed apps menu, click on Allow another app (under the list of Allowed apps and features).
Note: If the Allow another app button is greyed out, click on the Change settings button at the top and accept the UAC (User Account Prompt). After you do this, the button will become available. - From the Add an app menu, click on Browse and navigate to the following location, select hamachi-2.exe and click Open:
C:\Program Files (x86)\LogMeIn Hamachi\x64
Note: If you’re using a 32-bit Windows version, navigate here instead, select hamachi-2-ui.exe and click Open:
C:\Program Files (x86)\LogMeIn Hamachi
- If the selected app shows Hamachi Client Tunneling Engine, click on Add to add the main Hamachi executable to the exception list.
- Make sure that the changes are saved, then restart your computer and see if the issue has been resolved once the next startup sequence is complete.
If you’re still encountering the “Inbound Traffic blocked, check firewall settings” error when trying to use Hamachi (or this method wasn’t applicable), move down to the next method below.
Method 3: Creating a new inbound rule for Hamachi
If the first two methods above didn’t resolve the “Inbound Traffic blocked, check firewall settings” error and you are using Windows Firewall, then you should be able to resolve the issue by establishing a new inbound rule for Hamachi. This procedure is a little more advanced than the first two, but you should be able to get the job done if you follow the instructions carefully.
Several affected users that have also been encountering this issue have reported that they managed to resolve the issue by creating a new inbound rule that excluded Hamachi from the list of managed items.
Here’s a quick guide on how to create a new inbound rule for Hamachi:
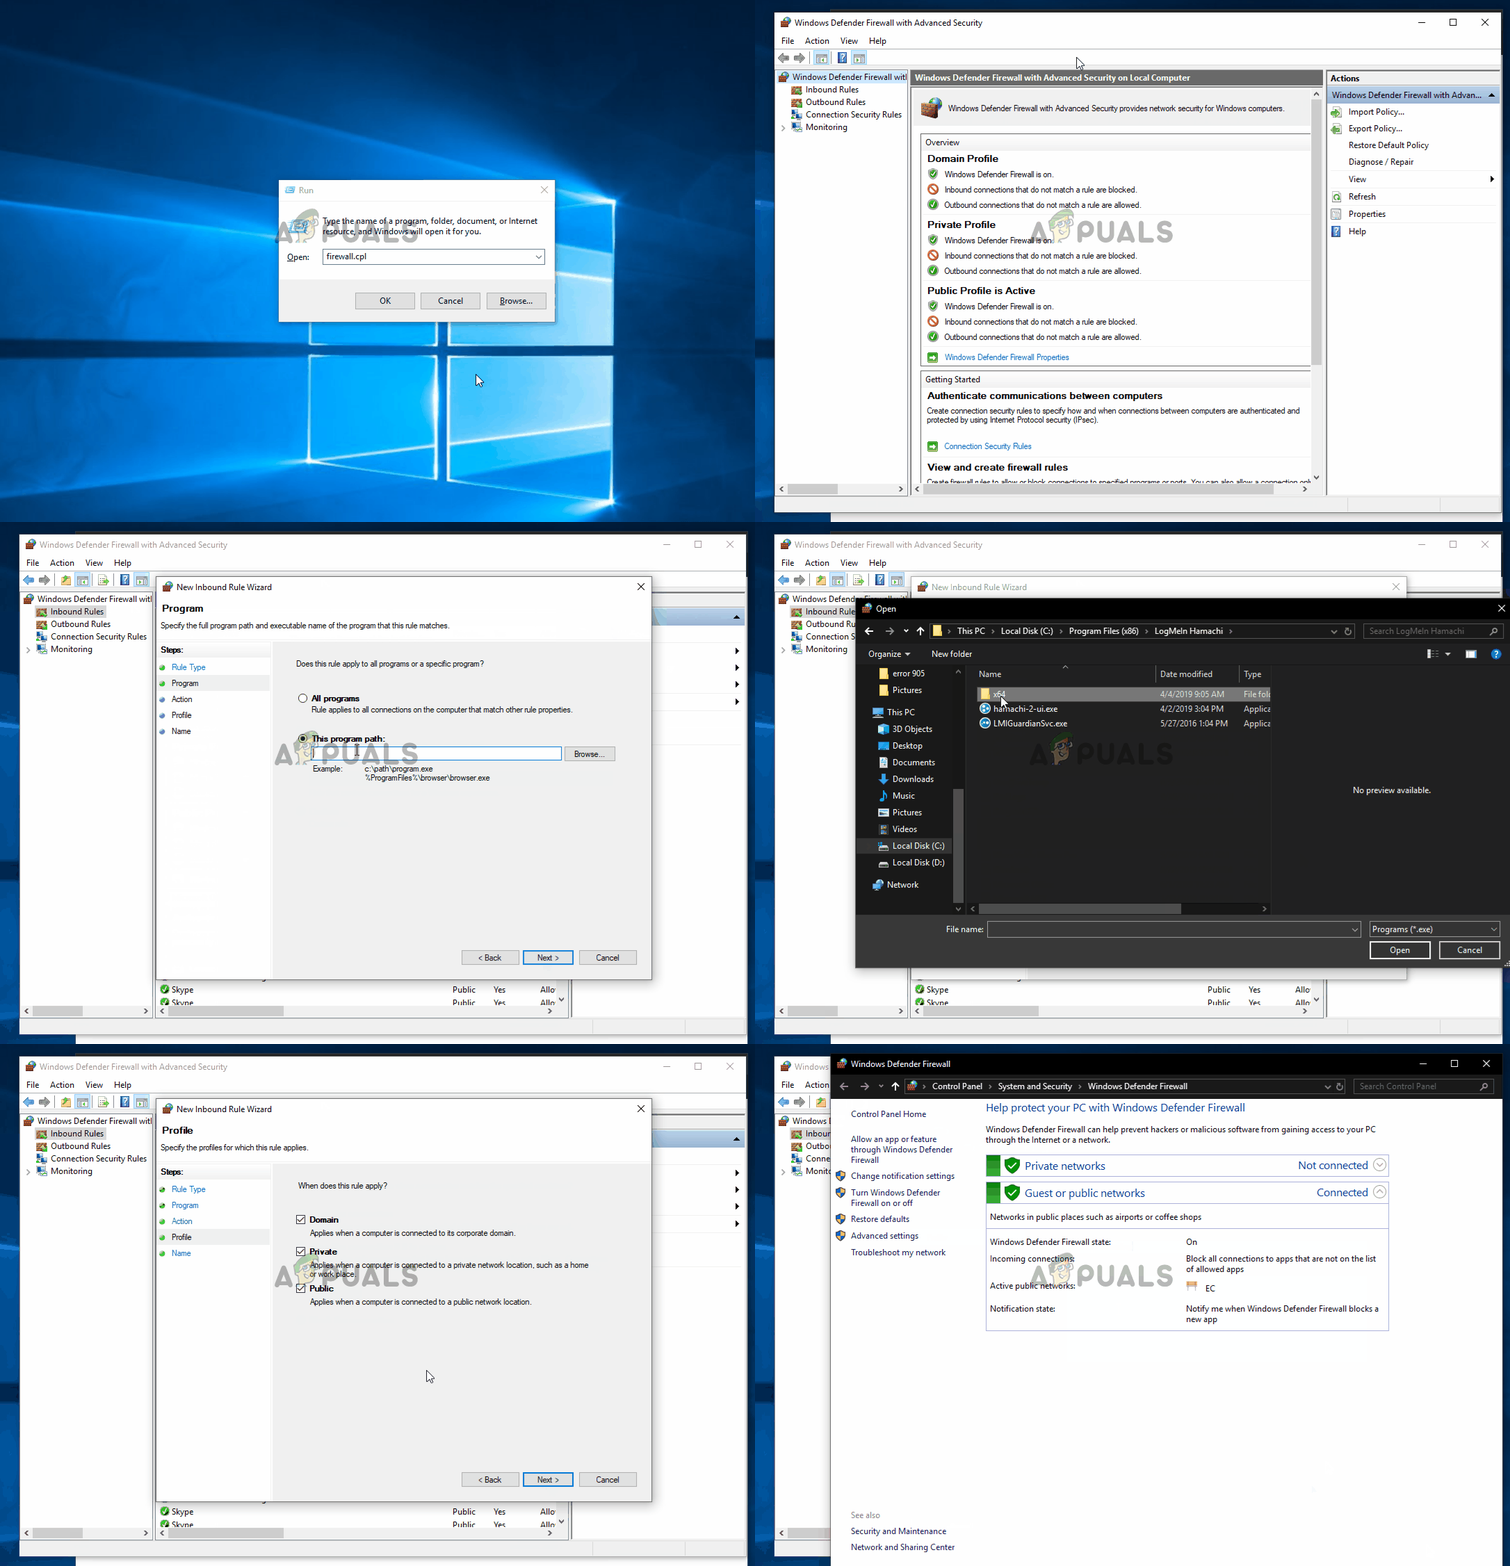
- Press Windows key + R to open up a Run dialog box. Then, type “firewall.cpl” and press Enter to open up the Windows Defender Firewall window.
- Once you’re inside the Windows Defender Firewall menu, click on Advanced settings from the vertical menu on the left section of the screen to access the Advanced Security options of Windows Firewall.
- When you’re inside the Windows Defender Firewall with Advanced Security window, click on Inbound Rules from the vertical menu on the left.
- Next, move over to the right section of the screen and click on New Rule (under Actions).
- Inside the New Inbound Rule Wizard, make sure that the Rule Type is set to Program and click Next to advance to the next menu.
- Once you get to the Program step, select the toggle associated with This program path and click Browse.
- Then, use the Open window to navigate to the following location, select hamachi-2.exe and click Open:
C:\Program Files (x86)\LogMeIn Hamachi\x64
Note: If you’re using a 32-bit Windows version, navigate here instead, select hamachi-2-ui.exe and click Open:
C:\Program Files (x86)\LogMeIn Hamachi
- Once the correct executable is selected, return to the New Inbound Rule Wizard once again and click Next.
- On the Action step, ensure that the toggle associated with Allow the connection is checked and click Next once again.
- Ensure that the rule applies to Domain, Private and Public by checking the boxes associated with each one and click Next.
- Name your new rule something suggestive like “Hamachi Tunneling” and click Finish to enforce the rule.
- Restart your computer and see if the issue is resolved once the next startup sequence is complete.
If you’re still seeing the “Inbound Traffic blocked, check firewall settings” error or this fix wasn’t applicable, move down to the next method below.
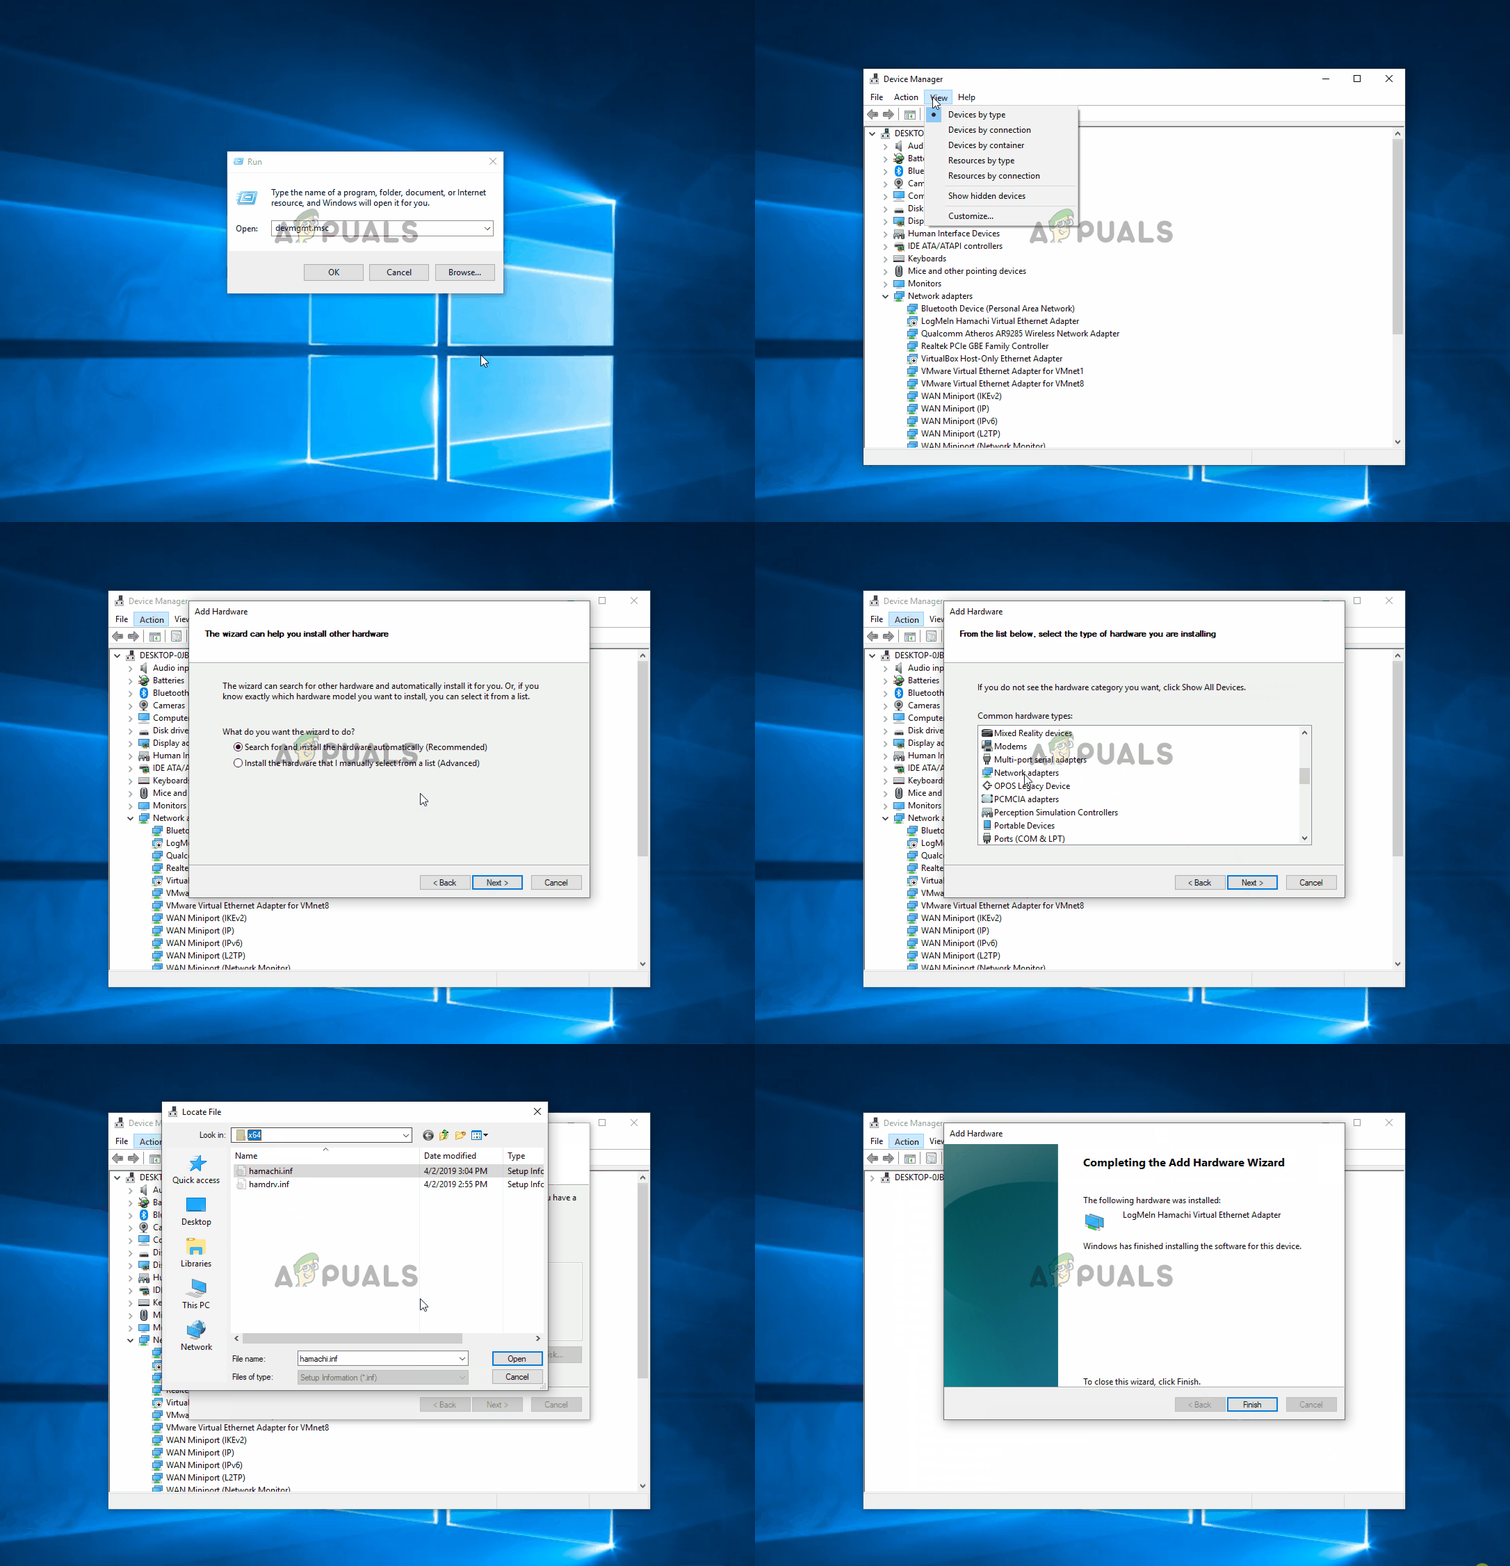
Method 4: Installing the LogMeIn Hamachi driver manually
It’s also possible that you’re encountering the issue because the main LogMeIn Hamachi driver that is supposed to handle the inbound connection was not installed correctly. Several affected users have reported that the issue was resolved after they used Device Manager to manually install the required driver via the .ini file.
Although this sounds like a technical procedure, it’s quite simple if you follow the instructions to the letter. Here’s what you need to do:
- Press Windows key + R to open up a Run dialog box. Then, type “devmgmt.msc” and press Enter to open up Device Manager. If you’re prompted by the UAC (User Account Control), click Yes to grant administrative privileges.
- Inside Device Manager, click on Actions from the ribbon bar at the top, then click on Add legacy hardware from the context menu.
- Inside the Add Hardware wizard, click Next at the first prompt, then select the toggle associated with Install the hardware that I manually select from a list (Advanced) and click Next once again.
- From the list of Common hardware types window, scroll down to Network adapters and double click on it.
- Once you get to the next screen, click the Have Disk button on the left section of the screen.
- Inside the Install from Disk window, click the Browse button, navigate to the following location, select hamachi.inf and click Open. Then, click OK to load the .ini driver inside Device Manager.
- When you return to the Add Hardware window, click Next once again.
- Click Next to kickstart the Hamachi driver installation and follow the on-screen instructions to complete the installation.
- Once the installation is complete, restart your computer and see if the issue is resolved once the next startup sequence is complete.
