How to Fix igdkmd64.sys BSOD on Windows 10
Igdkmd64.sys is the Windows driver for the Intel Graphics Kernel Mode, also known as igfx. It is made by Intel and it should be present with every system that comes with an Intel processor with an integrated graphics card.
If you’re getting a Blue Screen of Death, along with this error message, your logical conclusion would be that there is something wrong with the driver, and you’re right. This error may come out of nowhere, and it is also reported to appear to some Mac users who have installed Windows via Bootcamp.
However, whatever the root of the problem, there is a solution for it. Below I have described a few possible ways in which you can get rid of this annoying message and BSOD.
Method 1: Disable Intel’s integrated GPU (only applies if you have a discrete graphics card)
If your system has a discrete graphics card, such as an AMD or nVidia one, you can disable the Intel integrated GPU. It is true that this is more of a workaround than a fix, but if you don’t use Intel’s GPU, you won’t notice a difference.
- The first thing to do is to shut down your computer, and unplug the graphics card.
- Turn on your computer, and after that you need to open Device Manager. Do this by pressing Windows Key on your keyboard, typing Device Manager and opening the result.
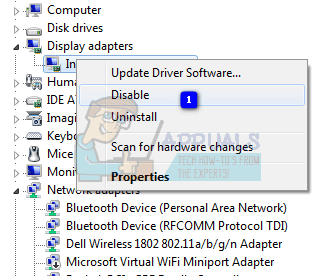
- Once inside, expand the Display Adapters, and locate Intel’s integrated GPU. Right-click it, and select Disable from the dropdown menu.
- After this is done, turn off your computer and plug in your graphics card again. Turn the computer on again and everything should be working.

Method 2: Update the drivers via Windows’ Force Update
If the previous method didn’t solve the problem, you can use the Force Update to try and get newer drivers. You should first download everything Windows Update has to offer.
- Press the Windows key on your keyboard and type Check for Updates. Open the result, and press Check for Updates.
- Do this repeatedly until there are no updates available and it says Your device is up to date.
- Once you’ve done this, open This PC and navigate to C:\Windows\SoftwareDistribution\Download and delete everything inside.
- Afterwards, open an Elevated Command Prompt, by pressing Windows and X simultaneously on your keyboard, and selecting Command Prompt (Admin) from the menu.
Within the Elevated Command Prompt, type wuauclt.exe /updatenow and press Enter on your keyboard. Once that’s done, close the command prompt and reboot your system.

Method 3: Stop overclocking, if you are
Chances are, if you don’t know whether you’re overclocking – you’re not, and this method doesn’t apply to you. However, if you are, this can put serious strain on your CPU, as well as your GPU, depending on which one you’re overclocking, and this in turn might lead to issues such as the BSOD with this message. Try returning everything to the stock frequencies and voltages and see if that fixes the problem.
Method 4: Rename igdkmd64.sys
If you’re a Mac user who runs Windows via Bootcamp, this solution has been reported to work in such a case.
- Find the .sys file. It is usually in the Windows folder of the partition where your operating system is installed, within System32 and inside the drivers folder.
- Select the file, right-click it, and choose Rename. Change the name to something like igdkmd64Backup.sys so you know what happened, and save it. You shouldn’t have this problem anymore.
Even though with recent updates of both Windows, and Intel’s own drivers, some users have reported that this issue is fixed, you can’t completely dismiss the chances that it might happen again. In case it does, above you have several methods that you can use to help you get rid of it and never have to deal with it again.