How to Fix High CPU and Disk Usage by utcsvc
Windows 10 has a lot of different modules to collect information regarding user experience and forward it to Microsoft to help with troubleshooting their operating system and help them make it better. For this purpose, Windows has a piece of software installed known as Universal Telemetry Client (UTC). It runs as a windows service known as DiagTrack. The actual service name is utcsvc
Solution: Disabling Telemetry Services
We can try disabling the Telemetry Services altogether. This will disable the user collection from your computer and hopefully, solve the problem at hand.
- Press Windows + R to launch the Run application. Type “services.msc” in the dialogue box and press Enter.
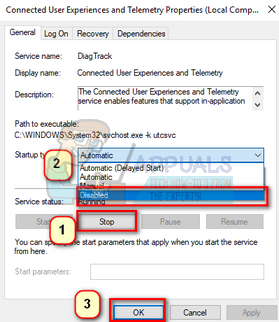
- After the services windows pop up, search for “Connected User Experience”. Double-click it to open its settings.

- Click “Stop” underneath service status. Then select “Startup type” and set the option to Disabled. Once you are done making changes, press Ok and exit.

- Restart your computer and check if the problem got solved.
If you have a problem accessing services, we can also disable the process using Group Policy Editor.
- Press Windows + S to launch the search bar of your start menu. Type “gpedit.msc” in the dialogue box. Right-click on the first result which comes forth and select “Run as administrator”.

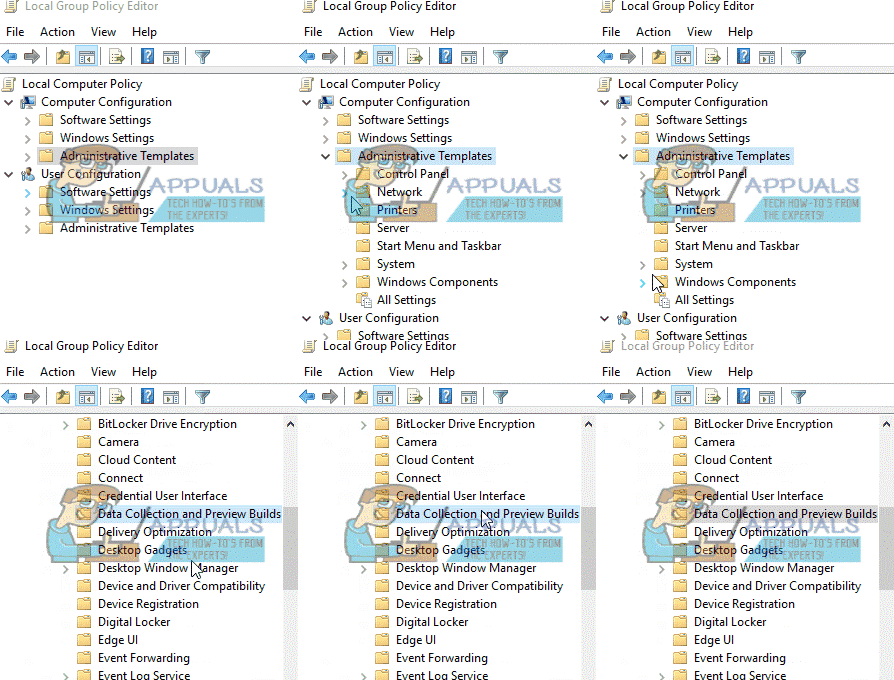
- Now navigate to the following path using the navigator present at the left side of the screen.
Computer Configuration/Administrative Templates/Windows Components/Data Collection and Preview Build

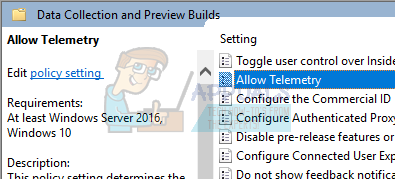
- Now at the right side of the screen, find the item named as “Allow Telemetry”. Double click it so we can edit the policy.

- Now change the setting to Disabled. Now click on Apply to save the changes and exit the window.

- Restart your computer and check if the CPU/Disk usage gets solved.
If you don’t have Group Policy Editor present on your computer, we can also disable the service using the Registry Editor.
- Press Windows + R to launch the Run application. Type “regedit” in the dialogue box and press Enter.
- Now navigate to the following path:
HKEY_LOCAL_MACHINE\SOFTWARE\Policies\Microsoft\Windows\DataCollection

- Right-click on “DataCollection” folder and select New > DWORD (32-bit) Value.

- Name the new key as “AllowTelemetry”.By default, the value of the key will be 0. But just to be sure, double-click the key and check if the value is 0 (zero).

- Reboot your computer and check if the CPU/Disk usage got solved.