How to Fix Fallout 4 Long Loading
Fallout 4 became famous for its stunning gameplay and visuals of post-nuclear apocalyptic setting. The game is a prequel of the existing series and was released for many platforms including Xbox, PS4, and Windows. However, despite the active development, we came across numerous instances where the game took quite some time to long.
This issue occurred to users all around the world and according to our reports, it is still occurring. This issue repeats itself either due to hardware issues or some software ones. In this article, we will go through all the possible causes as to why this might occur and what the workarounds involved are.
How to Fix Long Loading in Fallout 4?
According to several users and feedback from game experts, this issue stems from the game itself. Either the developers didn’t structure the starting of the game correctly or Windows itself is causing issues. Some of the reasons as to why you might experience this problem are but not limited to:
- Slow disk access: A lot of our users reported that it was because of slow disk access that they were having issues when loading the game. Slow disk access means that the game will take more time transferring data from your HDD drive to your RAM.
- Threads: Another instance can be where there are not an appropriate number of threads being run/executed for your game. Overriding this setting in the configurations file might fix the problem.
- Bug in the game: Even though this is a rare occurrence, we found several cases where there was a bug and the game was taking longer than usual. Performing a workaround for this might fix the issue.
- Vertical Sync: NVIDIA’s vertical sync is known to improve the gameplay of several PCs but it is also known to cause several different conflicts and issues with the games which aren’t optimized to run with it. Fallout 4 is one of these games.
- Fullscreen mode: Even though the majority of the users think that using a full screen reduces the load of the computer, in fact, it is quite opposite. It seems that Fallout 4 takes more time to load if you are playing in full screen.
- Capped frame rate: Fallout 4 has the option to cap your frame rate so it doesn’t go beyond a certain limit. This frame rate might prove the opposite when you are switching scenes or starting a game.
- Graphics drivers: Another rare cause why this issue occurs is because of either outdated or invalid graphics drivers installed on your computer. Reinstalling them usually solves the problem instantly.
- Outdated Game/Windows: You also might experience the slow disk access if you have an outdated version of the game. The same applies with Windows. Here, you can make sure that you are always running the latest version.
- Cloud sync: If you are playing Fallout 4 from Steam, the cloud sync feature can prove to be troublesome. It saves your progress and configurations but sometimes, it might conflict with the game engine.
Solution 1: Launching in Windowed Borderless mode
Before we start with other solutions, we will first attempt at starting your game in Windowed borderless mode. Fallout 4 has the option where you can either start it in full screen or Windowed mode. It seems that when you launch the game in full-screen mode, it consumes more resources and causes issues when loading. In this solution, we will navigate to Fallout 4’s properties and change the launch option.
- Launch Steam and click on Library to view all your games. Now, right-click on Fallout 4’s entry and click on Properties.
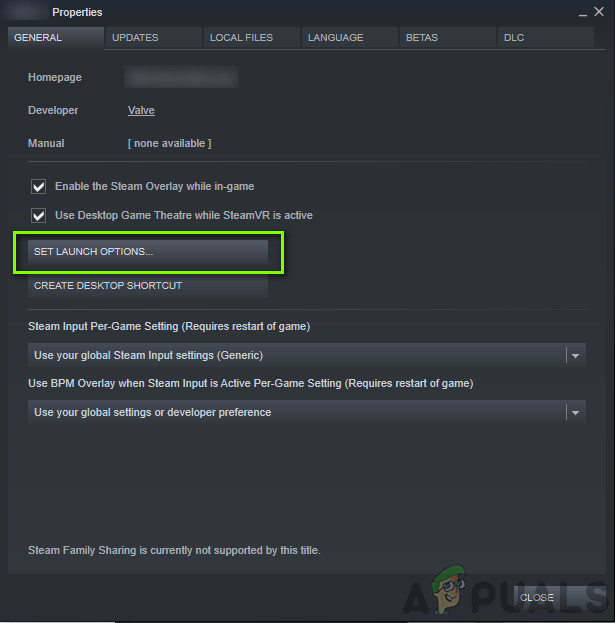
Set launch Options – Steam - Once in properties, navigate to the General tab and click Set launch options.
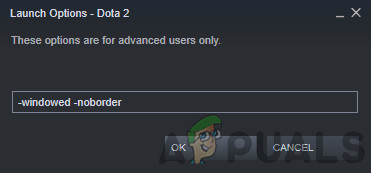
Launching in Windowed mode - Set the launch options to “-windowed -noborder”. Press OK to save changes and exit.
- Launch Fallout 4 again after restarting your computer.
Solution 2: Removing the FPS Cap
Fallout 4 has a nifty feature where you can set an FPS cap on the game. When you select a predetermined value, the FPS will not exceed this value in all cases. However, it seems when the game loads, it requires a boost to launch all the modules to get going. Same is the case when you are changing scenes. In this solution, we will navigate to the configuration files of Fallout 4 and change the setting manually by editing it.
- Navigate to Graphics settings using Options in the main menu as we did in the last solution.
- Once in graphics, look for the option of Maximum Frames Per Second. Move the slider to unlimited.
- Restart the game and check if the issue is resolved for good.
Solution 3: Disabling Steam Cloud Saves
Steam Cloud is an option in the gaming platform where you can save your progress and data over the Steam cloud on top of saving your settings locally. This helps if you are changing your computer and want your exact settings and configurations to load up easily. However, it seems that this feature clashes with a lot of different modules in Fallout 4 so we will attempt to disable it in this solution and see if this fixes the long loading issue in the game. Launch Steam as an administrator and click on Library present at the top.
- Now, all the games will be located at your left-side panel. Right-click on Fallout 4 entry and click Properties.
- Once in properties, click on the Updates tab and uncheck the option of Enable Steam Cloud Synchronization.
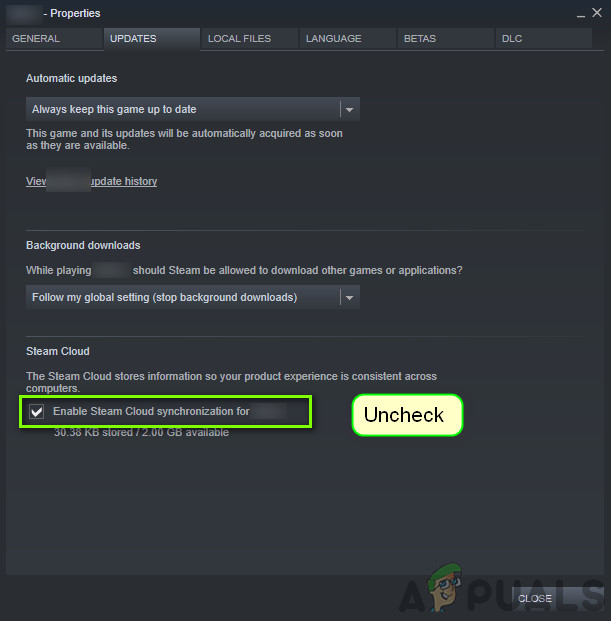
Disabling Steam Cloud Saves - Save changes and exit. Restart Steam and launch the game. Check if the issue still occurs.
Solution 4: Disabling VSync
Vertical Sync (Vsync) allows users to sync their frame rate on which the game is running with the monitor’s refresh rate. This results in improved stability and graphics in the game. This feature is already integrated into the game settings of Fallout 4. Even though this might sound cool and helpful, it is known to cause several issues. We will be disabling the Vsync and see if this makes any difference.
In this solution, we will navigate to the settings of the game and disable the option.
- Launch Fallout 4 and click on Options from the main menu.
- Now, click on Video and then select Graphics.
- Once in Graphics options, click on VSync and turn the option off.
Note: You can also tweak other graphics settings from here if this doesn’t work.
- Save changes and exit. Restart Fallout 4 and see if the issue is resolved.
Solution 5: Editing Fallout 4 Preferences
Another thing to try before we start moving your game to an SSD is changing the preferences of Fallout 4. We will be adding buffer settings in the preferences files. Make sure that you make a copy of the preferences file and store it to an accessible location before proceeding in case something goes wrong.
- Locate Fallout 4 installation files in the directory where it is installed.
- Now, locate the ini, right-click on it and either open with Notepad or edit it.
- Add the following lines underneath the heading of General:
iNumHWThreads=X

uExterior Cell Buffer=64
Here, you have to replace the ‘X’ with the number of CPU cores (disregard hyperthreading). You can play around with different values until it fixes the problem.
- Save changes and exit. Restart your computer and see if the long loading is fixed.
Solution 6: Moving Fallout 4 to an SSD
Before we move on to more technical solutions, we recommend that you try moving Fallout 4 to an SSD. As mentioned before, the disk read/write time in a normal HDD is a lot slower as compared to an SSD. It might be possible that you are experiencing long loading times in Fallout 4 because the speed isn’t fast enough.
Here, you can try either moving the existing game files to an SSD or download steam on that SSD and then install Fallout 4 from scratch. We recommend that you do the latter as it will help in troubleshooting any installation issues in the game.
- Launch Steam and navigate to Fallout 4 properties as we did earlier. Now, click on the Local Files tab and then click on the Move install folder.

SSD - Now, select the SSD from the drop-down and then proceed with the Wizard.
- After the files have been moved, restart your computer and check if the long loading issue is resolved.
Solution 7: Alt-Tabbing
Another workaround to try before we update your graphics drivers is alt-tabbing out of the game and then alt-tabbing back whenever there is a loading scene in the game. This is not a solution and it seems that you have to do it all the time.
It seems that as long as you are focusing on Fallout 4 when it is loading new scenes, it takes more time. When you alt-tab out of it, all the computation gets speeded up and everything loads up smoothly. Hence when the loading starts, alt-tab to your Desktop or some other application just for a few seconds. Check if this solves the issue of long loading.
Solution 8: Updating/rolling back Graphics drivers
Last but not least, you should check your graphics card for any updates available for your hardware. Updates for graphics hardware are released now and then; you should google your graphics hardware specifications and see if there are any updates available. If your card is outdated, we will either update it automatically or manually by first downloading the file.
Furthermore, if updating the drivers doesn’t work for you, you should consider rolling back the drivers to a previous build. It is not a surprise to know that newer drivers are sometimes not stable or conflict with the operating system.
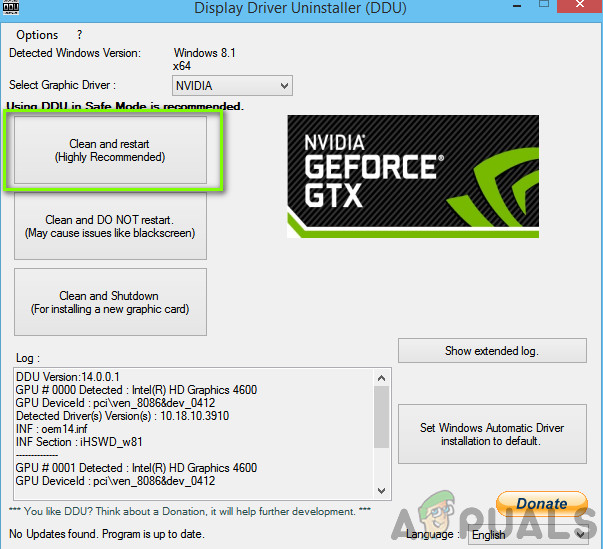
- Install the utility Display Driver Uninstaller. You can continue without this step but this ensures that there are no remnants of the drivers.
- After installing Display Driver Uninstaller (DDU), launch your computer in safe mode.
- After booting your computer into safe mode, launch the application which was just installed.
- After launching the application, select the first option “Clean and restart”. The application will then automatically uninstall the installed drivers and restart your computer accordingly.
Clean and Restart - Boot your computer into normal mode, press Windows + R, type “devmgmt.msc” in the dialogue box and press Enter. Most probably the default drivers will be installed. If not, right-click on any empty space and select “Scan for hardware changes”. Now try launching the game and see if the default drivers fix the crashing issue.
- Now there are two methods to update the graphics drivers; either you can update them automatically using Windows update or manually by browsing to the file where your graphics drivers are located. If automatic updating fails, you have to navigate to your manufacturer’s website and download the drivers first.
To update, right-click on your hardware and select Update Driver. Now select any one of the two options according to your case.
- Restart your computer after installing the drivers, launch the game and check if this solves the problem.


