6 Verified Solutions to Fix ‘Failed to play test tone’ Error

The Failed to play test tone is an issue that tells you that there’s a problem between Windows and the sound device your computer is using. It comes as an error message in case you have no sound, and you try to see if your sound device is working. This is the answer you will get from Windows.

This issue appears for a lot of users of Microsoft’s Windows OS, and affects many versions of it. Having no sound is something that no computer user should experience, as it is one of the essential things a computer should do.

Even though some forum posts might lead you to believe that it is a hardware issue, it is actually not. There are a number of things that you can do to solve this via software, so please read on to see how you can get rid of this issue and get your sound back.

Failed to play test tone Error
Failed to play test tone Error Fix

Method 1: Restart Windows Audio

This is the first possible solution, and the fastest one to do. However, there are a couple of users who reported that this only works temporarily, and the issue came back after a while.

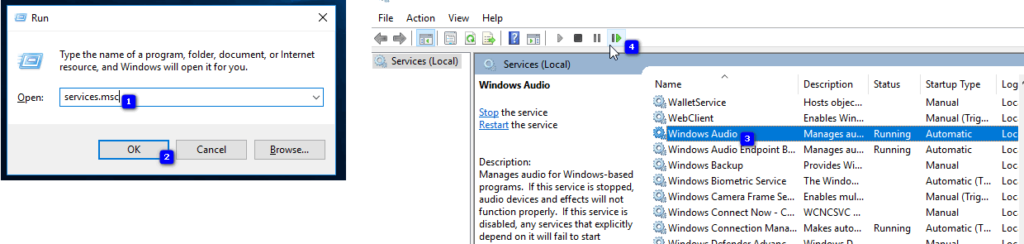
  1. Press the Windows and R keys on your keyboard simultaneously to open the Run window. In the Open box, type services.msc and press Enter, or click OK.
  2. From the Services window, scroll in the list until you find the Windows Audio service. Restart it by pressing the Restart button on the top toolbar. Close the Services window and you should have your sound back.

failed-to-play-test-tone-dell

Method 2: Run sfc/scannow from an Elevated Command Prompt

If the previous method didn’t work, running a full system scan can bring your sound back on.

  1. Open the Start menu by pressing the Windows key on your keyboard, and type cmd. Right-click the result and select Run as administrator. This will open an Elevated Command Prompt.
  2. In the Elevated Command Prompt, type sfc/scannow and press Enter. Wait for the scan to complete, don’t interrupt it. Reboot your device when it’s done.

sfcscannow

Method 3: Disable all enhancements

This is another method that was reported to work for a number of users, so if the previous two didn’t help, you can go ahead and try it.

  1. From the Start menu on your computer, type Control Panel and open the result.
  2. Switch to Large Icons or Small Icons view, whichever is more convenient, and locate Sound. Open it by double-clicking it.
  3. Select your speakers by clicking them. Click the Properties button near the bottom.
  4. Navigate to the Enhancements tab and disable all enhancements and sound effects. Click Apply and then OK to save your settings, and everything should be back to normal.

failed-to-play-test-tone-windows-10-dell

Method 4: Delete the KB974571 update (Windows 7)

A lot of Windows 7 users have reported that the KB974571 update was the one that caused this problem for them, and consequently, deleting it manually brought back their sound.

  1. Open Control Panel using the steps in the previous method, and again, switch to the Icons view. Find Programs and Features and open it.
  2. In the Programs and Features window, on the top left side, you will see a View installed updates link, click it.
  3. Find the KB974571 update and click it. Select Uninstall from the toolbar in order to remove it. Note that you may need to restart your computer before the process ends, so make sure to save your work. Wait for the process to finish.

Method 5: Install the High Definition Audio Device driver

This is a fully working driver, and installing it can solve a lot of issues – this one being one of them.

  1. Open the Device Manager by pressing the Windows key on your keyboard and typing Device Manager, then opening the result.
  2. Expand Sound, video and game controllers and select your current audio driver. From the Action tab, select Update Driver Software… .
  3. Click on Browse my computer for driver software, followed by Let me pick from a list of device drivers on my computer.
  4. From the list, select the High Definition Audio Device driver and click Next. Click Yes in case you get a User Account Control prompt. Wait for the wizard to finish and reboot your device.
  5. If the driver isn’t available, visit the manufacturer’s site and download the driver (latest one) for your sound card.

Method 6: Add the Local Service in the Local Users and Groups

Even though this might seem completely unrelated to the audio problem, it in fact helped a great deal of users.

  1. Right-click This PC or My Computer, depending on which version of Windows you have, and select Manage from the dropdown menu.
  2. To the right, you will see a System Tools section. Double click Local Users and Groups, and select Groups beneath it.
  3. Right-click Administrators in the list in the middle of the window, and select Add to group.. from the dropdown menu.
  4. Click Add, then Advanced, and then click Find Now. Double click Local Service, and click OK. You should see NT Authority\Local Service in the list, click OK. Close the Computer Management window and reboot your device. Your problem should be solved.

failed-to-play-test-tone1

As mentioned in the beginning, having no sound on your computer is a huge deal, and something you shouldn’t have to put up with. Fortunately, however, there are a number of possible fixes for this problem, all reported to work with various users, and you will surely fix your issue if you follow the methods outlined in the guide.

ABOUT THE AUTHOR

Kevin Arrows


Kevin Arrows is a highly experienced and knowledgeable technology specialist with over a decade of industry experience. He holds a Microsoft Certified Technology Specialist (MCTS) certification and has a deep passion for staying up-to-date on the latest tech developments. Kevin has written extensively on a wide range of tech-related topics, showcasing his expertise and knowledge in areas such as software development, cybersecurity, and cloud computing. His contributions to the tech field have been widely recognized and respected by his peers, and he is highly regarded for his ability to explain complex technical concepts in a clear and concise manner.

Comments

31
    J
    j Feb 23, 2017

    Method 1 worked great- Thank you!!

      KA
      K. Arrows Author Feb 24, 2017

      Welcome.

    KK
    Kenneth Friis Knudsen Apr 17, 2017

    I’m on Windows 7 Home Premium 64 Bit which doesn’t have Local Users and Groups in administration, and right now that’s the only thing i have yet to try to get my sound back, so what do i do when i don’t have access to that?

      KA
      K. Arrows Author Apr 17, 2017

      Can you send me a screen shot of device manager showing the sound adapter?

        KK
        Kenneth Friis Knudsen Aug 16, 2017

        Never mind, i did a refresh install everything is fine now.

    KW
    kwtsopoulos Jul 8, 2017

    Method 5 Saved me ! thank you!!!

    BO
    BO Jul 13, 2017

    Took me several days of troubleshooting. After coming to your site, Method 3 worked!!! Thank you for posting!

      KA
      K. Arrows Author Jul 14, 2017

      Thank you.

    BO
    BO Jul 13, 2017

    Took me several days to troubleshoot my audio problem. After google brought me to your site, Method 3 worked!!! Thank you for posting.

    SN
    sherrard nr Aug 7, 2017

    method 6 worked for me! thanks!

    MF
    martin fennell Sep 23, 2017

    Thank you. I had been running Yandex Browser and Kodi. I tried method 1, and I got the sound back on kodi, but nowhere
    else. I was going to close down the computer and reboot. I closed programs down. I tried playing a file, and the sound was back.
    So now I’m wondering if Kodi was interfering with the sound, or even the browser.

    JB
    JANE BERRISFORD Oct 28, 2017

    Method 2 worked for me – thank you so much ! Fantastic.

    AJ
    Amarnath JKM Oct 31, 2017

    Method 5 worked for me. Thanks a lot!

    JW
    Jimmy Wright Nov 21, 2017

    I don’t know who you are but Method #1 worked. Thank You very much and Happy Holidays

    KS
    Kathy Smiley Dec 1, 2017

    Method 1 nailed it! THANK YOU!

    DA
    Despina Athanasiadou Jan 11, 2018

    nothing from the above worked. on twoofthe solutions the following are a problem: there are no enhancements when you right click on the speakers- so can try that and there are no local users groups under system tools, as this is a one user laptop also, set up as an administrator . I am at a loss and notsure what to try now. only thing to try is the reimageplus, although the sfc /scannow did not come up with any corrupt files or issues. help!

    AA
    Aladdin Abdo Feb 12, 2018

    thank you

    RA
    raman Apr 22, 2018

    step 1 worked

    II
    I am future IAS May 15, 2018

    thanks

    ;^
    ;^} Jul 3, 2018

    Normally nothing ever works for me when it comes to troubleshooting, but thankfully Method 3 worked. I use a DAC, and it has virtual surround; disabling and enabling enhancements worked perfectly. I then went back into ‘configure speakers’, and then enabled 7.1 virtual surround again.

    Reply
    AC
    Archy Cad Oct 6, 2018

    no.5 work for me 🙂
    Thank’s

    SE
    Sean Nov 6, 2018

    You are a god amongst people. The working version of the HD audio driver fixed my issue, which was perplexing me to no end. I’m super grateful. Thank you so much!

    LL
    Louis Lestat Jun 21, 2019

    Thank you very much! You rock. HUGS!

    LL
    Louis Lestat Jun 21, 2019

    Thank you very much! You Rock!!!!! HUGS

    LL
    Louis Lestat Jun 21, 2019

    Thank you very much!!!

    TS
    Tim Smith Jul 12, 2019

    Brilliant. Thank you so much. The last option worked for me after days of trying everything else.. I was on the verge of rebuilding the system from scratch, no mean task considering I operate all kinds of virtual machines and emulators for legacy software, and as you point out, it was the last thing I would have considered. Very happy with this solution, and I’ve logged it with credit to pass on to anybody else struggling with the same problem.

    Reply
    MR
    Muhammad Rizky Ramadhan Jan 8, 2020

    Thanks a lot dude, you fixed it

    VS
    VS Apr 8, 2020

    Brilliant! Number 5 fixed my issue.

    PR
    Prashunjit Sep 19, 2020

    I am still not able to get this problem fixed

      MZ
      Muhammad Zubyan Author Sep 20, 2020

      Hey, there can you check which version of Windows you are on and let me know, please? You can check it by opening run and typing “winver” in the field and pressing enter once you press enter a window will open showing you the exact build number and everything of your Windows I want to know that because this problem was a bug which is fixed in the build 10166 if you want to download and install that update on your own Windows 10 Build 10166 is available for download and direct upgrade through Windows Update. Keep me updated!

      Reply
        PR
        Prashunjit Sep 21, 2020

        Hi Zubyan,Thank you for your reply.I was able to get this resolved, but I had to reset my PC for that from settings. After that it started working properly. My actual issue was I was able to hear audio through HDMI, but the headphone jack, and the laptop speakers were not giving any output. I usually rely on HDMI for my work, so I didn’t notice when this started happening, but the other day I wanted to play something on youtube and realized this. I also realized that the microphone in the laptop was also not working. I tried to uninstall the most recent windows update, but that also did not help. I cannot confirm which was the build version before the reset, but as of now, its 19041.508.One more thing, while I was facing this issue, I checked to see if there is any update pending, but it kept saying that everything is up to date. I am not sure how that happened.Anyways, everything is working fine now.Thanks,
        Prashunjit

        Reply