How to Fix Event Viewer Error 0x80000000000000
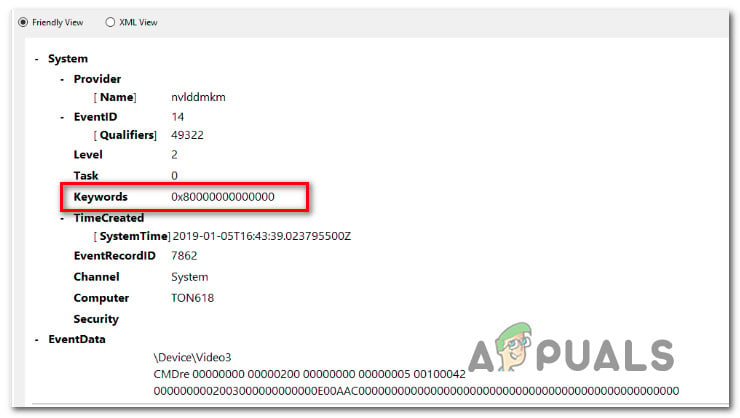
Several users have been reaching us with questions after checking the Event Log with the Error Code 0x80000000000000 after an application or BSOD crash. In most cases, affected users are reporting that the issue seems to occur randomly with no apparent trigger. The issue is not exclusive to a certain Windows version since it’s encountered on Windows 7, Windows 8.1 and Windows 10.

What is causing the 0x80000000000000 error?
We analyzed this particular error by looking at various user reports and the repair strategies that are commonly deployed to resolve this problem. As it turns out, the issue can be caused by one of the following potential culprits:
- System file corruption – As it turns out, this particular issue can occur due to system file corruption. If you’re getting constant Event Viewers with this error, you should be able to resolve the issue by repairing Windows files and fixing logical errors with a utility like SFC or DISM.
- Corrupted Visual C++ Redist Packages – Improperly installed or corrupted C++ Redistributable packages can also be responsible for constant errors of this type. Several affected users have reported that they managed to fix the problem by uninstalling every Redist pack and then reinstalling them cleanly.
Method 1: Reinstalling the C++ Redistributable packages
The most popular fix for this particular issue is to uninstall and then reinstall each potential C++ Redistributable Package that might be what’s causing this issue. This suggests that the issue might very well be caused by a corrupted Visual C++ Redist installation.
This procedure is confirmed to be effective on both Windows 7 and Windows 10. Here’s a quick guide on uninstalling and then reinstalling all required Visual C++ Packages that might be responsible for this particular issue:
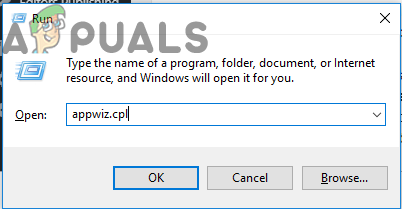
- Press Windows key + R to open up a Run dialog box. Then, type “appwiz.cpl” inside the text box and press Enter to open up the Programs and Features utility.

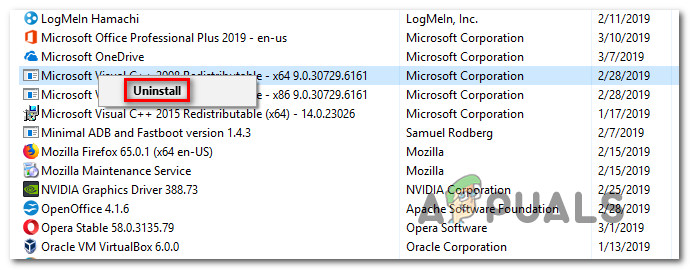
Typing in “appwiz.cpl” in the Run prompt - Once you’re inside the Programs and Features screen, scroll down through the list of installed programs and locate your Microsoft Visual C++ Redist installations. Once you see them, right-click on each in part and choose Uninstall from the context menu.

Uninstalling every Visual C++ Redist package - Then, follow the on-screen prompts to uninstall every redist package that you have installed.
- Once every package has been uninstalled, close the Programs and Features window and restart your computer.
- When the next startup sequence is complete, install every Visual C++ Redist package from the list below and do another restart once every installation is complete:
Visual C++ 2008 Redistributable (x86)
Visual C++ 2008 Redistributable (x64)
Visual C++ 2010 Redistributable (x86)
Visual C++ 2010 Redistributable (x64)
Visual C++ 2013 Redistributable
Visual C++ 2015 Redistributable
Note: The older Redist packs have two different versions, depending on the architecture of the computer. Only download the bit-version applicable to your OS-architecture. - Once the next startup is complete, see if the issue has been resolved.
If you’re still seeing new 0x80000000000000 errors inside the Event Viewer, move down to the next method below.
Method 2: Performing a DISM & SFC scan
As it turns out, this particular issue can also be caused by some degree system file corruption. If the problem occurs due to corruption inside some Windows folders or due to some logic errors, you should be able to fix them by performing DISM (Deployment Image Servicing and Management) or SFC (System File Checker) scans in order to replace corrupted occurrences.
These two utilities are both capable of repairing system files, but they do it in different ways. While SFC will repair corrupted files by replacing them with locally stored copies, DSM relies on WU (Windows Update) to download healthy copies of corrupted occurrences.
But since there are plenty of cases were one of these utilities manages to find an error that the other can’t we encourage you to run both scans in order to fix the issue. Here’s what you need to do:
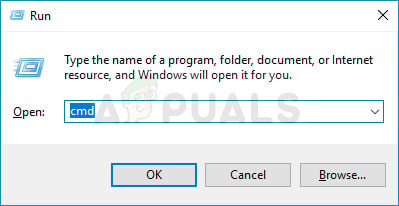
- Press Windows key + R to open up a Run box. Next, type or paste ‘cmd’ inside the text box and press Ctrl + Shift + Enter to open up an elevated CMD prompt.

Running CMD as an administrator Note: When you’re prompted by the UAC (User Account Control), click Yes to grant admin privileges to the CMD window.
- Once you’re inside the elevated Command prompt, type the following command and press Enter to initiate an SFC scan:
sfc /scannow
Important: Once you start this SFC scan, do not close this window or shut down your computer until the procedure is complete. Failure to do so will subject your computer to further corruption risks.
- Once the scan is complete, close the elevated Command Prompt and restart your computer even if the utility doesn’t report any corrupted files that were fixed. SFC is notoriously known for failing to report a logical error that it actually manages to fix.
- When your computer boots back up, follow step 1 again to open another elevated Command Prompt. Then, type the following command to initiate the DISM scan:
DISM /Online /Cleanup-Image /RestoreHealth
Note: DISM requires a reliable network connection in order to download a healthy file to use for corruption replacement. Keep that in mind before initiating a DISM scan.
- Once the scan is complete, do a final system reboot and see if the issue has been resolved once the next system startup is complete.


