How to Fix Error 0xCFFFF82E on Xbox One and Windows 10
Several Xbox One users are reportedly unable to log into their account on Xbox One. The error that comes up is Error 0xCFFFF82E. In most cases that we came across, the issue only seems to be occurring with one account – if the users try to login with a different account, the process is successful. Other affected users are reporting that they encounter this error while trying to use the Xbox Console Companion or Xbox Accessories on a Windows 10 computer.
What is causing the Error 0xCFFFF82E on Xbox One?
We investigated this particular issue by looking at various user reports and the repair strategies that are commonly being used to fix this particular issue. As it turns out, this particular issue can be caused by a couple of different factors:
- Xbox Live Services are down – As it turns out, this issue can also occur due to a problem with Microsoft’s servers. It’s possible that you’re encountering the problem during a maintenance period or during an outage period. In this case, there is little else to do other than to wait for the issue to be resolved by MS engineers.
- Improper Alternate MAC address – Another potential culprit that is known to trigger the error 0xCFFFF82Eon Xbox One is an improper Alternate MAC address. If this scenario is applicable, you should be able to resolve the issue by accessing the Network Settings of your console and deleting the Alternate MAC address. This will force your console to use the default address instead.
- The in-use IP address has changed – If you’re using an ISP that provides dynamic IPs, you’ll encounter this issue whenever your console is on sleep mode and the IP address that is in use gets changes. When this occurs, you’ll see this error after you wake your console app. In this case, you can resolve the problem easily by restarting or resetting your router or mode.
- Underlying Network issue – It’s also possible that you’re encountering the issue due to a network problem that is beyond your technical abilities. If this scenario is applicable, the quickest and most efficient way of solving the problem is to do a complete TCP/IP reset using an elevated Command Prompt.
- Hyper-V is conflicting with similar technology – If you’ve encountered the issue on a Windows 10 computer where Hyper-V is enabled, chances are the issue is occurring because the virtualization technology is conflicting with a similar 3rd party service. If this scenario is applicable, you should be able to resolve the issue by disabling Hyper-V from an elevated Command Prompt.
Method 1: Check the status of Xbox Live Services
Before you do anything else, let’s make sure that the issue is a part of widespread server issue that is affecting other users as well. It’s possible that the Error 0xCFFFF82E is, in fact, being thrown because Microsoft’s servers are unable to validate your account when you attempt to log in.
This can occur due to a widespread outage problem or if you’re unlucky enough to try this procedure in the middle of a maintenance period.
Luckily, you can verify if that’s the case very easily. Just click on this link (here) and see if all services are functioning as intended. If all services are green with ho exclamation points, it probably means that the issue is specific to your console or account.
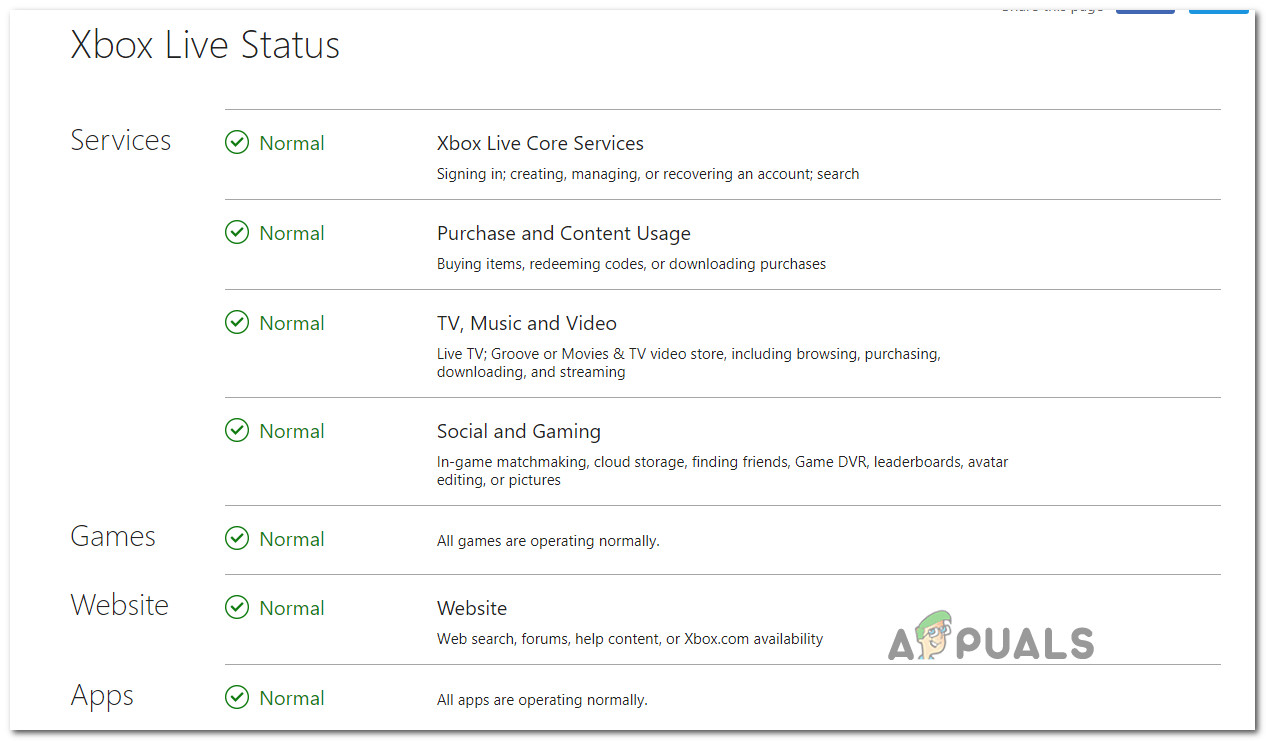
If you find that some services have issues, it’s a good idea to check the official Twitter account of Xbox (here) for any announcements about problems or maintenance sessions.
In the event that your investigation revealed no server issues, move down to the next method below to enforce the first potential fix capable of resolving the 0xCFFFF82E error.
Method 2: Clearing the Alternate MAC address settings
By far, the most popular fix for this particular Xbox One error message is clearing the Alternate MAC address of your Xbox One console. Several affected users have reported that they were able to log into their account normally (without encountering the Error 0xCFFFF82E) after applying this fix and restarting the console.
The fact that this fix was effective for a lot of users seems to suggest that the error is appearing in cases where the network configuration is ambiguous. Here’s a quick guide on clearing the Alternate MAC address of an Xbox One computer in order to resolve the Error 0xCFFFF82E:
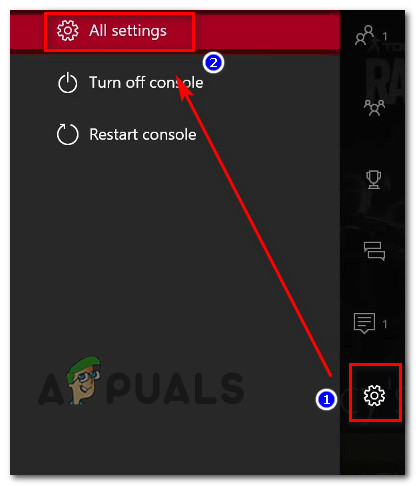
- Start your Xbox One console and get to the main dashboard. Once you get there, use the vertical menu on the right (or left, depending on your user preferences) and access the Settings menu.
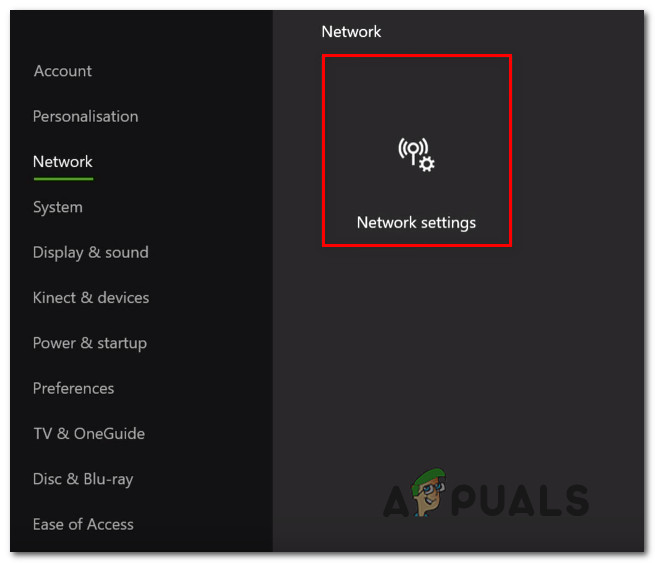
Accessing the Settings menu on Xbox One - Once you’re inside the Settings menu of your Xbox One console, select the Network tab from the vertical menu on the right. Next, use your thumbstick to access the Network Settings option from the right-hand pane.
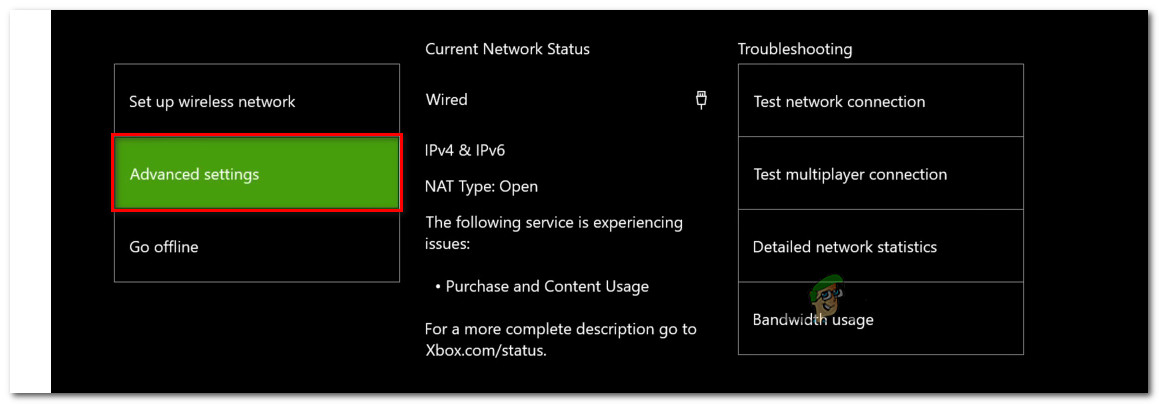
Accessing the Network Settings tab - Once you’re inside the Network tab, select Advanced settings from the list of available options.
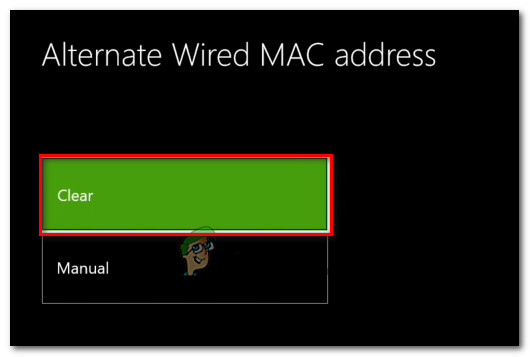
Accessing the Advanced settings menu of the Network tab - Next, access the Alternate MAC address menu from the Advanced Settings menu. You’ll then see a list of available options, but you need to select Alternate Wired MAC address, then click the Clear button associated with it to clear the current Alternate MAC address.
Clearing the Alternate Wired MAC address - Once the procedure is complete, restart your console and see if you are able to log in with your account without receiving the 0x000001f4 error) at the next startup.
If you’re still seeing the same error prompt, move down to the next method below.
Method 3: Restarting or Resetting the router/modem
Another potential fix that might just allow you to log in with your Xbox One profile without encountering the Error 0xCFFFF82E is to either restart or reset your router. Several users that we’re encountering the same issue have reported that they managed to fix the problem by forcing the network to refresh.
You should definitely start with a simple network restart since is the less intrusive method and will not make any long-lasting changes to your network credentials. To perform a router/modem reboot, simply press the dedicated button, press the On / Off button twice or physically disconnect the power cable from the power outlet.
If you already did this and it didn’t resolve your issue, you should go for a router/modem reset. But keep in mind that this procedure will also reset the custom login credential of your router address to the default values. In most cases, they will be reverted back to admin (for both username and password).
To perform a router/modem reset, simply push the reset button and keep it pressed for at least 10 seconds – with most models, you’ll notice the LEDs blinking once the reset procedure has been completed.
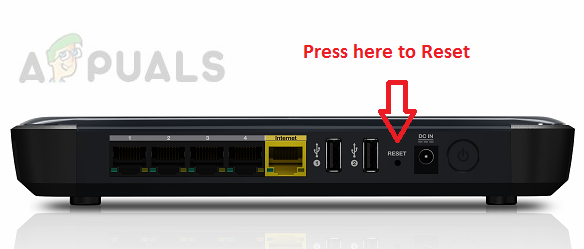
Note: With certain models, you’ll only be able to reach the Reset button with a needle, toothpick or a similar object.
If you’re still encountering the same 0xCFFFF82E error even after you’ve performed the two procedures above, move down to the next method below.
Method 4: Disabling Hyper V (Windows 10 Only)
Some affected users that we’re encountering the 0xCFFFF82E error on Windows 10 when they tried to log in with they Gamertag on an Xbox application (or play remotely) have reported that the issue was resolved after they accessed their BIOS or UEFI settings and disabled Hyper-V. After letting the computer boot up with Hyper-V disabled and then re-enabling it again, the issue disappeared for good for several affected users.
In case you didn’t know, Hyper-V is a proprietary virtualization technology owned by Microsoft. As it turns out, it has the potential to conflict with other similar technologies (VT-X or AMD-V) and create issues such as this one.
Here’s a quick guide on disabling Hyper V from your BIOS / UEFI settings to see whether it’s responsible for the 0xCFFFF82E error:
- Press Windows key + R to open up a Run dialog box. Then, type “cmd” inside the text box and press Ctrl + Shift + Enter to open up an elevated Command Prompt. When you’re prompted by the UAC (User Account Control), click Yes to grant administrative privileges.

Running CMD as an administrator - Once you’re inside the elevated Command Prompt, type the following command and press Enter to disable the Hyper-V function altogether:
dism.exe /Online /Disable-Feature:Microsoft-Hyper-V
- Once the command has been processed successfully, close the elevated CMD prompt and restart your computer to allow the changes to take effect.
- When the next startup sequence is complete, see if the 0xCFFFF82E error issue is still occurring while you attempt to open an Xbox-related application.Note: If you rely on the Hyper-V technology for various reasons, you can turn it back on by following step 1 again to open up another elevated Command prompt and typing the following command to re-enable the feature:
dism.exe /Online /Enable-Feature:Microsoft-Hyper-V
If the same problem is still occurring or this method wasn’t applicable in your particular scenario, move down to the next method below.
Method 5: Doing a complete TCP/IP Reset
If you’ve come this far without a result and you’re encountering the issue on Windows 10, chances are you’re having some underlying issues with your network configuration. Since the culprit can be anything from a wide array of potential network inconsistencies, the easiest way to clear the problem is to perform a complete TCP/IP reset.
Several affected users have reported that they’ve been able to fix the problem by performing the steps below. Here’s a quick guide on doing a complete netsh reset from an elevated Command Prompt window:
- Press Windows key + R to open up a Run dialog box. Then, type “cmd” inside the text box and press Ctrl + Shift + Enter to open up a Command prompt with administrative privileges.
Running CMD as an administrator Note: When you see the UAC prompt, click Yes to grant admin access and open an elevated Command Prompt.
- Once you’re inside the elevated Command Prompt, type the following commands in the listed order and press Enter after each one to do a complete TCP/IP reset:
Type 'netsh winsock reset' and press Enter.
Type 'netsh int ip reset' and press Enter.
Type 'ipconfig /release' and press Enter.
Type 'ipconfig /renew' and press Enter.
Type 'ipconfig /flushdns' and press Enter
- Once the TCP/IP reset has been performed, close the elevated Command prompt and see if the issue has been resolved.


Thanks! Clearing the alternate MAC worked for me.