How to Fix Error 0xC00DB3B2
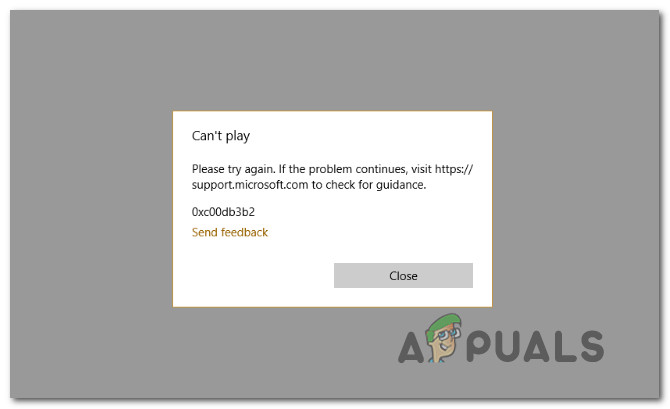
Several Windows 10 users are reporting that they are suddenly getting the 0xc00db3b2 error code when they try to play some videos with the Film & TV app. In most cases, affected users are reporting that the issue started occurring after a recent Windows update. The issue seems to be exclusive to Windows 10 and seems to affect all types of videos including 360 videos.
What is causing the error code 0xc00db3b2?
We investigated this particular issue by looking at various user reports and the repair strategies that are commonly being used to fix this error code. As it turns out, there are several different potential scenarios that have the potential of triggering the error code 0xc00db3b2:
- HEVC Video Extension is not installed – In most cases, this particular issue occurs because the extension required to play certain unique video formats on high-end configurations is not installed on the machine. In this case, you should be able to resolve the issue by installing the HEVC Video Extension app from the Microsoft Store.
- HEVC Video Extension is not functioning correctly – Another plausible scenario is that the HEVC Video Extension is installed but got affected either by some type of file corruption or by a glitch. If this scenario is applicable, you should be able to resolve the issue by resetting the HEVC Video Extension app.
- Movies & TV app contains corrupted data – Under certain conditions, this issue can occur due to some inconsistencies with how the Movie & TV app handles the codecs needed when playing certain video files. In this case, you will be able to fix the error by resetting the Movies & TV app.
Method 1: Install / Reinstall HEVC Video Extensions
The majority of users that encountered the error code 0xc00db3b2 have managed to fix the issue by installing or reinstalling the HEVC Video Extensions app from the Microsoft Store. This extension is designed to take advantage of the latest hardware capabilities including Intel 7th generation and newer GPUs with 4k Support.
But as it turns out, certain types of video content will require this extension to be installed in order to function as intended. On top of this, there are certain inconsistencies with how this HEVC extension operates. Since it has the potential of glitching, you should reinstall it in order to resolve the issue if you have it already installed – several affected users have confirmed that this procedure helped them to resolve the issue.
If you encounter the issue with a type of content that normally requires HEVC Video Extension app, follow the steps below to install or reinstall the Microsoft Store app:
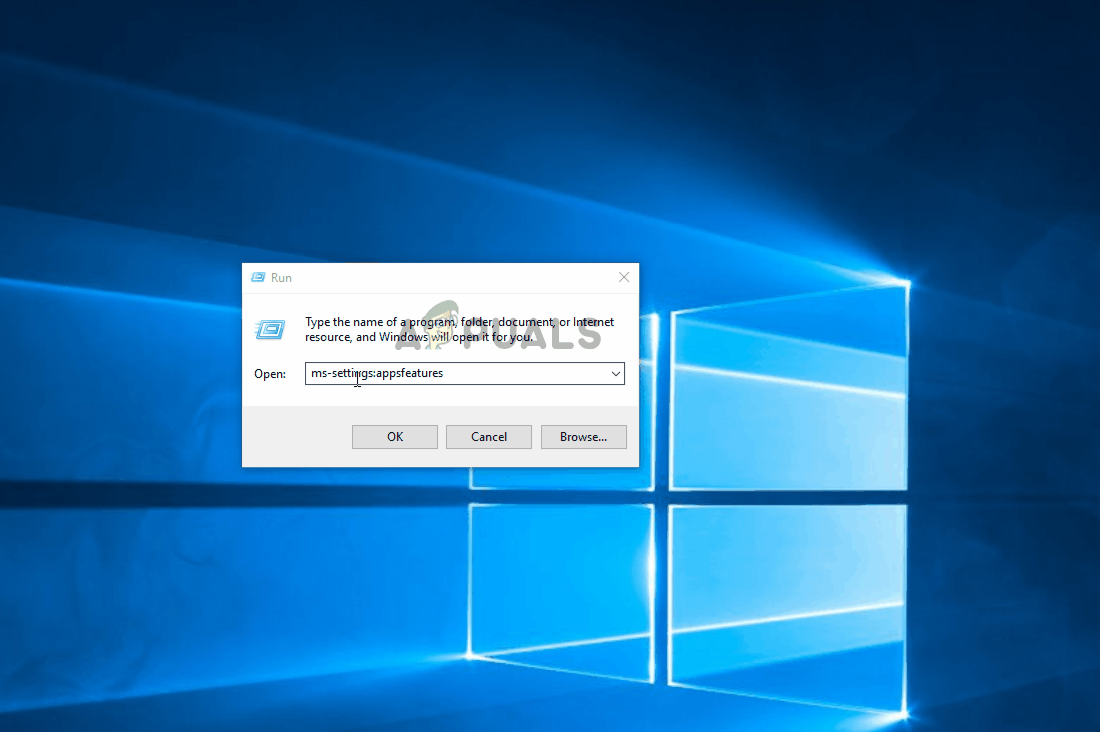
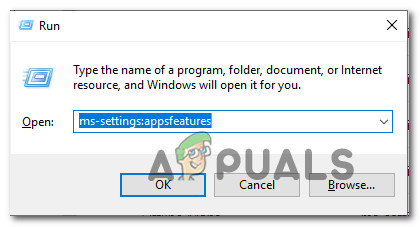
- If you already have HEVC Video Extension app installed, press Windows key + R to open up a Run dialog box. Then, type ‘ms-settings:appsfeatures’ and press Enter to open up the Apps & Features tool of the Settings app.
Accessing the Apps & Features Menu Note: If the HEVC Video Extension app is not installed, move down directly to step 4.
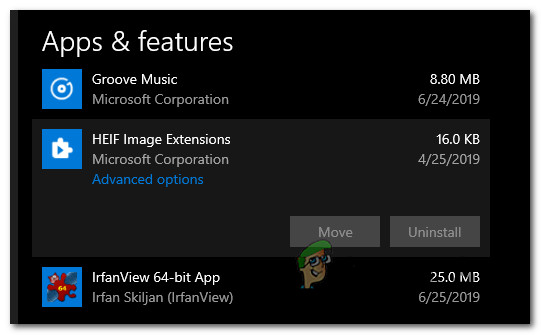
- Once you’re inside the Apps & Features tab, scroll down through the list of applications and locate the HEVC Video Extension app.
- When you see it, click on it once and then click Uninstall from the newly appeared context menu.
Uninstalling the HEVC Video Extension - Press Windows key + R to open up a Run dialog box. Then, type “ms-windows-store://home” and press Enter to open up the Home page of Microsoft Store.

Opening the Microsoft store via Run box - Once you’re inside the Microsoft store, use the search function in the top-right corner to search for HEVC Video Extensions.

FInding the HEVC Video Extension Note: You can also download it from your browser directly from this link (here)
- At the next screen, click on Get to install the application and wait for the process to complete.
- Once the application is installed, restart your computer and see if the issue is resolved at the next system startup.
If this method wasn’t applicable or didn’t resolve the issue for you, move down to the next method below.
Method 2: Resetting the HEVC Video Extension
Several affected users have reported that they managed to resolve the issue by accessing the Advanced Settings of the HEVC Video Extension and performed a reset. Although this is not as effective as Method 1, it’s an easier and less intrusive fix for users that want to avoid doing a reinstall.
Here’s a quick guide on resetting the HEVC Video Extension by using the Apps & Features Screen:
- First, press Windows key + R to open up a Run dialog box. Then, type ‘ms-settings:appsfeatures’ and press the Enter key to open up the Apps & Features tab of the Settings app.
Accessing the Apps & Features Menu - Once you’re inside the Apps & features screen, scroll down through the list of available apps and locate HEVC Video Extension.
- When you see it, click on it once, then click on Advanced Options (under Microsoft Corporation)
- Inside the Advanced Options screen of HEVC Video Extension, scroll down to the Reset tab and click on Reset.
- Click Reset once again at the confirmation prompt to kickstart the process.
- Once the process is complete, restart your computer and see if the issue is resolved once the next system startup is complete.

If the issue is still occurring, move down to the next method below.
Method 3: Resetting the Movies & TV app
As it turns out, the error code 0xc00db3b2 error can also occur due to some corrupted elements inside the Movies & TV app folder. Several affected users have managed to fix the issue entirely just by making their way into the Apps & Features menu and resetting the application as if it was started for the first time.
Here’s a quick guide on how to reset the Movies & TV app in order to resolve the error code 0xc00db3b2:
- Press Windows key + R to open up a Run dialog window. Next, type or paste ‘ms-settings:appsfeatures’ and hit Enter key to open up the Apps & Features tab of the Settings app
- When you get to the Apps & features screen, scroll down through the list of available apps and locate the Movies & TV app.
- Once you manage to locate it, click on it once, then click on Advanced Options (under Microsoft Corporation)
- Inside the Advanced Options screen of Movies & TV, scroll down to the Reset tab and click on Reset.
- Click Reset once again at the confirmation prompt to kickstart the process.
- Once the process is complete, restart your computer and see if the issue is resolved once the next system startup is complete.