How to Fix Error 0X80071AC3 ‘The Volume is Dirty’
While trying to access the files on or copy files to a disk, if Windows is unable to read the data on the disk or write data to the disk, it will lob an error message containing error code 0x80071AC3 at you. This issue affects all currently supported versions of the Windows Operating System, and while more common on external data storage disks such as external hard drives and USB sticks, the issue has also been known to affect internal hard drives and SSDs.
Error code 0x80071AC3 is accompanied by an error message that states Windows could not complete the operation in question because the volume (the disk Windows is trying to read or write to) is dirty. This problem can be caused by anything from bad sectors on the disk in question to a feature such as ReadyBoost preventing Windows from reading or writing to the disk in question. Thankfully, though, as long as the affected data storage disk is not dying or dead, there’s a lot you can do to try and get rid of error code 0x80071AC3 and have Windows successfully read or write to the affected disk.

The following are some of the absolute most effective solutions that you can use to try and resolve this problem:
Solution 1: Use CHKDSK to try and resolve the problem
CHKDSK is a Windows utility that can scan any data storage disk for issues such as bad sectors and file system errors and try to repair them. Running CHKDSK on the affected disk is a pretty good idea since CHKDSK might be able to successfully detect and fix whatever’s causing you to see error code 0x80071AC3. To run CHKDSK on a specific storage disk, you need to:
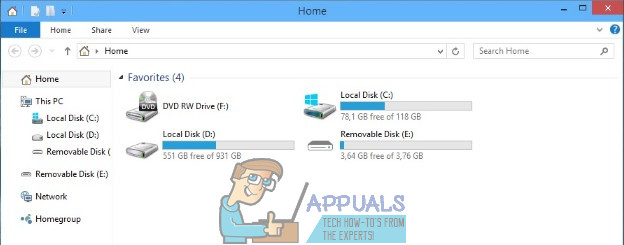
- Navigate to Computer, either through the Windows Explorer or through the Start Menu.
- Right-click on the storage disk being affected by this problem, and click on Properties.

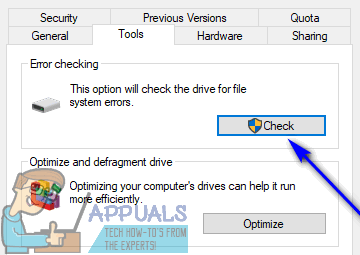
- Navigate to the Tools tab.
- Click on Check now… or Check (whichever applies) under the Error-checking section.
- In the dialog that opens, check both the options to enable them and click on Start.
- Wait for CHKDSK to complete the scan and try to get rid of any issues that it finds.
- Once CHKDSK is done working its magic, try doing whatever you were doing before that was causing you to run into error code 0x80071AC3, and see whether or not the problem still persists.
Solution 2: Disable ReadyBoost
Many external USB sticks come with the ReadyBoost Disk Caching feature built into them. ReadyBoost is designed to improve USB flash drive performance, but it can also, in some cases, lead to the user seeing error code 0x80071AC3 when trying to read or write to the drive. If you are experiencing this problem while trying to read or write to a USB drive and ReadyBoost is the culprit, disabling ReadyBoost might just be enough to resolve the problem. To disable ReadyBoost, you need to:
- Navigate to Computer, either through the Windows Explorer or through the Start Menu.
- Locate the external USB drive affected by the problem, right-click on it and click on Properties.
- Navigate to the ReadyBoost tab.
- Enable the Do not use this device option.
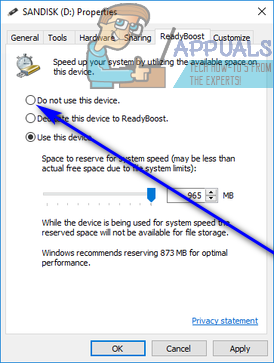
- Click on Apply.
- Click on OK.
When done, check to see whether or not the problem has been resolved.
Solution 3: Reinstall the drivers for the affected disk drive
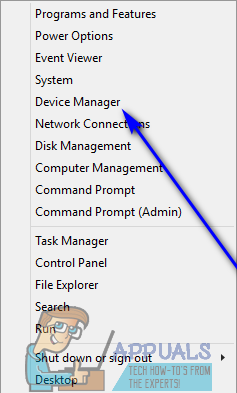
- Press the Windows Logo key + X to open the WinX Menu.
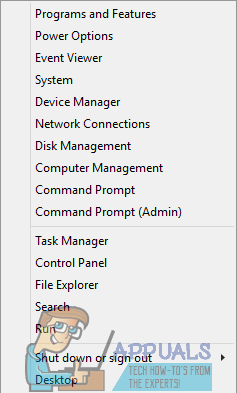
- Click on Device Manager.
- Double-click on the Disk drives section to expand it.
- Locate the drive being affected by this problem, right-click on it and click on Uninstall.
- When asked to confirm the action, click on OK.
- Remove the disk from your computer and restart your computer.
- When your computer boots up, repeat steps 1 and 2.
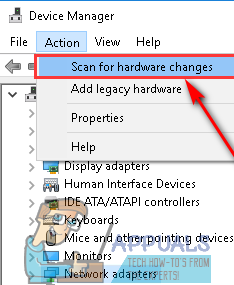
- Connect the disk drive to your computer and click on Action > Scan for hardware changes.
- Wait for the Windows to successfully reinstall the disk drive and its drivers, and then check to see if error code 0x80071AC3 still persists.
Solution 4: Make sure writing to disk drives is allowed in the Registry
You might be running into error code 0x80071AC3 because your computer’s Registry is configured to not allow your computer to write to disk drives in general or the disk drive you are experiencing this problem with. To make sure writing to disk drives is allowed in your computer’s registry, you need to:
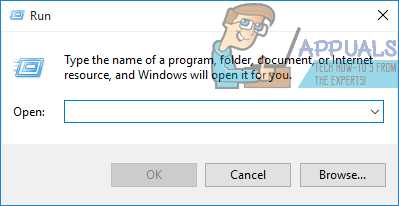
- Press the Windows Logo key + R to open a Run dialog.
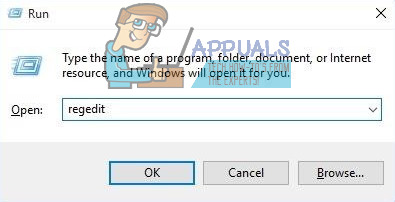
- Type regedit into the Run dialog and press Enter to launch the Registry Editor.
- Navigate to the following directory in the left pane of the Registry Editor:
HKEY_LOCAL_MACHINE > SYSTEM > CurrentControlSet > Control
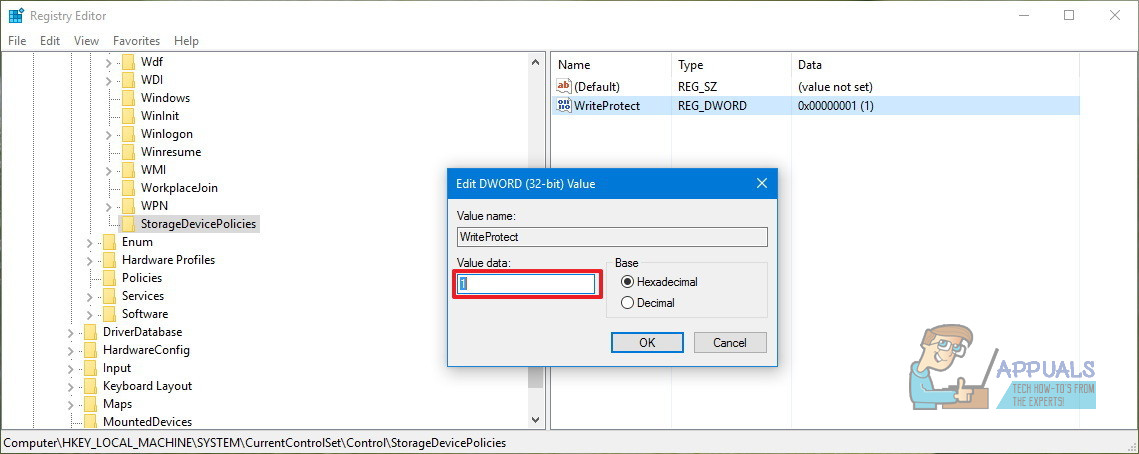
- In the left pane of the Registry Editor, locate and click on the StorageDevicePolicies key to have its contents displayed in the right pane.
- In the right pane of the Registry Editor, locate and double-click on the registry value named WriteProtect.
- See what the Value for the WriteProtect value is. If the Value field contains 1, that’s your problem – your registry is set to prevent your computer from writing to the disk drive in question. If that’s the case, replace the 1 in the Value field with 0 and click on OK.
- Close the Registry Editor and restart your computer.
- When your computer boots up, check to see if the problem has been resolved.
Solution 5: Try repairing the disk drive from a Command Prompt
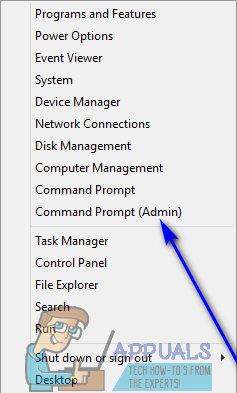
- Press the Windows Logo key + X to open the WinX Menu.
- Click on Command Prompt (Admin) in the WinX Menu to launch an elevated Command Prompt with administrative privileges.
- Type the following into the elevated Command Prompt, replacing X with the drive letter corresponding to the disk drive being affected by this problem, and press Enter:
chkdsk X: /B
- This specific iteration of the chkdsk command will get the utility to check the affected disk drive for faulty clusters, bad sectors and other issues and try to repair them. All you need to do is wait for the utility to perform the scan and repairs.
Once the process is complete, try doing whatever it was that you were doing before and see if you are still met with error code 0x80071AC3.
Solution 6: Format the affected disk drive
If all else fails, you still have one more option short of simply replacing the affected disk drive with a new one – formatting it. A complete format of the affected disk drive will get rid of anything and everything on the drive, including any data stored on the drive and (hopefully) whatever’s causing you to see error code 0x80071AC3 while trying to read or write to the disk. To format the affected disk drive, you need to:
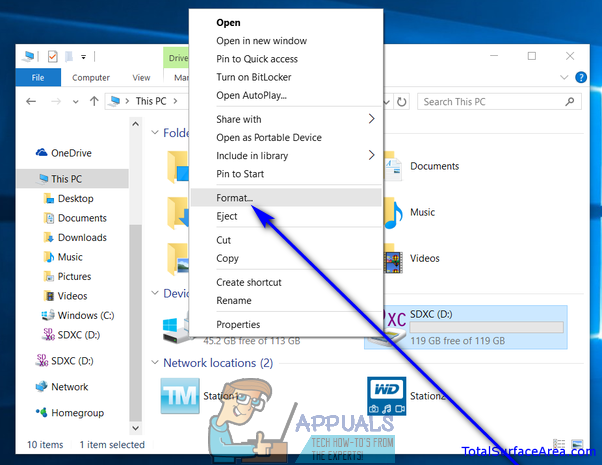
- Navigate to Computer, either through the Windows Explorer or through the Start Menu.
- Locate the affected disk drive, right-click on it and click on Format….
- Click on the Restore device defaults option.

- Click on Start.
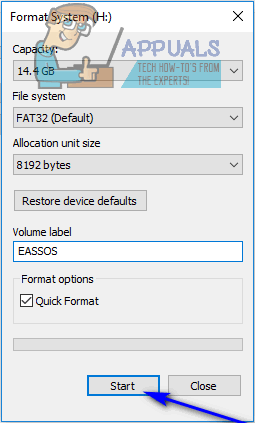
- If asked to confirm the action, confirm it.
- Wait for the disk drive to be completely formatted.
Once the disk drive has been formatted, check to see if the problem has been resolved.
What if you have done all of these, and a couple days after formatting, the disk is dirty again? This happens only on one computer I use, and only on my work USB drive. This happened with another USB stick, so I replaced it and the new one was dirty within a few days. I have formatted multiple times and this is just a band aid. I think the problem lies within the comptuer or operating system but have not found anything, anywhere to confirm.