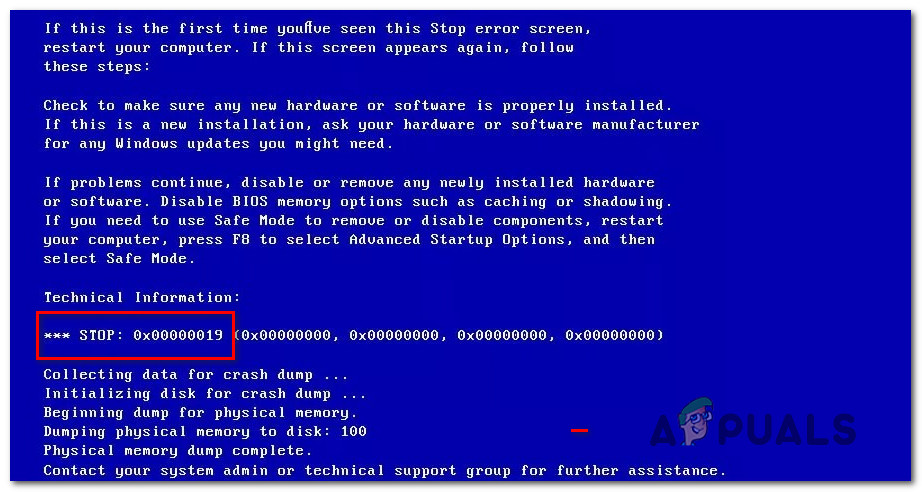
How to Fix Critical Windows Error 0x00000019?
Several Windows 10 users have been reaching us with questions after their actions are commonly interrupted by BSOD (Blue Screen of Death) critical crashes pointing towards the 0x00000019 error code. Most affected users are reporting that in their case, the issue seems to occur randomly (with no apparent trigger). Although this type of error is much more common with older Windows versions (Windows 7, Windows and 8.1 we managed to identify some instances of it occurring on Windows 10.
What’s causing the 0x00000019 BSOD?
We investigated this particular issue by looking at various user reports and by testing out several different repair strategies that are recommended by other affected users that have already managed to prevent the critical error from ever occurring again. But as it turns out, several different scenarios might potentially spawn this kind of error. Here’s a shortlist with potential culprits:
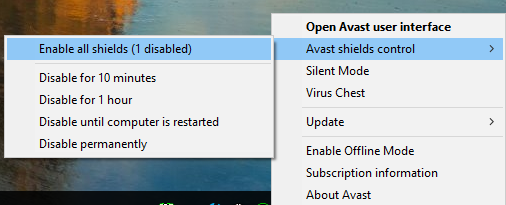
- 3rd party AV interference – If you’re using a 3rd party antivirus suite, chances are the program is interfering with a critical system component, which ends up facilitating the apparition of the critical system crash. Several users that found themselves in a similar situation (most commonly with AVAST), have reported that the issue was finally resolved after they disabled or they completely uninstalled the 3rd party AV suite.
- Different 3rd party interference – As it turns out, it’s also possible that a different 3rd party program is responsible for this situation. If this scenario is applicable, you should be able to resolve the issue by using the System Restore utility to restore your computer to a state in which this interference was not occurring.
- System File Corruption – According to various user reports, system file corruption can also be responsible for the 0x00000019 error. In this particular case, the most efficient way of resolving the issue is to run a couple of utilities capable of resolving corrupted OS files such as DISM or SFC.
- Bad disk sectors – It’s also possible that some bad sectors on your HDD are causing this problem. Traditional HDD is predisposed to triggering this kind of behavior (especially if they are over 3-4 years old). In this case, your best chance of fixing the issue is to run the CHKDSK utility (capable of replacing bad sectors with healthy ones).
- Underlying OS corruption – In more special circumstances, you could be encountering this problem due to some type of operating system corruption that cannot be resolved conventionally. In situations such as this one, your best chance of resolving the issue is to perform a procedure that will reset every OS component (DISM or SFC).
Method 1: Disabling or Uninstalling 3rd party utility
Although this might seem like an unlikely culprit, an overprotective AV suite may be somehow facilitating the apparition of ac conflict between the 3rd party security suite and a kernel process that is used to maintain the stability of the OS. We managed to identify multiple user reports blaming AVG antivirus for the apparition of this issue.
If this scenario is applicable and you’re somehow using a 3rd party security suite that you suspect might be responsible for the critical 0x00000019 crashes, you should be able to resolve the issue either by disabling the real-time protection or by uninstalling the suite altogether.
First, you should start by disabling real-time protection. Keep in mind that this procedure will be different depending on what 3rd party AV suite you’re using. But in most cases, you should be able to do it directly from the dedicated taskbar menu.
Once you manage to disable the real-time protection, start using your computer normally and see if the same issue is still occurring. If that’s the case, you should try uninstalling the security program altogether and remove any remnant files from your system to be certain that the external security suite is not creating the BSODs.
If you decide to go for a complete AV uninstall, follow this article (here) for step-by-step instructions on uninstalling the 3rd party suite and ensuring that you’re not leaving behind any remnant files that might still cause this behavior.
In case you uninstall your current 3rd party suite and you discover that the issue is no longer occurring, Windows Defender will automatically kick into action and take the place as the active security program. If you are not happy with it, you can go for a different, less intrusive 3rd party security suite.
On the other hand, if this scenario wasn’t applicable or you follow the instructions above to no success, move down to the next potential fix.
Method 2: Using the System Restore utility
If you only started seeing the 0x00000019 error code recently, a recent computer change may have facilitated the apparition of this issue. Since there are a lot of potential causes that might end up triggering this behavior, the best way of reverting the change that ended up causing the 0x00000019 error is to use the System Restore utility to restore your computer state to a point where the problem was not occurring.
If you didn’t know, the System Restore utility is designed to utilize snapshots that will return your OS installation to a previous point in time. If you pick the right restore points, you can use this tool to return your machine to a state in which this problem was not occurring.
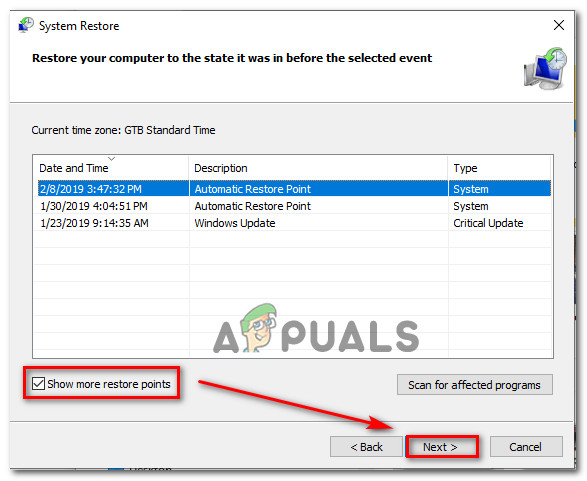
Just keep in mind that by default, all the recent Windows versions are configured to create new snapshots regularly whenever there’s an important event (like app installation, major update or a security scan). If you didn’t change the default behavior of creating snapshots, chances are you’ll have plenty of new snapshots to choose from.
IMPORTANT: Before you start following the instructions below to restore your machine to a previous point in time, keep in mind that the changes you made since the restore snapshot was created will all be lost. This means that every application, user preferences and anything else that was enforced during that period of time will be lost.
If you decide to go forward with the system restore procedure, here’s a step-by-step guide through the whole thing:
- Press Windows key + R to open up a Run dialog box. Once you’re inside the text box, type ‘rstrui’ and press Enter to open up the System Restore wizard.
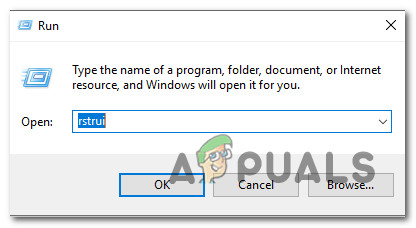
Opening the System Restore wizard via Run box - Once you’re inside the System Restore wizard, click Next at the initial prompt to advance to the next menu.

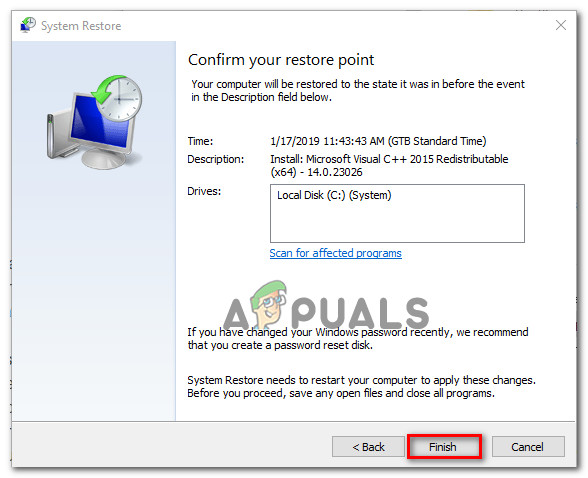
Getting past the initial screen of System Restore - Once you get to the next menu, go ahead and select a restore point that is dated before the time period where you first started encountering the 0x00000019 error. With the restore point selected, click on Next to advance the final method.
Restoring your system to a previous point in time - Once you get this far, the utility is ready to go. All that’s left to do now is click on Finish and then Yes at the confirmation prompt to start the restoring process.
Starting the System Restore process - As soon as you do this, your computer will restart and the new state will be enforced at the next system startup. After the entire process is complete, start using your computer normally to see if the 0x00000019 error code has been resolved.
Note: If a certain action was triggering the error, repeat it to see if you get the same BSOD crash.
If the same critical system crash is still occurring with the same error code (0x00000019), move down to the next method below.
Method 3: Running DISM and SFC scans
As it’s been proven by dozens of user confirmations, this issue can also occur due to some kind of system file corruption. A critical process may be tainted by system file corruption. In this case, you should be able to resolve most conventional system file corruption instances by running a c couple of utilities capable of fixing logical errors and system file corruption instances: SFC (System File Checker) and DISM ( Deployment Image Servicing and Management).
Although both utilities are useful for situations where a system file corruption is involved, the two have different approaches when it comes to fixing system file corruption. For example, SFC is much more efficient when dealing with logical errors, while DISM is better at fixing OS components.
Their approach to fixing system files is also different: DISM requires an Internet connection since it relies on the WU component to download healthy copies to replace corrupted files, while SFC is entirely local and it uses a locally cached copy to replace corrupted instances.
But since both utilities have their strong suites, we encourage you to run both if you’re facing the 0x00000019 and you suspect that system file corruption might be responsible.
Here’s a quick guide with what you need to do:
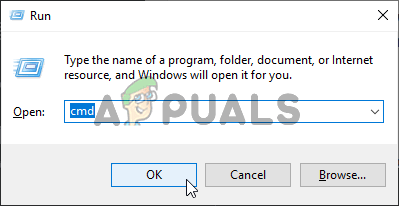
- Open up a Run dialog box by pressing Windows key + R. Next, type ‘cmd’ and press Ctrl + Shift + Enter to open up a Command Prompt with admin access. As soon as you see the UAC (User Account Control) prompt, click yes to grant admin access.
Running Command Prompt - Once you manage to get inside the CMD window, type the following command in order and press Enter after each one to initiate a DISM scan:
Dism.exe /online /cleanup-image /scanhealth
Dism.exe /online /cleanup-image /restorehealth
Note: Keep in mind that DISM is actively using Windows update to download healthy copies. Because of this, you need to ensure that you have a stable internet connection before initiating this procedure. The first command will scan your system for inconsistencies while the second will repair them.
- After the DISM scan is finished, restart your computer and wait for the next startup to complete.
- Once the next startup is complete, follow step 1 again to open up another elevated CMD window. But this time, type the following command and press Enter to initiate an SFC scan:
sfc /scannow
Note: Once you start this scan, interrupting this process is not recommended. If you do this, you run the risk of leaving your system exposed to other logical errors that might produce other issues in the future.
- Restart your computer once again and see if the issue is resolved at the next system startup.
If the same 0x00000019 error is still occurring even after you followed the instructions above, move down to the next method below.
Method 4: Performing a CHKDSK scan
As it turns out, this particular issue can also occur due to some bad sectors on your HDD that might be provoking general system instability. If bad sector data ends up affecting a critical service, chances are your system will trigger a stop error that will force a machine to restart.
Several affected users that were also struggling with this problem have confirmed that running a CHKDSK scan ended up resolving the issue for them entirely. Most users that pursued this fixed have reported that the BSOD with the 0x00000019 error has stopped occurring after the procedure was complete.
Here’s a quick guide on running a CHKDSK scan:
- Open up a Run dialog box by pressing Windows key + R. Next, type ‘cmd’ inside the text box and press Ctrl + Shift + Enter to open up an elevated Command Prompt. When you see the UAC (User Account Control) prompt, click Yes to grant administrative privileges.
Running Command Prompt - Once you’re inside the elevated Command Prompt, type the following command and press Enter to initiate an offline scan:
chkdsk /f
- After you initiate the CHKDSK scan, wait for the process is complete, then restart your computer and see if the issue is resolved at the next system startup.
If you’re still encountering the same 0x00000019 error even after performing a CHKDSK scan, move down to the next method below.
Method 5: Performing a repair install
In case none of the instructions above have allowed you to resolve the issue, there’s a high chance that you’re dealing with some type of system file corruption that cannot be resolved conventionally. In situations such as this one, the only viable fix is to perform a series of instructions that will reset every OS component.
When it comes to doing this, you have two ways forward – You either perform a repair install or a clean install.
A clean install is a less tedious procedure that only requires a few clicks and no installation media, but the major downside is that it will probably make you lose most of your data (apps, games, user preferences, etc.) if you don’t back them up in advance.
A more efficient method would be to perform a repair install. This will require an installation media and it’s a little more tedious, but it will allow you to keep all your components including apps, games, user preferences, and personal media. The operation will only rest the OS components.


